Add New Data Element
Component definition
This component is used to add data to a variable. It provides a quick way to create any type of variable to be used throughout your workflow. Every component that is down the path of this component can use its output variable.
This component lets you add new data. It also lets you change the value of an existing variable. To change the value of an existing variable, you should select a variable as the Variable Name. Then, the data in the Value option replaces the data in the chosen variable. If the Value option is left blank, the variable data gets cleared.
This component can be used to populate the IP address (or fully qualified domain name) of the run time Symantec Management Console. For this purpose, this component is normally used with the Create Basic Authentication Token component. These components are used to set up the full authentication that other components can use to access the run time Symantec Management Console. Full authentication includes the Symantec Management Console IP address and authentication credentials.
Generally, when the Create Notification Server Credentials component is used, you do not need to use this component to create a Symantec Management Console IP address variable. However, you may use an output Symantec Management Console IP address variable that this component generates at any place in your workflow instead of the output Symantec Management Console variable that the Create Notification Server Credentials component generates
One way you can use this component is for forms validation. You can set the component data to logical and the Value to true. Then, in a form, the output variable can be analyzed to see if data was entered into an option.
Component icon

Description of component output paths
Unknown
The component output paths are described in the following table:
Property |
Description |
|
Unknown
|
Unknown
|
|
Unknown
|
Unknown
|
Description of component tabs and their properties
The properties on the Configuration tab in the Add New Data Element component are listed and described in the following table:
The properties on the Settings tab in the Add New Data Element component are listed and described in the following table:
Connection information
Not applicable
Component settings
Unknown
Use cases
Some examples for the Number Range Rule component are as follows:
-
Vacation request
An employee asks off too many days, and is redirected to the request form with an error message.
-
Embedded or linked model outcome
A linked model ends in a true-false outcome. Two Add New Data Elements simulate multiple outcome paths.
Vacation request
Scenario: Vacation information for all employees is stored in a database. This information includes the number of vacation days each employee has left. The employees often forget how many days they have left and tend to believe that they have more than less. Sometimes they ask for more days off than they have left. The Compare Numbers Rule component compares the requested vacation days against the number of days allowed. If necessary, it informs the employee to revise the request and try again.
Process: This process is created as a Forms (Web) Project type.
The following screen shot shows the process:
.png)
After a vacation request is submitted, a custom component searches for the employee in the database and returns with the number of vacation days left.
The Compare Numbers Rule component compares the number of days off requested by the employee with the number of days left in the account.
If the employee has not requested too many days, an email is sent to the employee's manager. If the employee requested too many days off, an Add New Data Element component (renamed "Nice Try") adds an error message to the Web form.
The following screen shot shows the editor for the Add New Data Element:

Here we see that the Add New Data Element component creates a text variable that is called TooManyDaysErrorMessage that has an error message for the value: You have requested more days than are allotted to your account. The Form Builder component displays this error message on the form when the user sees the form for the second time. The employee can fill out the form again and re-submit it.
Other components in this example are as follows:
Form Builder
-
Custom component
This component is a custom component created with the integration engine.
For more information on the integration engine, see the Workflow Solution Administrator's Guide.
www.altiris.com/support/documentation.aspx
Compare Numbers Rule
Send Email
Embedded or linked model outcome
Embedded and linked models have only one output path. Thus, if you want the outcome of their process to affect the direction of the workflow, you must use external decision making.
Scenario: You have a linked model that contains a complex purchase order approval. When it ends, the order is either approved or rejected. If the order is approved, it moves on to the purchasing department. If the order is rejected, an email is sent with a rejection notice.
Process: This process is created in a Workflow Project type. After the Final Decision is reached, one of two variables is created - one with a True value, or one with a False value.
The following screen shot shows the process:
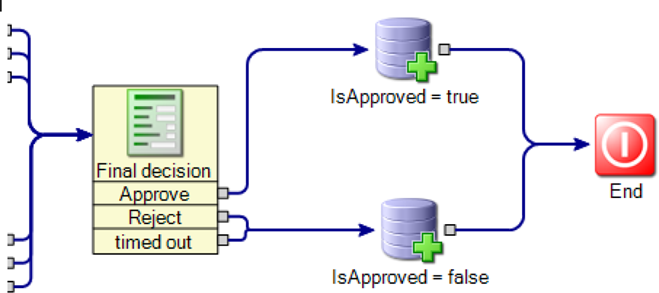
If the Final Decision is approved, the "True" variable is created. If the Final Decision is rejected, the "False" variable is created.
The important thing here is that both Add New Data Element components create a variable with the same name: IsApproved. Both variables are of the data type logical (true-false). The only difference between the two variables is that one is set to true, and the other to false. This way, only one variable, IsApproved, needs to be used as output data, and the primary model needs to evaluate only one data variable.
For more information on how to configure output data, see the Workflow Solution Designer's Guide.
www.altiris.com/support/documentation.aspx
The following screen shot shows the primary model:
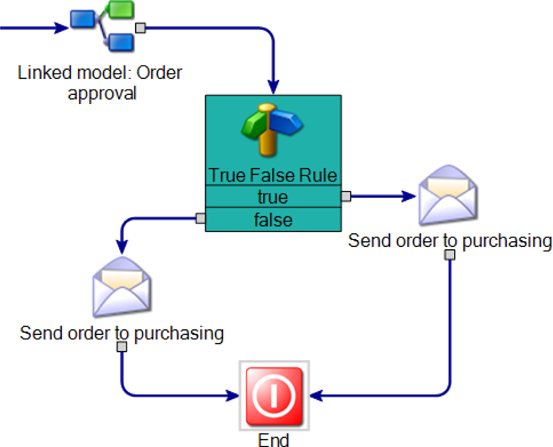
Once outside of the linked model, a True False Rule component evaluates IsApproved.
Other components in this example include:
Dialog Workflow
Linked model
True False Rule
Send Email