In this article we're going to setup our final automation OS, WinPE, as an automation option in our PXE environment.
The History of WinPE
The Windows Preinstallation Environment (WinPE) was released to system builders (OEMs) with Windows XP in 2001 as a means to configure XP for their factory images. It was a tool created by a few motivated Microsoft engineers who saw DOS has having an increasingly limited lifespan in the system builder environment. WinPE's purpose was to,
- Release OEMs from DOS's limited driver support by providing a deployment environment which used the same drivers as their live OS
- Provide a better way framework in which OEMs could install and deploy XP.
It didn't take long though for Windows Administrators to get wind of this tool, and a most public-spirited individual, Bart Lagerweij, dumped his fine work on DOS bootdisks and began work on his own variation on the WinPE CD - dubbed BartPE. Despite the rather dubious licensing issues of the first releases, a community quickly built up around Bart's Live Windows environment. Plugins were written and before long it became a great system recovery and diagnostic tool.
The reason for BartPE's popularity was largely down WinPE's exclusiveness. You see, the only way you could legally possess WinPE in the early days was through your Microsoft Distributor as an OEM Partner. Later, when WinPE was making inroads as an alterative imaging environment, this was rectified somewhat by making it available to large customers through Microsoft's Software Assurance. The availability crisis with WinPE gave BartPE a good headwind, and it wasn't until the final quarter of 2006 when Microsoft released WinPE (2.1) that it finally became a public download.
Whether Microsoft's decision to make WinPE 2 publicly available was influenced by BartPE's popularity we'll likely never know. I strongly suspect though that WinPE is where it is in the mainstream today thanks to Bart's fabulous work on the Windows live environment.
Altiris and WinPE Support
In the Altiris world, WinPE first became available as an automation option in 2005 with the release of DS6.5. The only supported version of WinPE back then was WinPE 2005 (WinPE 1.6), which was based on the code for Windows 2003 Server rather than Windows XP.
The table below shows the automation support options in various DS releases through the years.
| Version |
Release Date |
MS-DOS |
FreeDos |
Linux |
WinPE 1.6 |
WinPE 2.1 |
| DS 5.6 |
Apr 2003 |
Yes |
No |
No |
No |
No |
| DS 6.1SP1 |
Jul 2004 |
Yes |
No |
No |
No |
No |
| DS 6.1SP2 |
May 2005 |
Yes |
No |
No |
No |
No |
| DS 6.5 |
Aug 2005 |
Yes |
Yes |
Yes |
Yes |
No |
| DS 6.8SP2 |
Jul 2007 |
Yes |
Yes |
Yes |
Yes |
No |
| DS 6.9 |
Mar 2008 |
Yes |
Yes |
Yes |
Yes |
Yes |
The long awaited support for WinPE 2 officially came in with DS6.9, and heralded the start of mainstream usage of WinPE for most Altiris customers (DS6.8SP2 could be made to work with WinPE 2005, but this was not public knowledge at the time).
Adding WinPE Automation Support
Let's begin now and add WinPE to our automation OS list. As in the last chapter, we'll do this via the 'PXE Configuration Utility'
- Open up the PXE Configuration Utility
- Click 'New' to add a new PXE menu option
- New Shared Menu Option
Enter in the name for this menu option as 'WinPE Managed' and select 'Add pre-boot' so that we can add the WinPE source files.
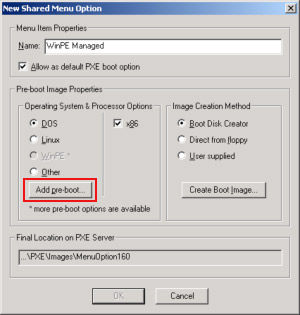
- Pre-boot Operating System Files
Select the 'WinPE 2.1 x86' option from the available list, and browse to the Altiris WinPE installer. Once you've selected it, and its path is entered into the text box, click 'Next' to proceed.

- The Wise Setup: DS Preboot Pack WinPE 2.1 for x86
A Wise installer will appear to install all the files for WinPE2.1. Just follow through the wizard, clicking 'Next' all the way.

A couple of points though,
a. You will be asked if its OK to execute WaikInst.bat (Windows Automated Installation Kit), it is so click 'Run' when prompted.
b. When the WinPE preboot pack has finished installing, you'll be asked if you want to install the WimFltr driver. We need this in order to mount and modify WIM images, so click yes.
- New Shared Menu Option
Now we've installed the WinPE source, WinPE you'll find that WinPE is enabled on your return to the menu option Window.
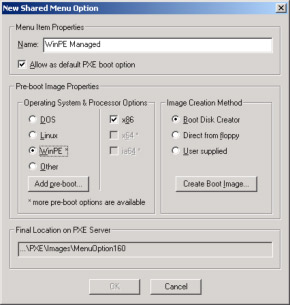
Click 'Create Boot Image' to continue
- Configuration Name
On this screen you can enter in a description if you like.
Click 'Next'
- Windows PE Hardware Device Drivers
On this screen you can add WinPE Network and Mass Storage drivers. There is a staggering 1180 device drivers already preloaded.

We don't need to add any drivers, but if ever do need to do this remember that WinPE 2.1 requires Vista drivers. Click 'Next'
- TCP/IP Protocol Settings
Leave the default settings here of WinPE getting its IP address from a DHCP Server.
- 10. Altiris Deployment Server Communication
Here we can configure how the agent should be loaded and connect to the deployment server. As usual, its best practice to wherever possible connect to your DS directly by IP.
There is an option to embed the agent into the WinPE environment, rather than loading it from the eXpress share. Try to always load the agent from the eXpress share where possible, as this means that as you upgrade your agents you don't have to worry about your automation environments.
The option to lock the keyboard can be very useful in environments where users are likely to interrupt imaging (it locks the keyboard and mouse). Remember though that this also locks you out if you want to troubleshoot, so make sure your happy with your processes before enabling this.
Click 'Next'

- Network Connection
This screen allows you to configure your account information used to connect to the server. The Altiris Service account will be used by default, and we're happy with that for now.
Click 'Next'
- Network Drive Mappings
Here we get to specify the drive letter we use to map a drive to the eXpress share. The default is the F:\ drive, and this is fine most of the time. But, you'll always find somewhere computers with multiple disks, CD/DVD Drives and USB card readers, and these will eat up your drive letters in WinPE.
To avoid a drive conflict, change this F:\ drive mapping now to M:\
- Selecting the M:\ drive letter from the dropdown box
- Enter \\Altiris-DS\eXpress in the path text box.
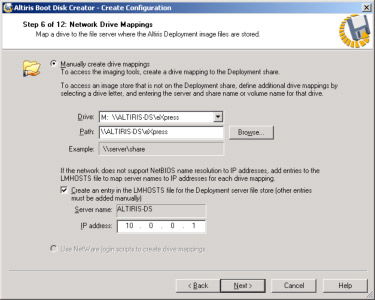
Click 'Next'
- Optional Components
Even though we are going to move with the defaults on this screen, let's pause for a look.
Microsoft provides several optional packages which you can build into WinPE for extra functionality. They have been made optional to the WinPE build to give you the chance to save valuable space in your WinPE image. These packages available on this screen are,
- WinPE-HTA-Package (HTML Application Support)
- WinPE-MDAC-Package (Microsoft Data Access Component Support)
- WinPE-Scripting-Package (Windows Script Host Support)
- WinPE-WMI-Package (Windows Management Instrumentation Support)
- WinPE-XML-Package (Microsoft XML Parse Support)
By default, only the WMI and Scripting packages are enabled, which is absolutely fine if you just want an imaging environment.

On this screen you can also enable the WinPE firewall, but note this will prevent multicast imaging if you do.
The WIM file is compressed by default. As we are going to download by PXE (essentially TFTP) the smaller the better, so leave compression on.
Click 'Next'
- Configuration Summary
This screen gives you the chance to review your settings, and review the WinPE build command line.
Click 'Next'
- Edit Configuration
Altiris provides you at this stage to tweak the configuration files, and add your own files if your wish. We don't need to worry about anything here, so click 'Next'
- Boot Disk Media Type
Because we have entered Boot Disk Creator from the PXE Configuration Screen, this screen will appear odd in that we can't change anything. This is fine though, BootDisk Creator is just recognising that we want to build a PXE boot menu option, and has just selected the media and tasks types appropriately.
You can see here though that if we had come in directly through Boot Disk Creator, that we could have built images for CDs and USB drives, as well as creating Network boot or stand-alone boot images.
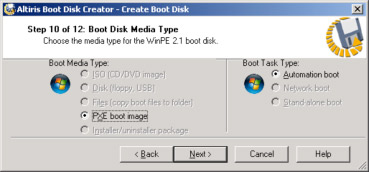
Click 'Next' to continue.
- Creating Boot Image
Just wait a minute or two now while base WIM (Windows IMaging Format) image extracted, modified and rebuilt, and compressed as per specification.
- Boot Disk Creation Complete
Click Finish
- New Shared Menu Option
Click OK
- PXE Configuration Utility
Click 'Save' to push this image down to the PXE Server, then click OK to exit
And that's it. If you now PXE boot your client, you should now see the following,
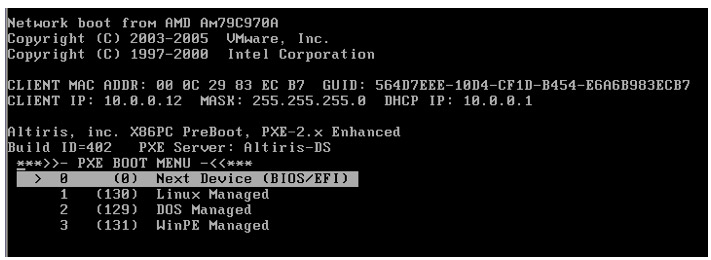
If you select "WinPE Managed" the WinPE loader will execute, and begin downloading the compressed image file from the server by TFTP,

Within about a minute, the WinPE image should have finished downloading and the environment will load,
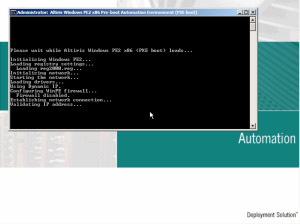
And because WinPE2.1 is Vista underneath, you'll then see the DAgent load and connect to the Deployment Server to check if there is any work to do,

Try now deploying images with DOS, Linux and WinPE.
Return to Index
Read Part 14: Scripting Windows XP