In this chapter we'll be covering how to script Windows XP using Altiris Deployment Server. We'll dive beyond the shallows here, covering topics such as driver injection, device identification and mass-storage controllers. These aforementioned topics crop up repeatedly when deploying Windows (either by scripting or imaging), making this chapter essential for any unfortunate admins who anticipate being awarded that glorious title of 'The Imaging Guy'.
Topics covered today include,
- How to install Windows XP using the OS Scripted Install wizard
- The install stages of Microsoft’s Windows XP Setup
- Adding Plug'n'Play drivers into your scripted install source
- Adding mass-storage drivers into your scripted install source
It is worth noting that although this chapter's focus is on Windows XP, the install processes for Windows 2003 Server are practically identical. This skills gained in this chapter therefore transfer rather nicely for those wishing to embark on server deployment too.
Introduction
Up to now, we’ve used Deployment Server to create and deploy images, but what we’re currently missing is a reliable and standards-based way in which to build them in the first place.
When we install Windows XP from a CD, many questions are asked throughout the install process which require user interaction. Some organisations simply document these answers in some form, so that they can be referred to again and again by the desktop team when building images. This is however quite arduous, and steps can be missed. This can result in images being built which do not comply with the original, as-documented organisational standard. Oops.
There is however a way to avoid these random inconsistencies when setting up your systems. Instead of documenting these answers just so they can be entered by hand during setup, Microsoft allows you to store these answers in a specially formatted text file call the unattend file. This file can be fed directly into the setup process to provide you with a completely automated Windows install. The result is an installation which reliably configures all your windows settings from start to finish without user interaction and in exact accordance with your organisational needs.
Understanding and manipulating these unattend files are generally the key to a successful delivery of any Microsoft OS.
Scripted Install Overview
When we use Deployment Server to script the installation of any operating system, under the hood Altiris is simply utilising the OS vendor's best-practice techniques to deliver the OS. Therefore in order to understand how Altiris deploys any given OS, you must understand the mechanisms built by the vendor for the OS deployment.
Microsoft Scripted Install Fundamentals
To perform a scripted (aka unattended) installation of Windows XP or 2003 Server, Microsoft recommends that you,
- Create an answer file
This is a text file that at minimum should contain answers to any questions that Windows Setup would normally prompt for during installation. An answer file also can contain instructions for configuring core operating system settings and installing applications without user intervention.
- Create a distribution share
This is a folder made available on the network which contains the OS installation files. Computers connecting to the share can then retrieve copies of the files during an unattended installation.
Microsoft provide two programs to assist in the setup of Windows XP; Winnt.exe for execution within 16-bit MS operating systems (such as MS-DOS) and Winnt32.exe for execution within MS 32-bit Windows operating systems (such as Windows 95/98, 2000, XP, WinPE). The idea is that no matter what Microsoft OS is in place, XP can be deployed silently in an unattended fashion by specifying the location of the answer file and distribution share.
Once Winnt.exe or Winnt32.exe is executed, Windows setup begins and consists of three stages;
- File-copy mode
The first of the three stages of Setup, where the Windows source and any specified additional files (such as drivers and application sources) are copied to the computer’s hard disk.
- Text Mode
The second stage of Setup determines the basic hardware of the computer (CPU, motherboard, hard disk controllers and memory). The core of the Windows registry is populated along with OS destination folder, C:\Windows.
- GUI mode
This is the final stage of Windows Setup where the configuration of the computer’s hardware in finalised, and OS's file system and registry completed. Network settings are also put in place as are any other administrator configured customisations.
At this point I'd like to emphasise that whether you script XP using Altiris, Microsoft, LanDesk or some other Desktop Lifecycle Management (DLM) product, the three stages listed above are core to the deployment. The job of the DLM is to try to take some of the pain away in getting such scripted deployments working in your environment. The danger here is that the DLM can become a deployment black-box, removing the need to understand the install processes. This is a double-edged sword. Yes, you can get moving quickly in your OS deployment , but this now comes at the cost of you not having the knowledge necessary to enhance and build on your DLM's native functionality.
In what follows, I'll try to explain how the scripted install works by focusing on how the Deployment Server process executes each of the above stages.
Building an XP Scripted Install Job
Deployment Server natively has a wizard for building scripted installations. For a basic scripted install, it isn't bad but does possess certain limitations for advanced setups (which I'll highlight as we go). Let's begin now by running through a scripted install task for Windows XP.
When scripting XP, my preference is to use Winnt32.exe to kick-off the Windows setup. Feel free to give DOS a try too as a jump point with winnt.exe, but be warned that DOS is significantly slower when WinPE when if comes to preparing you your harddisk.
In what follows then, we'll be using the 32-bit OS of WinPE to launch winnt32.exe. To make the deployment process as smooth as possible, the WinPE automation environment will be delivered by PXE, which will seemlessly take care of the multiple reboots we'll encounter during Windows Setup.
Let's get started now and create our scripted OS deployment task,
- Create the Scripted Install Job
In the Deployment Console, Right-click in the jobs pane, and select the option to create a new Job. Call it 'Script XP SP3'
- Add Task
Add Scripted OS Install Task
- Select OS
Here we get the chance to choose either a Windows or Linux scripted installation. Leave it as the default -Windows.

Click 'Next'
- Configure OS Version and Language
- OS Version
Select the OS version as 'Windows XP Professional'
- OS Language
Select the OS Language as 'English'
- Automation Environment
Set the Automation Preboot environment to 'WinPE Managed (Auto-select)
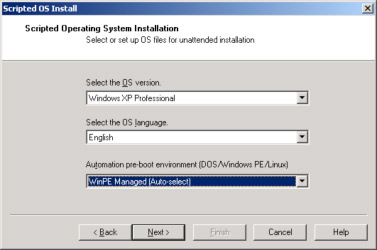
Click 'Next'
- Configure OS Source Files
Here we configure the location of the i386 source files for the XP installation. Set the following,
- Service Pack Sources
Click 'Next' when offered to add service pack file. Note: If you can, try to avoid adding service packs with this method. Instead slipstream them into XP's i386 source, as installing service packs after your scripted install will drastically increase you deployment times. See the notes at the end of this article on slipstreaming.

Here I should highlight a watch point with the Altiris scripted install Wizard -Deployment Server hard-configures the Distrbution point locations. For small business customers this is unlikely to cause issue. Enterprise customers though should take note of the following,
- Distribution point naming convention
In the above screenshot you can see that the i386 folder has been copied to the location .\deploy\WinOS001\i386. The naming convention is simple -Windows distribution folders are called WinOSxxx (where xxx is number which auto-increments as you add more Windows OS sources into your scripted install wizard). One thing to note about this convention is that it cannot be changed to give you an indication of Windows flavour or service pack. This can become frustrating when it comes to editing specific source trees as to you'll need to drill down into your scripted OS tasks to confirm which auto-incrementing integer you need. Maintaining a text file in the root with an index of folder names to OS source versions can make such maintenance tasks easier.
- The Deployment Server must host the Distribution point
A more critical point which emerges enterprise customers deploying across WAN links is that the scripted install wizard fixes the distribution source as being the Deployment Server and this too cannot be changed. In such scenarios you must use scripted install tasks with care as they will utilise precious WAN bandwidth.
As long as you are aware of the above points, the wizard doesn't do a bad job. ;-)
- Disk Formatting and Partitioning
Here we can choose whether to format the filesystem as FAT16 or FAT32 (or indeed proceed without imaging the disk at all). Leave with the default of imaging with the FAT32 image.
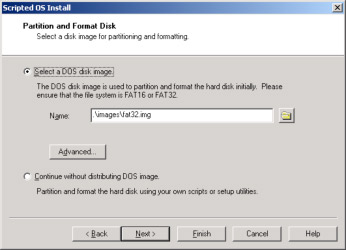
Click 'Next'
- Unattended Installation Import
This screen is so that you can import a pre-configured unattend.txt file. We don't have one (yet), so click 'Next' so we can create on using the UI.
- Answer file setup
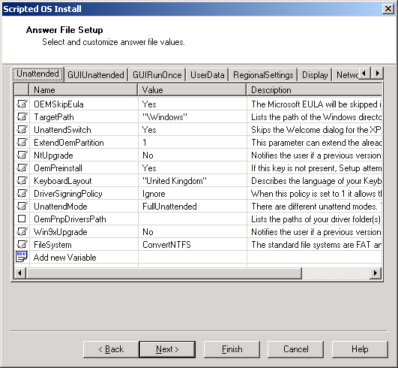
In order to get moving quickly, let's just make the minimum of modifications here,
- Unattended Tab
Keyboard Layout: As I'm British, I like to change the KeyboardLayout from US to "United Kingdom". Probability is however that a UK keyboard will just frustrate you, so choose the appropriate layout for your keyboard.
- UserData Tab
Here you must enter the product ID (your XP Serial number)
Click 'Next'
- Command-Line Switches
On this screen we can see the command-line switches used by Windows setup. In order to make setup a bit more reliable in WinPE, the one thing we'll add here is a switch to specify exactly the drive we wish to install the windows OS on -the C:\ drive. Here add the text, /syspart:C: so the switches line looks like,
/u:c:\altiris\files\unattend.txt /s:%ALTIRIS_SHARE%\%s /syspart:C:
Next, we're down the contents of cmdlines.txt -this is the file which windows will execute at the end of Windows setup to perform any actions you need as the administrator. As you can see, this performs a silent install of the AClient. Nothing to change here, so click 'Next'

- Deployment Agent Settings
On this page you can change the contents of the agent input file used in automation. The defaults should be fine, so click 'Next'
- Install summary
Click 'Next'
- Return codes
This screen allows you to perform specific actions based on the tasks return code.
Click 'Finish'
Deploying XP with the Scripted OS Install Task
Now let's deploy this job on an unsuspecting computer by dragging and dropping your new scripted install job. As you watch the screens fly by over the next 40 minutes or so, its worth breaking down the install process to give us a better idea of what's going on as we pass through the three setup stages. Below, I describe as accurately as possible what happens between each computer reboot whilst the scripted install is executing.
The process is illustrated below in figure 22

Figure 22: The 6 boot-cycles encompassing a Windows XP Scripted Install using Altiris Deployment Server.
For those wanting further detail on what happens within each of these six boot-cycles, here's the breakdown;
- First Boot: PXE (Disk Preparation)
In this first boot cycle, the PXE server delivers the WinPE automation environment to the client so that it can deploy the FAT32 disk image to the client. This FAT32 partition preparation permits the next setup stage to copy the OS source files from the distribution point to the local FAT32 partition (by default, this FAT32 image will span the entire disk). As the FAT32 image file is tiny (it's empty afterall) the RDeploy screenshot I show below will appear for just a fraction of a second.

Once the image has been delivered, the agent will instruct the computer to reboot.
- Second Boot: PXE (Windows FileCopy Phase)
On this PXE boot, the FAT32 partition will be prepared with the C:\Altiris folder which houses the AClient install files and the windows setup unattend file. Once these files have been copied to the destination computer, Windows setup is called with switches pointing to the i386 install source on the express share (and to the unattend.txt file residing in the C:\Altiris folder).
Below I show the command window which briefly pops up showing the unattend and aclient files being copied. At the end we can also see WINNT32.EXE being executed which officially marks the start of the Windows setup process,
Once WINNT32.EXE loads, control is handed over to Windows setup and the first stage of setup (the FileCopy stage) begins. The aim of this stage is to further prepare the disk so that Windows setup can take full control of the installation process from now on. This entails copying the network source to the local disk as two temporary folders (the boot file folder, $win_nt$.bt and the local source folder $win_nt$.~ls). As part of this stage, a mini NT loader is written to the MBR which makes the disk bootable.
When this stage of the setup initialises in WinPE, it does so in a full GUI mode which shows that we're doing this FileCopy in a zippy 32-bit mode (but do not confuse this with the GUI stage!)
Note, in this stage setup say's it is" Preparing Installation" in the left hand pane, which simply means it's copying the installation files from the fileshare. At this point Setup anticipates to complete in 60 minutes, which we refer to as the T-60 point. At T-50 minutes the file copy completes and Setup initiates a reboot.
On reboot, if you were to take a look at the C:\ on the computer you would find a directory similar to that below,

- Third Boot: Harddisk (Windows Text-Mode stage)
Here Deployment Server understands the client must boot off its harddisk to continue into the second phase of Windows Setup -the Text-Mode stage. As a result, the WinPE automation option is no longer automatically selected in the PXE boot, and after the timeout a local disk boot ensues. In this stage the following occurs,
- Preliminary hardware detection takes place using NTDetect.com (where you see the option to press F6 for Mass-Storage Drivers)
- Files are copied from the local source folder to the C:\Windows folder
- The Windows registry is created
- A placeholder NT boot loader $ldr$ is written to the disk to allow a more advanced stage of Setup to load on the next boot.
Once above textmode tasks have completed, Windows has partially been installed to the harddisk. Windows setup instructs the system to reboot so that a more thorough hardware detection can take place in the next stage, allowing Windows to install completely.
At the end of this boot cycle, if you were to take a peek at the disk this is what you would see indeed that the Windows directory has been born!

- Fourth Boot: Hardisk (Filesystem Conversion)
On this boot, the FAT32 filesystem is converted to NTFS. At the end of the conversion, setup once again reboots

- Fifth Boot: Harddisk (Windows GUI-mode stage)
This boot constitutes the last stage of the Windows XP setup. Here the meat of the install is done –the Windows file structures and registry settings are completed, and a full driver detection is performed.
The time-line is approximately as follows,
- T-37 minutes -Installing Devices
- T-32 minutes -Installing Network
- T-20 minutes -Copying Files
- T-19 minutes -Installing Start Menu items
- T-18 minutes -Registering Components
- T-13 minutes -CmdLines.txt execution
(The answer file created by Altiris contains the line OEMPreInstal=YES entry which results in the commands saved in cmdlines.txt being executed at this point. In our specific case, this file contains the single command line which installs the AClient. At this point you'll a CMD Windows flash by as the AClient installs.)
- At T-9 minutes, we start to Finalizing Installation and begin Saving Settings
- Windows Reboots
Once the Gui-Mode phase of setup is completed Window has installed and Windows setup instructs the system to reboot
- Sixth Boot: Harddisk (Windows XP)
Now Windows is ready for you to login. As part of the Windows setup, other commands can be run (in the form of GuiRunOnce entries) but in the OS deployment methodologies I tend to avoid these as they require a user logon.
Once the the user has logged on, and any pending GuiRunOnce tasks executed, the Windows setup can now truely said to be complete.
Collecting PnP Drivers For Your Scripted Installs
The most common issue that crops up when deploying Windows XP from the original i386 source is the Plug'n'Play drivers. The reason for this is simple -over time the XP source simply becomes dated. Unmodified, the source device support will remain limited to the devices deemed common enough to be included in your specific release. Since the release of XP Service Pack 3 in April 2008, a lot of new devices have come to market and as a result a wealth of updated device drivers have been written. Consequently, when you deliver your scripted install task to modern hardware you'll be hard pushed to find even your network or graphics drivers installed.
The good news however is that Deployment Server can natively handle the addition of new PnP drivers into a scripted XP delivery. All you have to do is download your device drivers, unpack them, and then dump them into the $OEM$ folder structure located within your distribution point. Here's the process,
- Identify the Location of your Distribution Point
In step 6 of "Building an XP Scripted Deployment Job" above, I pointed out that Altiris creates the XP source tree under .\Deploy\Win001\i386
If you look in here you'll find a rather special folder called $OEM$ -this is the root of a folder structure designed by Microsoft to give OEMs the facility to inject custom files into the setup process. For example, if you create a subfolder called $$, its contents will be copied to the Windows folder during setup. In a similar vein, the contents of a subfolder $1 will be copied over to the first windows drive (the C:\ drive), and the contents of $2 to the second windows drive and so on.
The recommended method for injecting PnP drivers into a Windows scripted install is to populate a folder called C:\Drivers with your updated driver source before GUI-mode stage is initialised. One way to achieve this is to create the folder $OEM$\$1\Drivers in our distribution point and populate it accordingly. This will ensure that your C:\Drivers folder is put in place as part of the text-mode stage of setup (which precedes GUI-mode) .
- Create the Driver Folder Structure
In order to keep track of our drivers, it is good practice to create a simple driver folder structure ordered by the driver type. For example,
$OEM$\$1\Drivers\LAN
$OEM$\$1\Drivers\VGA
$OEM$\$1\Drivers\MODEM
$OEM$\$1\Drivers\CHIPSET
$OEM$\$1\Drivers\AUDIO
etc...
where LAN will hold your network drivers, VGA will hold your graphics drivers etc. Note is is not uncommon to see incremental driver folders such as LAN1, LAN2, LAN3, etc which help take cater for multiple models.
Navigate now to your distribution point, and create the the $OEM$\$1\Drivers folder.
- Download the Missing Drivers
When you test your vanilla scripted install on a target computer (say a Dell Latitude E6400) you'll see a number of unknown devices in device manager. To resolve this, we'll need to download the Dell driver packs and extract these into your distribution point folders created above.
Let's assume for what follows that we're first going to work on the graphics driver. On a test computer (or even the target computer) navigate to the Dell website, choose your model and download the graphics driver pack. DO NOT HOWEVER DOWNLOAD AND EXPAND DRIVER PACKS ON YOUR DEPLOYMENT SERVER!
- Expand the Drivers
When you execute a Dell driver pack, you'll see something like the following,

Click 'Continue' and you'll be asked to confirm the driver download location,

Change this to something a little more friendly like,

Note I've changed the path to C:\Dell\Drivers\vga -this makes your folders easier to navigate as build up the driver library for the computer. Click 'OK'.
At this point your drivers might expand and automatically start installing. Hence why you never to this on your server ;-)
- Collect the drivers
Your extracted driver folder will look something similar to the structure below,

What we have here is a driver install wrapper. We have a setup.exe which looks at your system, performs some environment checks and then installs the appropriate driver with nice dialogs.
We don’t want this however –for our Drivers folder we just want the raw driver files. This means the driver inf files, the sys files and any dlls. These are found in this case in the Graphics subfolder,

These are the files we want. Copy the contents of the graphics folder now to the distribution point under,
$OEM$\$1\Drivers\VGA
Adding the Pnp Drivers using the Scripted Install Wizard
In order to allow the scripted install wizard to see our VGA drivers, all we have to do run through the scripted install wizard again. The wizard will detect the new PnP driver structure within the $OEM$ folder and syncronise this structure as necessary with the unattend file.
Edit the Scripted Install task now and keep clicking 'next' to flick through the wizard screens. When you click 'Next' on the 'Preparation of unattend.txt Answer File' screen, you'll get the following pop-up,

This means the wizard has detected the drivers folder under the $OEM$ structure, and has automatically parsed it to generate the unattend string OemPnPDriversPath. This is an enumeration of ALL the driver subfolders it has found within the $OEM$\$1\Drivers folder.
Click 'OK' and you'll see the answer file UI below. I've highlighted the OemPnpDriversPath entry which should now be in place. In GUI-mode, the PnP detection algorithm parses this OemPnPDriversPath string assimilating the folders declared here into its driver search path.

Here we hit the major problem with Deployment Server's enumeration of all folders in this string (whether they contain drivers or not). According to Microsoft KB27678, Windows setup is severely limited in the number of characters which the OEMPnPDriversPath string can hold. Specifically,
- For Winnt.exe driven setups, OEMPnPDriversPath limit is 99 characters
- For Winnt32.exe driven setups, OEMPnPDriversPath limit is 1023 characters
In the case of the graphics drivers above, just with this driver the OEMPnPDriversPath string is 717 characters long. So adding in just this driver has resulted in over 70% of the space available in the string being used. In fact the folder containing the inf files is simply in the root of the vga folder so the OEMPnPDriversPath string should in fact simply be "drivers\vga;" -only 12 characters.
Ammend this string now to give you a leaner OEMPnPDriversPath string as shown below,

Click 'Finish' and try once again your scripted install. With luck you'll notice the VGA drivers are now correctly installed.
Completing your Library of PnP Drivers
Its now left to you to repeat the process above to resolve the remainder of the drivers missing in device manager -a process which can be far from trivial. Some drivers are simply difficult to locate. For illustration below, I show an 'Unknown Device' entry from the Windows Device Manager,

So what is it? Is it a modem, a sound card, a graphics card? Without help, you can soon find yourself pretty stuck. You could take the approach that you don't care, and begin downloading and expanding all the device drivers for your particular model, but this too can have complications. You see, most vendors offer a multitude of customisation options for each model. This means, for example, that when downloading a graphics driver you can still be left a choice of Intel, NVidia or ATI even after specifying your exact model.
To get you out of this information hole, you can use the Windows Device Manager. The Details tab in Device Manager screen grab above provides a drop-down list containing an entry called "Hardware IDs". In here you'll see some entries which contain the vendor and device class strings,
PCI\VEN_<VendorID>\DEV_<DeviceID>&CC_<ClassID><SubClassID>
where the VendorID and DeviceID fields are 4 digit hex numbers, and the ClassID is a two digit hex number. In the above 'Unknown Device' example we are therefore looking at a device with a VendorID of 8086 and a ClassID of 02.
Let's start with the VendorID. To resolve this field to a human-readable vendor name like Promise, ATI, RealTek or Intel the best way is to search for this vendor code in the vendor list on the PCI Database website. In many cases though you won't even need to do this. You see, even though there are over 1500 vendors out there, across your enterprise systems you'll generally only see a few as shown below,
Statistically speaking we can see that Intel and Microsoft dominate as the vendors accountable for your device drivers -they in fact account for over 90% of the device drivers on a typical enterprise PC! And as a Microsoft driver will be native to the OS, Intel is pretty much the most common vendorID you'll have to resolve when tackling an unknown device. And Intel has the rather neat ID of 8086.
There are of course others you may come across, and below is a little table showing some of these,

In the above I include Microsoft really for completeness. And don't panic about memorising this -just print it out and stick it on your PC... ;-)
So, next we move to the ClassID. This field is useful as it tells us what type of device we're talking about, for example is this 'unknown device' a network card or a graphics card? A RAID card or a modem? If you want to download the correct vendor driver package you definitely need to know what type of device you've got in front of you.
Below is the full Device Class list,

So in our example above with a Vendor ID of 8086 and a Device Class of 02, we can now see we are in fact looking an Intel Network Controller. Armed with these two pieces of information, you can now locate the correct driver from the vendor's website.
Some useful tips here are,
- Although I've illustrated the driver extraction process with the VGA drivers (Device Class 03), its actually worth getting the NIC drivers (Device Class 02) sorted as a priority -this will get agent comms flowing and allow the scripted install task to actually complete. This will allow you to do more from the console.
- Once the NIC drivers are resolved, I usually tackle the VGA and then chipset drivers. VGA will give you a good screen real-estate allowing you to use a browser to download further drivers. Next, go for the chipset drivers -these will generally resolve a multitude of Device Manager entries in one go.
- It can be useful to test your downloaded driver files by manually updating the device thru Device Manager on the target machine. If the drivers install successfully with this manual method, then you can be confident you've got the correct driver.
- If you are still uncertain as to exactly what device you are dealing with, enter in the Device ID from the device property window in Device Manager into the PCI Database. If you see multiple results, narrow down by Vendor ID. The VendorID/DeviceID combination will be unique and will tell you exactly what your device is
- Sometimes driver packages do not give you the opportunity to extract the drivers into a specific folder. However if you open up a Windows Explorer Windows and navigate to %temp%, you should see folders created as you move through the driver install wizard. One of these new folders will hold the expanded driver files, so copy this off to a safe location before exiting the wizard (which normally cleans up the temp folder behind it).
Adding Mass-Storage Drivers
On some machines, XP will not install unattended simply because it cannot see the harddisk. This can be due to the disk controller not being supported in the XP source, an common occurance when dealing with SCSI, AHCI or RAID controllers.
If you were installing from CD, you could cater for this by pressing F6 when prompted to load additional Mass-Storage support. When delivering XP unattended though, you need a workaround to maintain a hands-off install.
There is a Microsoft KB for adding mass-storage support on Windows 2003 Server, which applies equally well to XP, but frankly the process is painful. You have to,
- Add a TEXTMODE folder under the $OEM$ folder
- Copy your mass-storage drivers to the TEXTMODE folder
- Edit the txtsetupoem.inf file (should it exist)
- Edit your unattend.txt file
There is a caveat here though -sometimes it just doesn't work. There are tincy-wincy differences in how the text-mode stage of setup parses mass storage drivers when compared to how the live Windows OS does it. As a result, some mass storage drivers just won't work as text mode drivers.
This can be a problem.
Do you need to add Mass Storage support into your Scripted Install?
So, at this point, you should ask yourself why you are looking at adding mass storage support into your scripted install, and can you avoid it without compromising your OS delivery. A common approach is to restrict scripted installs to the image build stage. In this scenario, you use 'standard' computer (typically a virtual machine) onto which you script the OS, apply hotfixes and install software. The idea is then to use sysprep (which has more advanced mass storage support) to seal the image and upload this to the server.
Apart from having a more refined mechanism for resolving potential mass storage issues, delivering sysprep images provides a much faster desk delivery time as all the hotfixes and software are pre-installed.
For those who just cannot avoid the requirement to adding mass storage support into their images, a little piece of freeware called NLite will be your saviour.
Using NLite to integrate Mass Storage Drivers into your XP Source
Nlite is the best way I have found so far to enhance the mass-storage support present in your XP source. As this will also seemlessly integrate service packs and hotfixes into your distribution point, it's pretty much invaluable.
For those unfamiliar with NLite, this is what it does,
"nLite allows you to customize your installation of Windows XP, Windows 2000, or Windows 2003. You can integrate service packs and hotfixes from Microsoft directly into your windows distribution files without having to re-download and install them every time you need to re-install windows"
Cool huh? What it doesn't say in the NLite blurb is that it also allows you to add driver support too. In case you are now wondering about shoving in all your PnP drivers in through NLite too, I suggest caution. Adding your PnP driver structure directly into your source can bloat it badly, and also remove any manageability you have in delivering your drivers through the $OEM$ structure.
Let's proceed now and as an example use NLite to add the latest Intel Matrix Controller support directly into your Windows source;
- Download and install NLite (Current version 1.4.9.1)
- Download the Intel Matrix Storage drivers from the Intel website. In order to extract the drivers (rather than install them) open up a command line and type,
IATA89ENU.exe -a -p c:\IntelMatrixDrivers
This will extract the drivers to the folder C:\IntelMatrixDrivers
- Start NLite, and on the "Configure the Windows Installation" files choose your distribution point and click 'Next'

- On the 'Presets' Screen Click 'Next'
- On the 'Task Selection' screen, select 'Drivers'

- In the 'Drivers' window, select the option to insert a 'Multiple Driver Folder' and browse to the location of your mass storage drivers (in this case C:\IntelMatrixDrivers\winall\Drivers).
- In the 'Driver Integration Options' window, select all the drivers and confirm the selected mode is 'Textmode'

- Back in the 'Drivers' window, you'll now see all the controllers present in the driver folder. Click 'Next' to begin integrating the drivers into the XP i386 source.

Now when you deliver your scripted install to real hardware, the integrated mass storage support will be much enhanced.
Summary
In today's chapter I have tried to cover the basics of using Deployment Server to prepare your scripted installations. The great benefit of scripting your initial install is that it can really help standardise the way you build images. You can then add script tasks do things like,
- Configure your XP firewall
- Set NTP servers
- Set profile defaults
- Install software
And with that you are really on the road to complete automation.
Drivers are the biggest pain in deployments -both Plug'n'Play and Mass-storage drivers can give issues, and only time can give you the experience you need to do it well. I've tried to layout some good guidelines here, and hopefully others will add their comments too.
In this article, I illustrated a few watch points when using the native scripted install wizard. Some are minor (like the naming convention) but the most critical is the too simplistic enumeration of the driver folder in the $OEM$ structure. In order to make this work better, your only choice is to create your own custom scripted install job, where you take control of each of the setup phases using your own tasks. Sounds daunting, but don't worry -that's the next chapter...
Return to Index