In this article, we will perform a simple install of Deployment Server. This type of install is one where all of the numerous Altiris services are co-hosted on the same server. We will follow best practice and install using a restricted service account.
Downloading Deployment Server
At the time of writing, the latest version of the standalone Deployment Server is 6.9SP4. This can be downloaded as trial-ware from the Symantec portal for which you'll need to register. Once logged into the portal, Deployment Server can be downloaded from the following URL, http://www.symantec.com/business/products/downloads
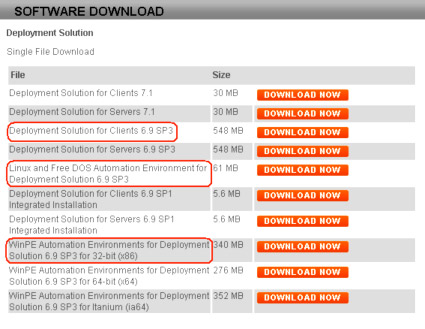
Above I've highlighted the important downloads for Deployment Server -the full installer, Linux & DOS automation, and WinPE (x86) automation. I recommend you download all of these to the same source location not only for neatness, but to assist the installer in finding the automation frm files.
Creating an Altiris Service Account
One flaw in the DS installation wizard is that it asks you to provide an administrative account for running the DS services. This is misleading -it incorrectly implies that the Altiris services must run under an account which has elevated rights. The truth is that these rights are only required for the duration of the product install.
Our first task then is to configure a new account for the Altiris services. We'll need to temporarily grant this account administrator rights for the product installation, but as we'll see in the following chapter we can remove these rights afterwards, leaving DS to run under a restricted account.
-
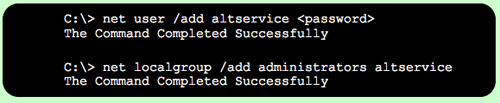
Create a local administrator account called altservice, this will be the DS service account. Set it a nice, long password.
-
Start up the local user manager (lusrmgr.msc) and set the altservice account to never expire (preventing automatic account expiry in 42 days).
Beginning the Deployment Server Installation
Now we've got MS SQL Server and IIS up and running, we can proceed to installing Deployment Server.
-
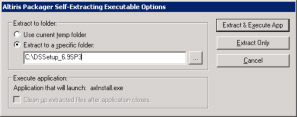
Double-click the Altiris package, Altiris_DeploymentSolutionWin_6_9.exe to unpack the archive.
-
I always recommend amending the extraction folder to reflect the service pack. So for a DS6.9SP3 install, I'd use C:\DSSetup_6.9SP3,
-
Click the command button to 'Extract and Execute App'. This will automatically launch setup.exe after unpacking the archive and begin the installation.
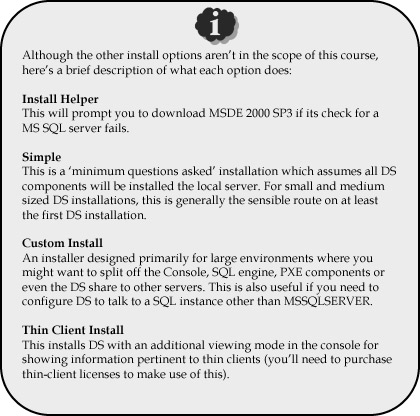
Selecting the Install Type
For the course (and in fact most real-life scenarios) you will want to install all of Altiris' components on at least one server. Let's start this off now.
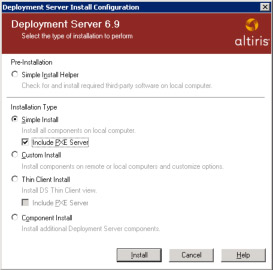
Install all Altiris components on your server, and include the PXE Server option to allow computers to be imaged by booting them off their Network PXE Boot firmware,
-
Select 'Simple Install' & check the option to 'Include PXE Server'.
Click 'Install'.
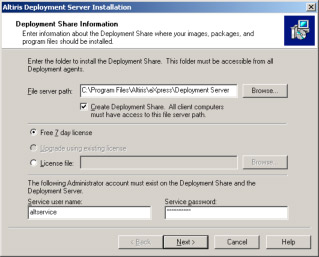
Configuring the Deployment Share
Altiris Deployment Solution makes available the entirety of its directory structure as a network share. This share is called the express share and holds not only the Deployment Server program files, but images, software packages and client OS install files too.
-
Select your license type.
If you don't have any DS licence files to hand, you can use the 7-day free license. Be aware this temporary license only entitles you to manage 10 clients for a month.
-
2. The Service Account
Configure Altiris services to run under the altservice account you created earlier.
Click 'Next'
The Pre-Boot Operating Systems
In order to image a computer, Altiris requires your target system to load an automation operating system (OS). Since version 6.5, Deployment Server has expanded automation pre-boot choice from just DOS, to Linux and Windows PE too.
If your DS Install self-extractor was saved in the same folder as the Linux .frm file, your Linux Automation pre-boot architectures will be automatically selected in what follows,
-
If your Linux options are not auto-selected, use the Wizard screen to locate your .frm files as shown below.
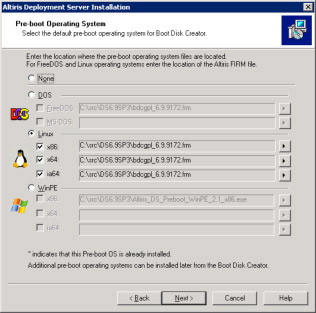
Click Next.
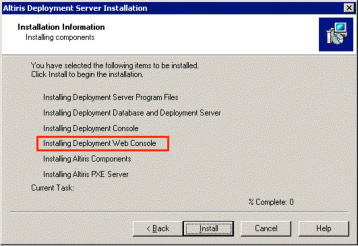
Installation Components
This screen is a review of all the components scheduled for installation. Pay particular attention to whether the entry for 'Installing Deployment Web Console' exists. If it does not, it indicates that IIS is not yet installed, or not yet running.
-
Confirm that the Web Console is scheduled for installation
-
Click 'Install'
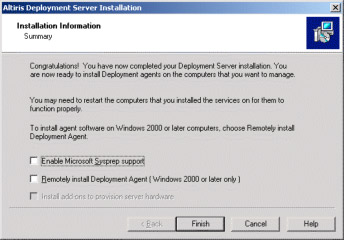
Installation Information Summary
Well done! Deployment Server is now installed.
-
We don't need the enable sysprep, or install remote clients at this stage so click 'Finish' on this screen.
Return to Index
Read Part 5: Deployment Server 6.9 - A Quick-Start Course, Part 5: Securing the Service Account