An imaging admin may at times encounter a situation where the use of a network at all is not possible, or not desirable. Many organi8zation may have network usage restrictions, or there might be a machine that is for some reason "air-gapped" from the network. The imaging tools present in Deployment Solution 7.5 can be used in these situations. Here's how.
Prerequisites:
You will need a method to boot the client machine(s) into a Pre-OS environment. I recommend these steps for creating boot media. These instructions assume that you have boot media created with those instructions. This method also requires a USB-connected storage drive.
To Create an Image
1. Connect your storage device to the machine you wish to image via USB.
2. Boot the machine with a stand-alone boot disk with Ghost (see Prerequisite, above).
3. Ghost will launch. If it does not launch, at the command prompt type Ghost32.exe or Ghost64.exe and press Enter. Ghost will launch.
4. In Ghost, choose Local > Disk > To Image.

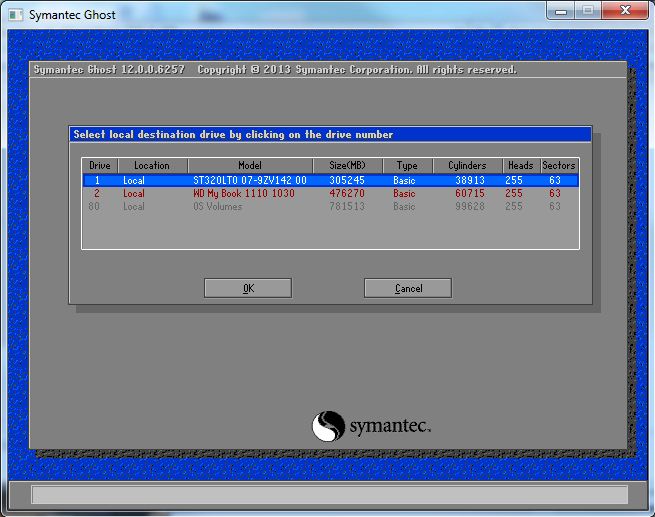
5. It will ask for the source drive, and you wil typically be choosing Drive 1. Please ignore 'Drive 80 - OS VOLUMES'. Also note that your USB drive will show up on the list. If there is any confusion, check the 'Size(MB)' column to verify it based on size.

6. Make sure you select the USB storage drive in the 'Look in:' dropdown menu at the top, then specify a filename for the image file.

7. Select the compression level. We recommend using 'Fast' compression.
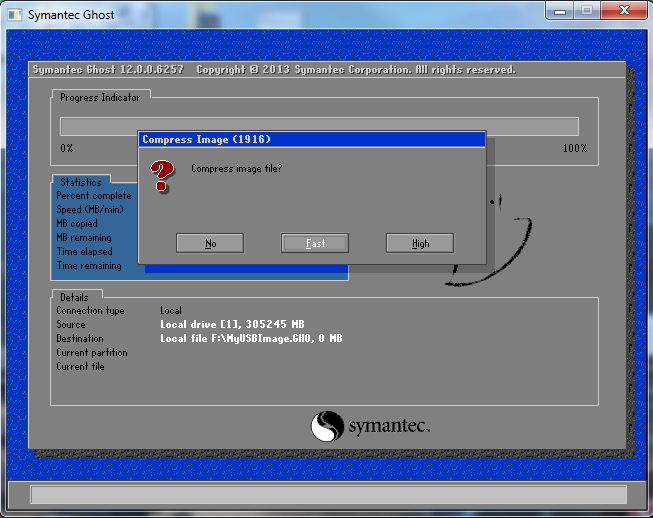
8. Proceed with image creation.
To Deploy An Image
1. Boot the machine with a stand-alone boot disk with Ghost (see Prerequisite, above).
2. If your boot disk automatically launches Ghost, close Ghost. You will have a command prompt.
3. Ghost will launch. If it does not launch, at the command prompt type Ghost32.exe or Ghost64.exe and press Enter. Ghost will launch.
4. In Ghost, choose Local > Disk > From Image.

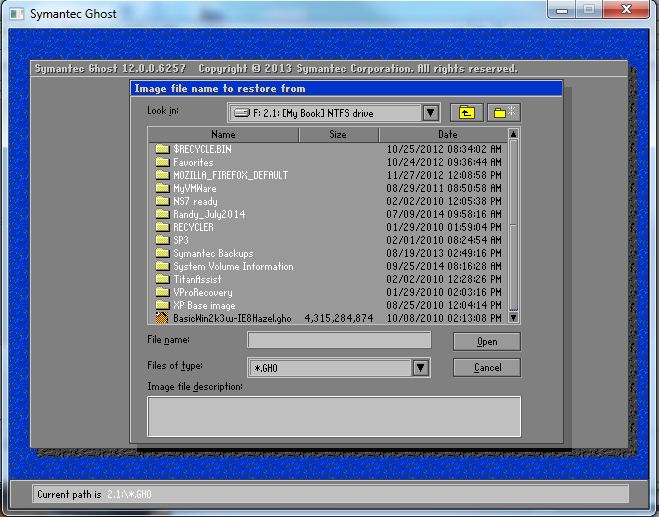
5. It will ask for the source image. The source image will be the USB drive; WinPE will assign it a drive letter. Select the appropriate *.GHO file from that location.
6. Select the destination drive to which you wish to deploy. Note that the drive that is the source for the image is in red text and cannot be selected.
7. Proceed with image restore.