Intel's AMT technology incorporated in the vPro platform provides useful functions for managing systems out of band. What about ASF? Broadcom and Intel put ASF onboard NICs before Intel introduced AMT and vPro. Altiris offers support for ASF technology with Out of Band Management 7.0, Real-Time System Manager 7.0, Network Discovery 7.0, Task Server, and other OEM Solutions. Setting up ASF isn't a simple as throwing a switch. This article covers how to enable and use ASF functionality in the Client Management Suite 7.0 Infrastructure.
Introduction
You may have ASF capable machines out in the environment and not know it. Symantec can identify those systems and provide details of ASF's current state. Does the NIC support ASF? Is ASF enabled or disabled in the BIOS? What steps need to be taken to enable ASF fully so that components like Real-time System Manager and Network Discovery can use the technology? What can ASF do? These questions are addressed in this article. If you are familiar with using ASF within the 6.x Notification Server infrastructure then this article is a refresher including:
ASF Overview
ASF, or Alerts Standard Format, resides directly on the NIC in firmware. This provides out of band capabilities that sit below the hard drive and the loaded operating system. The following features are available to use once ASF has been enabled both within the firmware of the system and within the Symantec CMS infrastructure.
Alert Functionality
ASF provides functionality for PET (platform event trap) alerts. Alert functions are limited to what the hardware OEM provides. The full list of potential alerts follows.
| Alert |
Description |
| Chassis: Chassis Intrusion - Physical Security Violation |
System chassis has been opened. |
| Chassis Intrusion - Physical Security Violation Event Cleared |
System chassis intrusion alert has been cleared. |
| BIOS: Corrupt BIOS |
The system BIOS is corrupted. |
| Corrupt BIOS Cleared |
The system BIOS corruption has been resolved. |
| Boot: Failure to Boot to BIOS |
The system BIOS did not complete loading upon initiation. |
| CPU: CPU DOA Alert |
The CPU is not functioning properly. |
| CPU DOA Alert Cleared |
The CPU is now running properly. |
| Heartbeats: Entity Presence |
Periodic heartbeats transmitted to verify system presence. |
| Temperature: Generic Critical Temperature Problem |
System temperature is out of limits. |
| Generic Critical Temperature Problem Cleared |
The system temperature problem has been cleared. |
| Voltage: Generic Critical Voltage Problem |
The voltage from onboard voltage regulators is out of limits. |
| Generic Critical Voltage Problem Cleared |
The voltage problem has been cleared. |
| Power Supply: Critical Power Supply Problem |
System power supply voltage is out of limits. |
| Critical Power Supply Problem Cleared |
System power supply voltage problem has been resolved. |
| Cooling Device: Generic Critical Fan Failure |
Fan speed/rpm is out of limits. |
| Generic Critical Fan Failure Cleared |
Fan speed/rpm problem has been resolved. |
| Connectivity: Ethernet Connectivity Enabled |
Ethernet connectivity is enabled. |
| Ethernet Connectivity Disabled |
Connectivity is disabled. |
Again note that all OEMs do not support all of the above alert features. Check the manufacturer's documentation for a list of what alerts are supported on your specific systems.
Remote Interaction Functionality
Not all the functionality is available through Symantec CMS, but the following list shows the full remote functionality available on an ASF-enabled system.
- Get System State - Returns the current system status. - This is incorporated when executing ASF states in Task Server; for RTSM this is fully supported
- Get Client Capabilities - Returns client ASF configuration per the DMTF ASF specification. - Task Server will not specifically capture this information but will attempt ASF functions if ASF is detected as active; RTSM does capture this information so the proper functions are available in the Real-Time Interface
- Presence Ping - Similar to Internet Control Message Protocol (ICMP) ping utility; responds with pong to verify the system presence.
- Power up - Powers up the remote system. - SUPPORTED
- Power down - Powers down the remote system. - SUPPORTED
- Reboot - Reboots the remote system. - SUPPORTED
- Reboot with a redirect - Reboots the remote system with options to boot to PXE, the local floppy or optical drives (This isn't a true IDE redirect) - SUPPORTED
Enabling ASF
Enabling ASF requires a series of steps. This section outlines the steps as described within the Symantec Client Management Suite infrastructure. The full steps are highly recommended to ensure that all functionality is enabled in ASF and available to the Symantec Management Platform and supporting Solutions.
Enabling Steps
Walk through the following steps to discover and enable ASF on all supported systems.
- Run an Out of Band Discovery on all applicable systems to discover what systems are ASF capable. This requires the Altiris Agent. The steps are as follows:
- In the Symantec Management Console, browse under Home > Remote Management > and select Out of Band Management.
- In the left-hand tree browse under Out of Band Agent Install > and select Out of Band Discovery.
- On the title bar for the task, click the button labeled off and click on 'On' (this is only required if this policy is not already enabled).
- Change the assigned collection if needed (This discovery can run on any Windows system and it does not harm non ASF or AMT systems).
- NOTE: It will take time for this Task to propagate out to all systems and for the applicable data to be returned to the Notification Server.
- Once sufficient time has passed (a good time mark is 24 hours) identify which machines are ASF capable by browsing under Manage > and select Filters. In the left-hand tree browse under Filters > Out of Band Management > and click on either Broadcom ASF Capable computers or Intel ASF Capable Computers.
- In the BIOS, enable ASF. The OEM may ship systems as ASF enabled if that option is indicated during the ordering of the systems. This would greatly simplify the process since this step requires a remote or site boot into the BIOS to enable ASF (it's possible a BIOS update can enable this remotely, check with the computer manufacturer). ASF enabling differs depending on the manufacturer and version of the BIOS.
- Enable the rollout the Out of Band Task Agent. The steps are listed as follows:
- In the Altiris Console, browse under Home > Remote Management > and select Out of Band Management.
- In the left-hand tree browse under Out of Band Agent Install > and select Out of Band Task Agent - Install.
- On the title bar for the task, click the button labeled off and click on 'On' (this is only required if this policy is not already enabled).
- It will take time for this Task to propagate out to all systems and for the agent to be installed.
- ASF settings need to be updated to enable any and all functionality. Execute an Update ASF Configuration Settings task within Task Server. See the screenshot below and the following steps on how to do this:

- In the Symantec Management Console, browse under Manage > Jobs and Tasks.
- In the left-hand tree, browse under System Jobs and Tasks > Real-Time Console Infrastructure.
- Right-click on the folder Real-Time Console Infrastructure (you can also choose another location to create the task if so desired) and choose New > Job or Task.
- In the resulting window, within the right-side tree browse down under Remote Management and select the task type Update ASF Configuration Settings.
- Check the box labeled 'Modify ASF general settings'.
- Make sure 'Enable ASF' is checked.
- Check the option 'Modify security settings'. Current experience shows that each field should be populated by 40 digit keys. Once set, a profile can be created with the proper keys to authenticate in the Symantec Management Platform for Out of Band Management and Real-Time System Manager use. See the section 'Utilizing ASF in Altiris' below for details. Keep track of the Generation and Authentication Keys as these will be required under 'Utilizing ASF within the Symantec Client Management Suite.
- Click the OK button to save the task (you can rename the task if you wish before saving).
- Once saved, browse to the bottom in the right-pane window (it should show the new task you created) and click the New Schedule button.
- Leave the radial set to 'Now', or if you need this to run at a different time, select the schedule radial and set the schedule appropriately to your situation.
- Use the Selected Devices dialog to add filter/targets or individual systems to this run instance.
- Click Schedule when ready.
- Run OOB Discovery again so that the system is seen as ASF Enabled and configured in the filters/targets.
Utilizing ASF within the Symantec Client Management Suite
Once enabled, Symantec can utilize ASF within the Symantec Management Platform Task-Server infrastructure, or individually through the Real-Time System Manager interface. To use RTSM or Task Server with ASF, a profile must be created that contains the proper security keys. Please see Step 5-g. under enabling steps above to see what keys need to be set. This can be done with the following steps:
- In the Symantec Management Console browse under Settings > and select All Settings.
- In the left-hand tree browse under Monitoring and Alerting > Credential Settings > and select Credential Management.
- Click the Add Credentials button. If you've previously setup ASF credentials, choose it from the available list and click the edit button.
- From the Credential Type dropdown select ASF Credentials.
- Provide a name for these specific credentials.
- Input the Generation key and Authentication key previous configured when configuring the ASF devices, as shown in this screenshot:

- Click 'OK' to save the ASF Credentials.
- Browse back up to the Monitoring and Alerting folder > browse under Protocol Management > Connection Profiles > and select Manage Connection Profiles.
- Select the profile you wish to use (the Default Connection Profile can be used for general usage) and click the edit button.
- Wait for the full page to load before attempting to make changes, as shown in this screenshot:
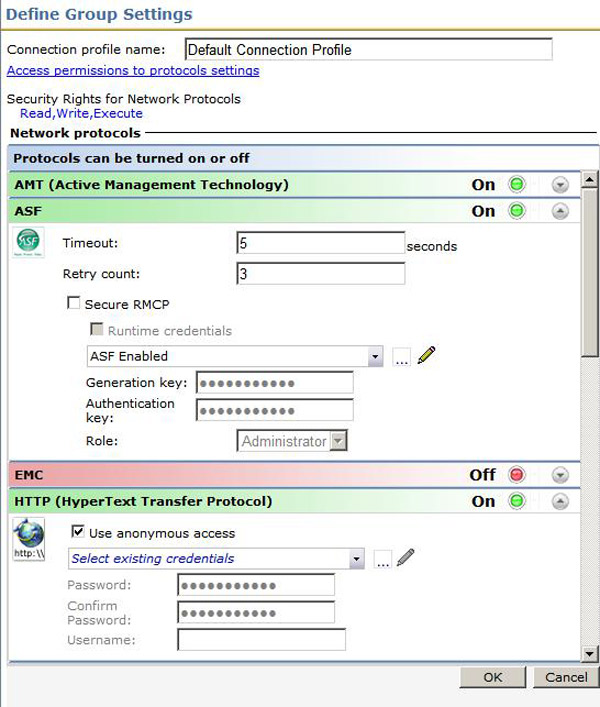
- Expand the section labeled ASF by clicking on the down arrow to the right.
- In the 'Select existing credentials' dropdown select the credentials you created previously.
- On the bar for the credentials, click the button labeled off and click the 'On' (this is only required if this protocol is not already enabled).
- Click OK to save the changes.
Task Server
With the introduction of the Symantec Management Platform 7.0, ASF functions are added to a large number of tasks available through the Task Server interface. A single job or task can be run simultaneously on many systems, and any available tasks within Task Server can be utilized with the ASF functions. This allows functions such as reliable power management to be included amid a job that might roll out patches, software delivery programs, inventory scan, etc...
The following example job contains ASF functions. The steps used to create the Job are included as follows:
- In the Symantec Management Console, browse under Manage > and select Jobs and Tasks.
- In the left-hand window browse under System Jobs and Tasks > Software > and select Quick Delivery.
- Right-click on the Quick Delivery folder > choose New > Job or Task.
- From the left-hand tree select the option Server Job, usually located at the bottom of the tree.
- Name the Job: Software Rollout using ASF Power Management.
- Under Jobs / Tasks choose New > Task.
- In the resulting window looking under Real-Time Console Infrastructure and select Power Management.
- Name the Task ASF Power On.
- Choose the power action Power On and click OK.
- To the right of the Job tree, select the radial option Enter task input now.
- Under the section For Connection credential settings dropdown select use a set value.
- Click on the resulting link Select Connection Profile and choose the profile you configured your ASF credentials within.
- Now add a Quick Delivery Task (for demonstration purposes the configuration etc of this task will not be covered in this article).
- Lastly, select New > Task again.
- Select Power Management again but this time configure it as a Power Off.
- Done! See this screenshot for an example:

You can now schedule this job to run on ASF enabled computers. Any other combination can be used within a Task Server Job, or the individual functions can be executed individually as stand-alone tasks.
Real-Time System Manager (RTSM)
In the Symantec Client Management Suite RTSM is now included! When connecting to a system through the Real-Time tab from Resource Explorer, available ASF functionality should be automatically detected. This assumes that ASF has been properly enabled and configured as per the previous steps. The RTSM console is a one-to-one console that allows direct interaction with a system. Most of the functions found in Task Server are also available in the Real-Time interface, though for RTSM it is a direct system manipulation.
Conclusion
Understanding the steps for setting up and configuring ASF will enable you to properly configure all available ASF systems, making the technology available. Once available, power management becomes reliable. Also PXE boot can be directly invoked if necessary from the RTSM console, negating the need to visit a machine that is down for imaging or other PXE related tasks.