Summary
This document details the process we have developed, and use, to scan in the assets that we track within our Symantec Management Platform for ITAM managed equipment. Feel free to use this as a basic template, take what you want, and adjust, review, and apply to your environment. Remember, there is no one-size-fits-all when it comes to Asset Management.
The information below is a result of the accumulation of meetings, discussions, trial-and-error, additional revisions to our process as situations arise. We feel that this is a good foundation for over 98% of the scanned Asset Management activities.
Scanned Asset Types
We scan in, and subsequently track, assets that are over $250.00. All Asset Types are out of the box in the Symantec Management Platform.
There are some exceptions, but generally we scan in and track the following device types:
- Asset Type: Audio Visual, which include the following model types:
- Control Processors
- Transmitters
- Receivers
- Scalers
- Switchers
- Touchpanels
- Document Cameras
- Projectors
- Televisions
- Asset Type: Computer, which include the following model types:
- Desktops
- Laptops
- Asset Type: Mobile
- Tablets (iPads, Xooms, etc.)
- Asset Type: Network Printer, which include the following model types:
- Network printers
- Desktop printers
- Asset Type: Scanner
- Desktop scanners
Scanned Asset Naming Standards
Standardized and normalized data is crucial to our reporting methodologies. As such, these are some examples of the Manufactures and Models of assets that are entered manually when scanning in assets:
|
Asset Type
|
Manufacturer
|
Model
|
|
Computer
|
Dell
|
OptiPlex 9020
|
|
Computer
|
Dell
|
Dimension XPS
|
|
Computer
|
Dell
|
Latitude E6500
|
|
Computer
|
Dell
|
Precision T1900
|
|
Computer
|
Apple
|
iMac
|
|
Computer
|
Apple
|
Mac mini
|
|
Computer
|
Apple
|
MacBook Pro
|
|
Computer
|
Apple
|
iPad 16GB
|
|
Computer
|
Apple
|
iPad2 64GB
|
|
Computer
|
Motorola
|
Xoom 32GB
|
|
Control Processor
|
Crestron
|
MPS-100
|
|
Control Processor
|
Crestron
|
CP2E
|
|
Transmitter
|
Crestron
|
DM-TX-201-C
|
|
Receiver
|
Crestron
|
DM-RMC-200-C
|
|
Touchpanel
|
Crestron
|
TPS-6-B-T
|
|
Touchpanel
|
Crestron
|
TPS-1700
|
|
Document Camera
|
Elmo
|
EV-4400AF
|
|
Document Camera
|
Samsung
|
5500 DX
|
|
Document Camera
|
WolfVision
|
VZ-8plus
|
|
Projector
|
Hitachi
|
CP-X1250
|
|
Projector
|
Sharp
|
XG-P25X
|
|
Printer
|
Epson
|
Stylus Pro 4800
|
|
Printer
|
HP
|
4515tn
|
|
Printer
|
HP
|
CP3505x
|
|
Scanner
|
Canon
|
4010C
|
|
Scanner
|
Canon
|
DR-2580C
|
|
Scanner
|
Canon
|
DR-3080CII
|
|
Scanner
|
Epson
|
10000XL
|
|
Scaler
|
Crestron
|
DM-RMS-SCALER-C
|
Scanning Assets
I won’t get into how to configure the Barcode Solution here, and will leave that for a separate article. However, I will detail the steps below that we take when we scan in the assets upon receipt.
Note: We utilize a Motorola Symbol MC5590 handheld scanner running Windows Mobile 6.5 Classic for scanning assets into our 7.x environment.
- Click the Windows icon button in the lower left corner on the barcode scanner screen.
- Then click the Symantec Barcode Application.
- Click Create/Receive.
- Select configured Receiving profile.
- Select the correct Asset Type. See https://www-secure.symantec.com/connect/articles/how-we-define-asset-types-and-asset-statuses for my asset type definitions.
- Enter the Purchase Order (PO) and line number in the Name field (ex. P1204311_2).
- Enter the Manufacturer. (See above for examples).
- Enter the Model. (See above for examples).
- Click the dropdown for the Assets’ Status (usually In Stock).
- Click the dropdown for the Location.
- Click the dropdown for the Cost Center.
- Now you scan the Serial Number (SN) of the asset.
- Change only what you need to on the above lines and then proceed to scan the next asset.
Connecting to Upload Data
You may complete these steps via Wi-Fi or via docking the scanner.
If you want to use Wi-Fi, then follow these steps to connect Wi-Fi. If not, then skip down.
Note: when you turn the scanner on, it takes a few seconds for it to connect to Wi-Fi. Wait until it says one way or the other before continuing with the steps below. To connect to Wi-Fi, follow these steps.
- Turn on the Scanner.
- Check to see if Wi-Fi is on
- Click the Windows icon in the lower left corner of the screen.
- Click Home.
- Look at the Wi-Fi screen to see if it says Log On/Off’ Wi-Fi: <SSID>, and has a Signal.
- If it shows that above, then skip to step 6.3.
- If it doesn’t show that, then continue.
- Click the Fusion button in the lower right corner of the screen.
- If it says Enable Radio then that means that Wi-Fi is turned off. Go ahead and click Enable Radio to turn Wi-Fi on.
- If it says Disable Radio, then Wi-Fi is already turned on and you don’t need to change it.
- Click the X in the lower right corner to return to the Home screen.
- The Wi-Fi message should say ‘Log On/Off’ Wi-Fi: <SSID>, and have a Signal.
- Continue to the Uploading Data steps.
If you have issues using Wi-Fi, then simply dock the scanner and re-try.
- Dock the scanner.
- Click Connect without setting up your device on the screen that pops up.
- Continue to the Uploading Data steps.
Uploading Data
- If your already in the barcode app (which you probably are if you just finished scanning assets) then click Menu |Back | Home.
If you are NOT already in the barcode app, then launch it with these steps:
- Turn on the Barcode Scanner.
- Click the Windows button in the lower left corner of the screen.
- Click on the Symantec Barcoder app.
- Click Synchronize.
- Enter your account name, password, and server name (use FQDN).
- Check Use secure connection if you have it setup, otherwise don’t.
- Click Login.
- Select the configured Receiving profile
- Click Next.
- Click Upload Only.
- Click Sync.
- Wait until it says upload complete. Then you can close the app or press the x button, the windows button, or just press the power button.
Commit the uploaded Data
After uploading the data, you must follow these steps to allow the data to be committed to the database.
- From your workstation, login to the Altiris console.
- Navigate to Home | Service and Asset Management | Barcode.
- Click on Barcode Solution | Manage Changes | Resource Uploads.
- You may expand the Batch to view the assets that will be uploaded by clicking the little plus sign next to Batch.
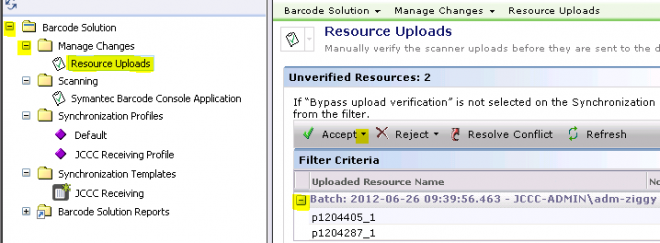
NOTE: You cannot view details of each of the scanned assets like you could in 6.5 from this view.
- Click Accept All without conflict.
- Click OK.
- When done, click Close in the popup window.
- You are now done entering, assigning, prioritizing, categorize and funding an ITP.
AV Asset Post Upload Processing
There is manual intervention required to correctly change the name of an AV asset after the PO field is auto-populated via the CMDB rule below. There is an automation policy that emails a report daily for any AV asset that is named like ‘P[0-9]%’ to be manually corrected. There is a separate document for this process.
|
Device Type
|
Asset Name
|
|
Control Processors
|
Control Processor
|
|
Transmitters
|
Transmitter
|
|
Receivers
|
Receiver
|
|
Switchers
|
Switcher
|
|
Touchpanels
|
Touchpanel
|
|
Document Cameras
|
Doc Camera
|
|
Projectors
|
Projector
|
|
Video Converters
|
Converter
|
|
Digital Signal Processor
|
Digital Signal Processor
|
|
Lens
|
Lens
|
Non-AV Asset Post Upload Processing
Once you complete the above steps, the rest of the post upload processing is automated. You don’t have to do any of these steps. They are just here for convenience. See the master configuration document for a more detailed explanation. Here is a summary:
- The Purchase Order field in the Cost Items for an asset is populated from the PO number that is entered as the asset name when it is scanned at receiving time. This process runs daily at 6:00 pm.
- For non-AV assets, the Available for Use date, Planned Disposal Date (+4 years), and cost Amount of the asset is populated from the PO line items that are imported nightly from Banner and matched on the PO number that is entered in the asset Purchase Order field under Cost Items. This CMDB rule runs daily at 6:30 pm.
- For AV assets, the Available for Use date, Planned Disposal Date (+5 years), and cost Amount of the asset is populated from the PO line items that are imported nightly from Banner and matched on the PO number that is entered in the asset Purchase Order field under Cost Items. This CMDB rule runs daily at 6:35 pm.
- For Apple assets that incorrectly have an ‘S’ prefixed to the serial number when scanned in, we remove the ‘S’, leaving just the serial number. This CMDB rule runs daily at 6:40 pm.
- For computers that are named with the four digit phone extension (or last four digits) of the user, we have a CMDB rule that will assign the Asset User Owner to:
- The user if the phone extension is not shared with any other person), which runs daily at 7:00 pm.
- The manager of the user if the phone extension is shared with other direct reports of a manager and the manager has a different phone extension than their direct reports, which runs daily at 7:05 pm.
- The manager of the user if the phone extension is shared with other direct reports of a manager and the manager has the same phone extension than their direct reports, which runs daily at 7:10 pm.
Post Upload Editing
If for some reason you need to manually edit a record, simply navigate to the JCCC Master Asset Report
Run it, then right-click | Edit the desired record. It is best to search on serial number as that is the best piece of uniquely identifying data in that report.
Next, how move forms are used to track our assets and keep them up-to-date. Just look here: https://www-secure.symantec.com/connect/articles/how-we-fill-out-and-process-move-form