Successful software delivery depends heavily on the proper placement of Package Servers in an environment, however it is often misunderstood how the success of these components is tied directly to how well the Site Maintenance configuration page is handled. This article walks through the process of how software delivery pulls these components together to delivery packages to an organization.
Contents
Software Delivery
SQL Tables
SWD Package Tab
SWD Programs Tab
SWD Advanced Tab
IIS and HTTP
NSAgent
Site Maintenance
Redeploying A Software Delivery Task
Option 1: Cloning Failed Tasks
Option 2: Running A Task Again
Software Delivery
Administrators often use the Software Delivery Wizard to build software delivery tasks using Notification Server. The wizard, as shown below (figure 1.1), walks through the four steps necessary to create a package.
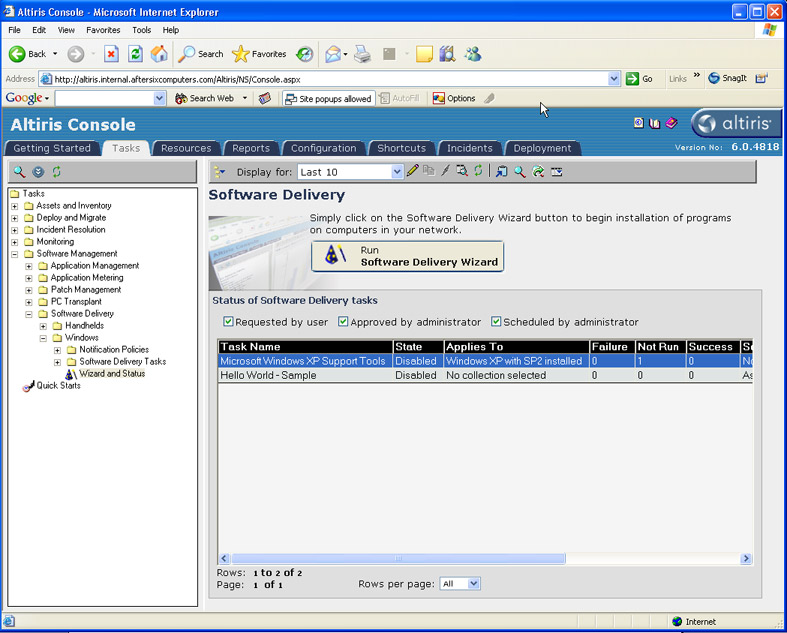
Figure 1.1
For this example we have created a task called "Microsoft Windows XP Support Tools." These tools are a set of administrative utilities that are included with Windows XP Professional that many network administrators find are invaluable to assist with client troubleshooting. Microsoft includes updated versions of this software with each new release and in our environment we are going to deploy the version that is included with Windows XP Professional with Service Pack 2. Microsoft includes an MSI to install this application however an MST had to be created in order to automate the installation. Because this will be deployed to our entire environment it's critical that our package servers have the file in place prior to deployment.
To see how this package gets transmitted from the Notification Server to the package servers and then down to the client machines, we must identify the Globally Unique Identifier or GUID that has been assigned to this package. As a reminder every object within the Notification Server is assigned a GUID in order to make it unique.
We begin by selecting the Software Delivery Task from the Software Delivery Tasks folder as highlighted in the graphic below. This will bring up the properties for the task. From this screen you can see all of the details that were populated through the use of the Software Delivery Wizard. From this screen choose the "Go to Package" as called out in the graphic below (figure 1.2).
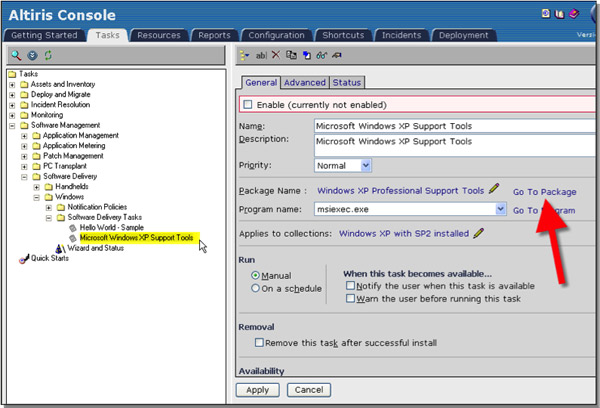
Figure 1.2
Selecting the option "Go to Package" brings up the detailed properties of the package which opens a new window that will display the properties of the package. One of the more simple ways to determine a GUID for a package is to open the properties of the package or item in question and reference the web address that is used to display the item.
As you'll see from the graphic below, I have highlighted the GUID that has been assigned to this specific Package (figure 1.3). In Notification Server 6.0 GUIDs link multiple tables within the database. As GUIDS are also used to maintain secure permissions on objects within the database it is critical to understand how to determine these.
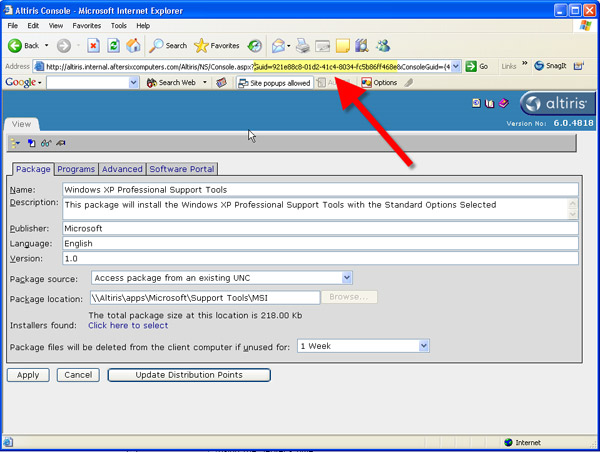
Figure 1.3
Now that the GUID has been established the next section will discuss how the information displayed in the GUI translates into the SQL tables.
SQL Tables
Now that we've identified the GUID for this package, we can trace the GUID in the SQL tables and we learn that once the package is created, details of the package are placed into seventeen tables within the Altiris database as shown in the table below:
| Tablename |
ColName |
Rows |
| Evt_NS_Item_Management |
ItemGuid |
4 |
| Item |
Guid |
1 |
| Item |
SecurityGuid |
1 |
| ItemPresentation |
BaseGuid |
1 |
| ItemPresentation |
Guid |
1 |
| ItemReference |
ChildItemGuid |
1 |
| ItemReference |
ParentItemGuid |
1 |
| ItemReplication |
ItemGuid |
1 |
| ItemResource |
Guid |
1 |
| ItemSchedule |
ItemGuid |
1 |
| SecurityACEPermission |
EntityGuid |
139 |
| SecurityEntity |
Guid |
1 |
| String |
BaseGuid |
4 |
| StringCache |
BaseGuid |
6 |
| SWDPackage |
PackageId |
4 |
| SWDPackageCodebase |
PackageId |
2 |
| SWDProgram |
PackageId |
2 |
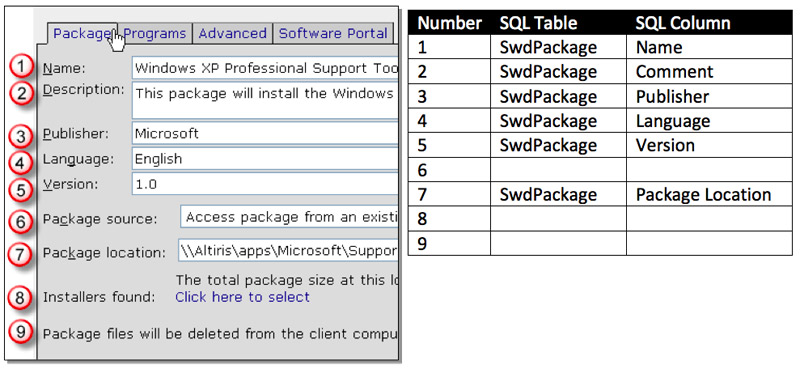
To put these tables into context the following section shows a screenshot of the appropriate tab followed by a table that corresponds to the location in the SQL table where each field may be found.
SWD Package Tab
SWD Programs Tab
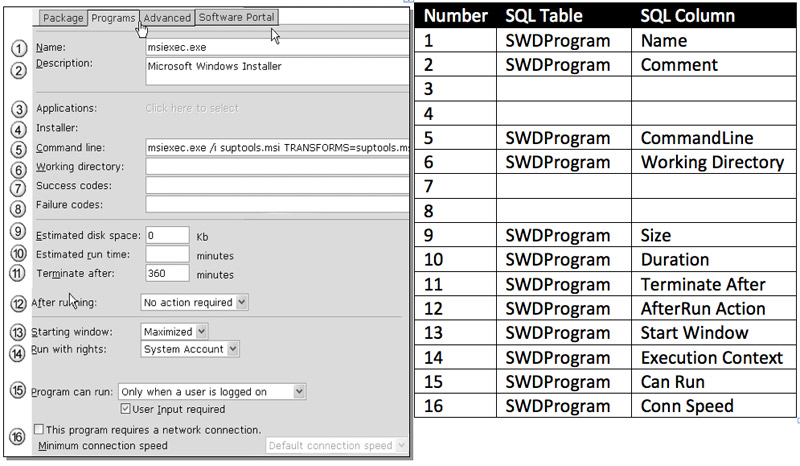
SWD Advanced Tab

IIS and HTTP
The most common design scenarios call for a single Notification Server that is placed in the corporate headquarters with package servers placed in remote offices however in order to ensure that software packages are replicated correctly, Altiris designed several checks and balances. While the data in the SQL tables is important, the actual transmission of the files from their source to the destination computers is handled through the HTTP protocol. Supporting a distributed architecture through HTTP is one of Altiris' most powerful features however because the protocol itself has very little error control built into it, some additional checks and balances needed to be designed to ensure successful replication.
For each package, IIS creates a Virtual Directory that matches the GUID of the package, as shown below (figure 1.4). Within the properties of each Virtual Directory, IIS points the requestor to the actual UNC path where the files are located. This allows the packages to be published to a URL.

Figure 1.4
The data flow for the Altiris architecture is that the Notification Server will replicate packages to each Package Server or in the event no Package Servers are in use, the NS Agent will replicate this directly. When a request is made to the Notification Server from a Package Server that needs to download packages, the Agent is actually requesting a snapshot be sent of the package. Snapshots are XML files that are used to identify several key details about each package and are critical to the successful replication of each package. There is one snapshot.xml file generated for each package. Each of these files is named by the GUID for each package. The snapshots are located on the Notification Server in "<install directory>\program files\altiris\notification server\snapshots". In our example the file name is: {921e88c8-01d2-41c4-8034-fc5b86ff468e}.xml
The contents of the files are posted below however for legibility several lines have been split:
 <FolderSnapShot path="\\Altiris\apps\Microsoft\Support Tools\MSI"
time="2004-11-04 16:19:17"
hash="jF68aZ6uNw5pU8Hf+0fIQA=="
PkgVersion="1099621157">
<Root size="223232"
files="2"
folders="0">
<File name="SUPTOOLS.MSI" size="219648" lastModifiedTime="2004-11-04 21:10:38"/>
<File name="suptools.mst" size="3584" lastModifiedTime="2004-11-04 21:12:29"/>
</Root>
</FolderSnapShot>
The purpose of these files is to ensure that the replication of the packages over HTTP was successful. The first line called FolderSnapShot path maps back to the Package Location of the Package Tab for each package. When a package is first created a time and hash value is assigned to the package location along with a version number. Each time an administrator makes a change to the original package these three values are updated. When Package Servers or NS Agents request configuration updates they read the snapshot files and validate that the package contents they maintain still match the original.
Once the version and contents of the package have been validated, the package server agent reviews the line "files="2" and folders="0". This lets the package server known that it actually has files or folders that must be downloaded and the remainder of the file is read to determine what is supposed to be downloaded. Notice that in addition to the name and size, a lastModifiedTime is included as an additional check to ensure the most up-to-date version is included.
Snapshots are updated by the "NS.Package Distribution Point Update Schedule" which is a scheduled task that runs in the background every 24 hours. Whenever a package is modified, Altiris has provided administrators with the "Update Distribution Points" option within each package. Pressing this button triggers the NS.Package Distribution Point Update Schedule to run however it is important to understand that this button has a ten minute offset to it when pressed. When triggered, the NS.Package Distribution Point Update Schedule goes through each of the snapshot.xml files and re-writes the updated values.
There are several troubleshooting scenarios where understanding snapshots come into play. One example is a scenario in which a company moves all or some of their MSI files from their original location. This could be due to lack of available hard drive space or it could be because the company purchased a SAN or NAS solution and wants to store the data there or it could be accidental. The package locations are stored in SQL and are not automatically updated. If the UNC path used in the Package location was modified as part of the data move, the Notification Server attempts to read the files in a directory that no longer exists. The snapshots in this scenario will still reflect the original path and when the NS.Package Distribution Point Update Schedule is run it will update the files= and folders= line to reflect 0. Package servers will see this change and will modify their own packages to reflect this. On the NS Agent, the advertisement will still be downloaded however it will contain zero files and folders and when the agent attempts to run it, the install will fail. This is what is known as a false positive. The communication process from the Notification Server to the Package Server to the Client is working successfully however nothing is actually replicating.
To correct this behavior, it is necessary to delete the existing snapshot and then generate a new snapshot by running the NS.Package Distribution Point Update Schedule.
NSAgent
The Software Delivery process starts with package creation on the Notification Server however up until this point we've focused on what happens on the Notification Server. Understanding the role the NS Agent plays in replicating the packages is equally important.
The NS Agent is the foundation for the Altiris architecture. Once the NS Agent is installed, each of the Altiris solutions installs plug-ins that enables additional functionality. As seen in the screenshot below (figure 1.5), there are a number of plugs-ins that are installed beyond the base agent. The agent we are focused on is the Software Delivery Solution Agent.
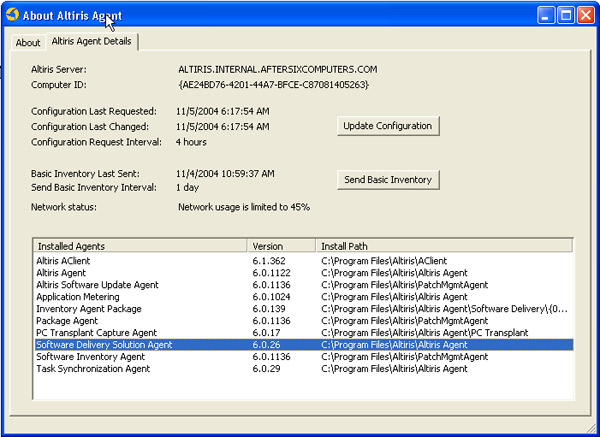
Figure 1.5
Whenever a package is enabled on the Notification Server, the NS Agent downloads those packages into "<install directory>\program files\altiris\altiris agent\software delivery" in the form of folders that are named after the GUID for the package as shown in figure 1.6.
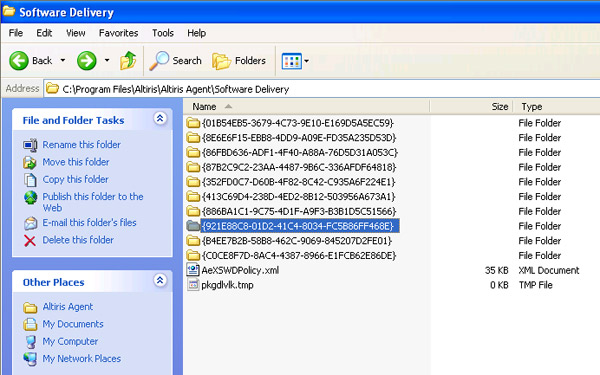
Figure 1.6
However before we dig into the details of the folder, its important to point out the AeXSWDPolicy.xml file that sits in the root directory. This XML file is a summary file of all of the advertisements that have been downloaded to the client machine. When the NS Agent is installed, this file is empty except for a SWK Key value. Upon the first configuration update internal client machines are added to the base collections and any software delivery packages that apply to these collections will be downloaded to the agent. The details of how software delivery packages are displayed in the Altiris Agent console is a result of the data placed into the AeXSWDPolicy.xml file.
In our example the software package has been assigned to the collection "Windows XP with SP2 installed." As soon as the first configuration update interval passes and the client requests an updated configuration, the AeXSWDPolicy.xml file is updated with the details regarding this package and a new menu item is added to the console as seen in the following graphic (figure 1.7):

Figure 1.7
Notice that the package has not actually be downloaded. Selecting the Properties of this package and choosing the Download History tab (figure 1.8), confirms that at this time, the NS Agent is not aware of where it can go to download the contents of this package. What we should be seeing in the Download History is a source location and path.
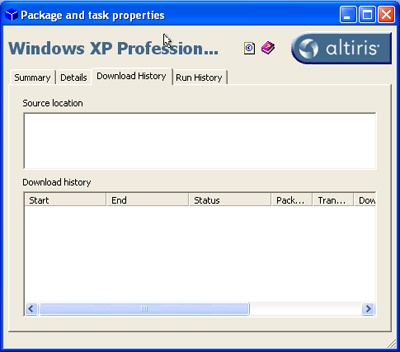
Figure 1.8
When the Software Delivery Solution attempts to download a package, it needs to know where it can actually download the package from. The Agent makes the request to the Notification Server through IIS by running GetPackageInfo.aspx. This process results in a file called package.xml that is written to <install directory>\program files\altiris\altiris agent\software delivery\<PACKAGE GUID>.
The Package.xml file tells the NS Agent where the files are located and how it can download them. The following is the Package.xml file from the software delivery advertisement we've been referring to:
<Package id="{921E88C8-01D2-41C4-8034-FC5B86FF468E}" name="Windows XP Professional Support Tools" size="0" version="1099621157" remote="false" priority="Normal" status="valid" minspeed="0" statusDescription="valid">
<Source time="2004-11-05 11:43:20">
	<SiteQuery url="http://altiris.internal.aftersixcomputers.com/Altiris/NS/Agent/GetPackageInfo.aspx" resource="{F54DBBEC-6979-47CF-B839-47032F5F79BC}" type="codebases"/>
	<Codebase unc="\\altiris\apps\Microsoft\Support Tools\MSI" snapshot="http://altiris.internal.aftersixcomputers.com/Altiris/NS/Agent/GetPackageSnapshot.asp"/>
	<Codebase href="http://altiris.internal.aftersixcomputers.com/Altiris/Packages/{921e88c8-01d2-41c4-8034-fc5b86ff468e}" snapshot="http://altiris.internal.aftersixcomputers.com/Altiris/NS/Agent/GetPackageSnapshot.asp"/>
</Source>
</Package>
Using the SiteQuery line, the Software Delivery Agent knows what URL it needs to go to in order to find the details about the package it is attempting to download. This can be seen in the graphic below (figure 1.9) as the Source Location has now been populated.
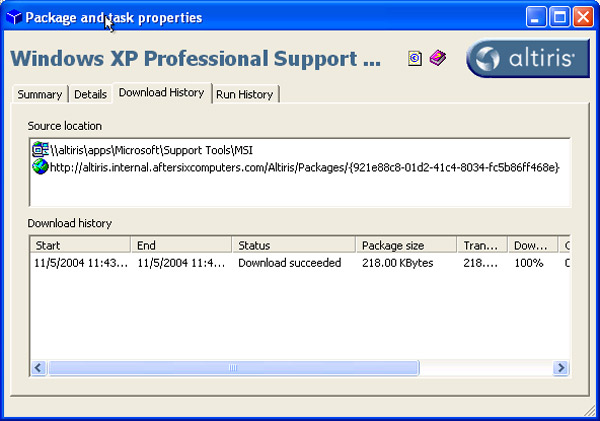
Figure 1.9
Note: In our example, the environment currently does not have any package servers so there is only one SiteQuery line. As package servers are added to the environment, the SiteQuery and Codebase lines will grow. We will come back to this point later in this document when we talk about Site Maintenance to see why this is a very important thing to remember.
The Source Location lists two options for downloading the package. For redundancy Altiris includes both the UNC as well as the URL whenever packages are downloaded. Both of these locations are stored in the SWDPackageCodeBase table within the Notification Server database. While the order displayed may lead you to believe that the UNC is the preferred download mechanism, it is actually reversed. All NS Agents are programmed to download using HTTP first.
At this point in the process the Agent now understands where to go to find the files however an equally important detail the Agent must be told is exactly what files or folders need to be downloaded. To answer this question, the NS Agent calls the GetPackageSnapshot.asp. The results of this request are the creation of the second file called snapshot.xml that is written to <install directory>\program files\altiris\altiris agent\software delivery\<PACKAGE GUID>.
The following is the snapshot.xml file from the software delivery advertisement we've been referring to:
<Snapshot id="{921E88C8-01D2-41C4-8034-FC5B86FF468E}" path="C:\Program Files\Altiris\Altiris Agent\Software Delivery\{921E88C8-01D2-41C4-8034-FC5B86FF468E}\cache" time="2004-11-04T16:19:17" version="1099621157">
<Root size="223232" files="2" folders="0">
	<File name="SUPTOOLS.MSI" size="219648" lastModifiedTime="2004-11-04 21:10:38"/>
	<File name="suptools.mst" size="3584" lastModifiedTime="2004-11-04 21:12:29"/>
</Root>
</Snapshot>
Notice that this file lists the specific directory where the package will be downloaded to as well as the files and sizes that is in the directory. Earlier it was mentioned that checks and balances are used to ensure proper replication between the client and the server and the snapshot.xml file is a major component in this. By comparing the contents of the snapshot.xml file on the client machine as well as on the Notification Server or on a package server, the NS Agent is able to ensure that the contents of each package are identical.
There is one additional file that is created in the <install directory>\program files\altiris\altiris agent\software delivery\<PACKAGE GUID> and that is the log.xml file. For troubleshooting this file lists the status of everything that has happened to this client prior to running.
The following is the log.xml file from the software delivery advertisement we've been referring to:
<Log id="{921E88C8-01D2-41C4-8034-FC5B86FF468E}" downloadEvent="1" transferBytes="223232" transferRate="223232" attempts="1" successes="1">
<History>
	<Download version="1099621157" status="valid" statusDescr="valid" transferBytes="223232" packageSize="223232">
		<Session startTime="2004-11-05 11:43:20" endTime="2004-11-05 11:43:20" source="http://altiris.internal.aftersixcomputers.com/Altiris/Packages/{921e88c8-01d2-41c4-8034-fc5b86ff468e}" transferRate="223232" transferBytes="223232" transferCache="0" result="0"/>
	</Download>
</History>
</Log>
Of note here is that the attempts="1" successes="1" line shows that the download was successful.
When all three of these elements, the package.xml, the snapshot.xml and the log.xml file are successfully created, the package download process is complete. The following graphic (figure 1.10) shows the directory structure that will be generated on the client machine.
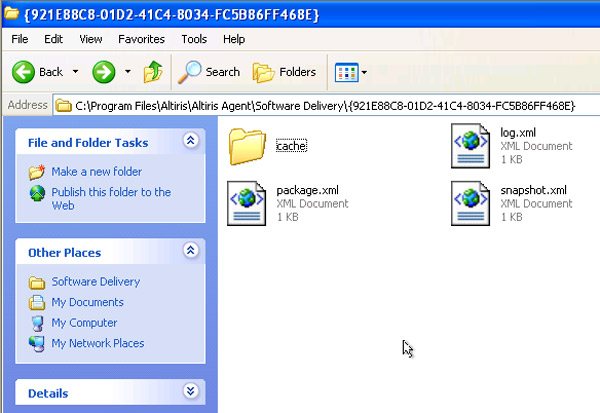
Figure 1.10
This structure is identical for every package created using the Notification Server. The only other thing to point out is that for each software delivery package, the Cache directory is where the program files are actually stored.
Site Maintenance
Notification Server 6.0 introduces administrators to a redesigned Site Maintenance page however the user documentation provides very little information for how this component is used or how important it really is. Understanding how this configuration page affects software delivery is critical to ensuring that your package servers and clients are communicating properly.
The Site Maintenance page as seen below (figure 1.11) is divided into three tabs: Sites, Subnets and Package Servers. We will examine each section in detail beginning with Sites.

Figure 1.11
Sites are modeled after the Active Directory model found in the Active Directory Sites and Services component of Active Directory. Microsoft defines sites as well connected subnets and as such, sites represent the physical structure or topology of a network. Active Directory uses the site boundaries to define replication rings, but also to determine what servers clients should authenticate against. Active Directory enabled services such as DNS also leverage site information. Beginning with Notification Server 6.0, Altiris expanded the Active Directory connector to allow for these objects to be imported into the Notification Server in order for clients to locate package servers based on their physical location on the network. Sites can also be created manually for organizations that do not have Active Directory in place or properly configured to reflect the network topology.
Much like the Active Directory model for Sites and Services, it's up to the Altiris administrator to define which subnets make up a site. This is accomplished by the Subnet tab. The subnets tab is populated by the Basic Inventory that is collected from the Altiris agents. The subnets can also be imported using the Active Directory connector or they can be created manually by administrators. When a subnet is created manually, it should be assigned to a site.
The last tab of this page is the listing of Package Servers. When a Package Server is created, the subnet of the Package Server is compared against the subnets defined in the Subnets tab and the package server is automatically assigned to the site that the subnet represents. If the Altiris administrator has properly defined the sites and subnets then there is nothing else to configure.
Package Servers exist in an Altiris architecture in order to distribute software delivery packages to servers that are within the same site as the clients that need the packages. This serves two purposes: the first is to preserve the bandwidth between sites; the second reason is to offload this responsibility from the Notification Server to Package Servers so that the Notification Server can spend its time running the remainder of the Altiris architecture.
In our scenario we are distributing the Windows XP Support Tools to all of the Windows machines in the environment that have Service Pack 2. For our example we have satellite offices in California, Utah and Atlanta. Each site is connected via T1 line and there are 300 client machines at each location. The software delivery package for the Windows XP Support tools is just under 5MB however we want to ensure that clients in Atlanta are requesting files from the Package Server in Atlanta and clients in California should only be requesting files from the Package Servers in California.
Without site maintenance properly configured a client machine in California is going to request a configuration update from the Notification server in Atlanta and the client is going to be sent a list of the sources where it can download this file from. As this source list is generated at the Notification Server the server uses the Site Maintenance page to determine what servers to place on the list however when this is not properly configured the NS Server will simply include every package server it knows about. The source list generated is called a codebase. In our example, without site maintenance the codebase will contain the names of all three package servers.
The NS Agent is not aware that it is installed on a machine that is sitting in California and so it will look at the list of the three servers and ping each server to determine which one responds the fastest. The one that responds the fastest is the one that is chosen for the package download. In small environments this is not a very long process however for environments with more than 10 package servers, the codebase files become quite large. To assist with this, when there are more than 5 package servers in the codebase, the NS Agent randomly picks between four to six servers to perform the ping test against prior to choosing a download location. As this is randomly chosen these could be anywhere on the network.
When site maintenance is used, the Notification Server receives the request from the client sitting in California and based on the subnet the client is a member of, the Notification server compares the clients subnet to the subnets listed in the Site Maintenance page and sends back only the codebase for the package servers that have been assigned to the subnet where the client is located. This ensures that all requests made from California are handled by the California Package Server.
As an Altiris administrator its important to ensure that Site Maintenance is properly configured to ensure successful software delivery.
Redeploying a Software Delivery Task
Occasionally the need will arise to redeploy a Software Delivery Task. This is often due to a failed installation attempt. The Notification Server provides several methods for accomplishing this This section focuses on the two most popular methods for attempting a reinstallation of the software.
Option 1: Cloning Failed Tasks
After a software delivery task has been created and an initial run was attempted a success or failure code will be returned. In this example we will be redeploying the Google Toolbar after several machines have failed to install it correctly the first time.
To start this process, open the Software Delivery "Wizard and Status" to begin; this is located in the following location: Tasks > Software Management > Software Delivery > Windows > Wizard and Status. If you have failed installations, a number will show under the "Failure" column. Select the task in question then click the "Clone this task for the computers where it failed" button on toolbar as shown below (figure 1.12) or you can use the "alt-c" keyboard shortcut.
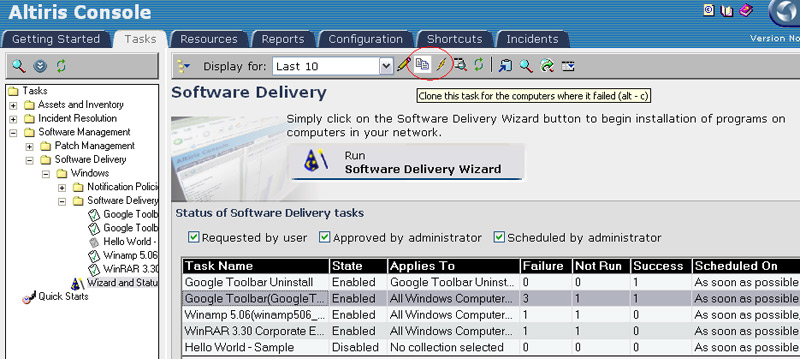
Figure 1.12
After you click the "Clone this task for the computers where it failed" button or use the keyboard shortcut, a new task will be created using the same package called "1st rerun of task name" as shown in figure 1.13.
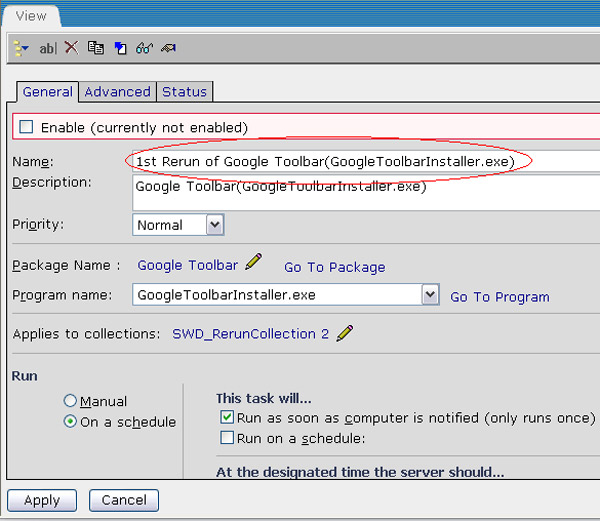
Figure 1.13
Before the package is actually enabled it is a good idea to verify that all of the configuration options are correct.
As seen in figure 1.14 below, a new task has actually been created.
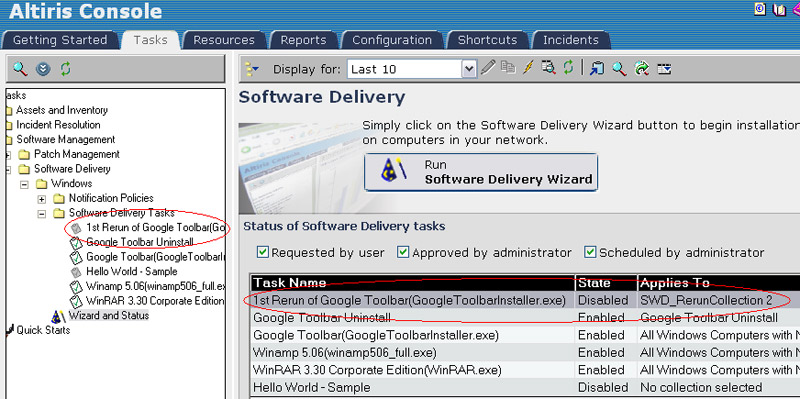
Figure 1.14
In addition to the new task name, a new dynamic sequential system collection will be created (figure 1.15)
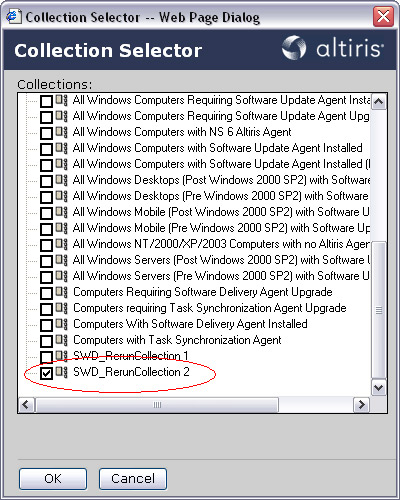
Figure 1.15
This method will only attempt to run the installation on computers where the original SWD task failed. This method will not rerun the installation on any computers that returned a success code.
Option 2: Running a Task Again
Similar to the above method is the "Run task again" method. This method allows you to completely run a task all over again. As in the previous example, there are two ways to execute this method; from the toolbar, click the "Run task again" button (figure 1.16) or use the "alt-r" keyboard shortcut.
Figure 1.16
As opposed to the "Clone" method, this method will redeploy a Software Delivery Task regardless of failure or success as shown in figure 1.17 and figure 1.18.
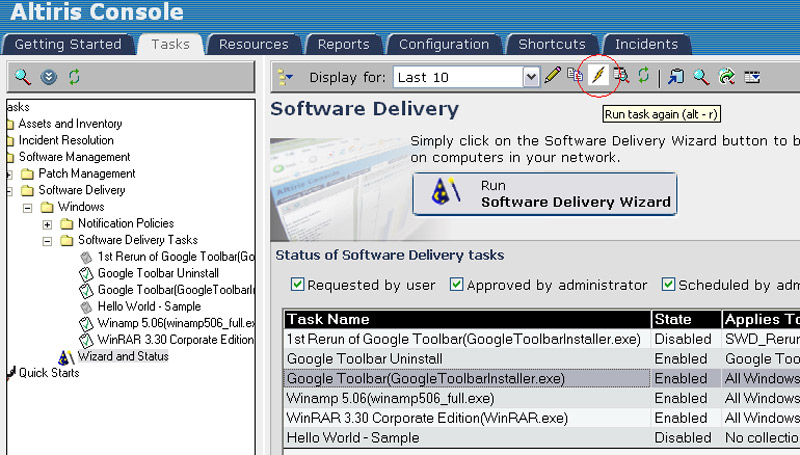
Figure 1.17

Figure 1.17
By leveraging either of these methods, Altiris administrators are able to quickly and easily redeploy existing software delivery tasks to machines that failed to run appropriately.