If you've ever tried creating an SSO using the tools built into Symantec Workspace Corporate you might have found yourself quickly lost. As you build out the form, all the options can quickly overwhelm creating that old feeling of procrastination. It can be a big chore trying to identify what goes where and why. While at first it may seem like it's a hopeless task, once you get the hang of it you will find that this tool is one of the most robust SSO creation tools out there. What at first seemed to be an endless trail of attribute names, starts showing its power for creating SSO's for almost any type of Web or Windows applications which require a user logon.
While the goal of this article is not to demonstrate how to create an SSO, I found a great way to visualize the creation process that makes this task quite a bit easier. It helps to have at least a basic understanding of programming, but it's not necessary.
Let's take a look at a Web application as I show the HTML underneath and paint a picture of how to visualize it as an SSO. The following snippet of code is from the logon form at http://mysupport.symantec.com.
<!-- PPM2119 : SYM Account Integration    -->
    <form name="loginForm" method="post" action="https://symaccount.symantec.com/SymAccount/processLogin.do">
    <img src="https://symaccount.symantec.com/SymAccount/stayAlive.gif" id="stayAlive" name="stayAlive" border=0 width=1 height=1 alt="" />
    <td width="400" align="right" valign="top">
      <table bgcolor="#e2e2e2" border="0" align="center" width="100%" cellspacing="0" cellpadding="0">
        		        <input name="submitName" size="50" maxlength="50" type="hidden" value=''>
        <tr>
          <td colspan="3">
            <p class="login_header_mys">Login to your account</p>
          </td>
        </tr>
        <tr>
          		          <td width="30%" align="right" valign="middle">
            <p class="field_labels_mys fontSize11 colorGrayDark">User ID :</p>
          </td>
          <td colspan="2" valign="middle">
            <!-- PPM2119 : SYM Account Integration    -->
            <input class="header_mys" type="text" name="uid" maxlength="50" tabindex="1" value="" style="width:180px">
                          <img src='web/images/global/1x.gif' height="19" width="19" align="top" alt="">
                      </td>
        </tr>
        <tr>
          		          <td width="30%" align="right" valign="middle">
            <p class="field_labels_mys fontSize11 colorGrayDark">Password :</p>
          </td>
          <td colspan="2" valign="middle">
            <!-- PPM2119 : SYM Account Integration    -->
            <input class="header_mys" type="password" name="userPassword" maxlength="50" tabindex="2" value="" style="width:180px">
                          <img src='web/images/global/1x.gif' height="19" width="19" align="top" alt="">
                      </td>
        </tr>
        <tr>
          <td> </td>
          <td colspan="2">
            <input name="Login" type="image" id="Login" onclick="loginSubmit();" src='web/images/i18n/en/login/but_login.gif' tabindex="3">
            <!--<input name="Login" type="submit" id="Login" onclick="loginSubmit();" value="Submit" src='web/images/i18n/en/login/but_login.gif' tabindex="3">-->
          </td>
        </tr>
        <tr>
          <td> </td>
          <td colspan="2">
            <p  class="field_labels_mys fontSize11 colorGrayDark">
              <!-- PPM2119 : SYM Account Integration    -->
              <a href="https://symaccount.symantec.com/SymAccount/initforgotPassword.do?returnURL=https://mysupport.symantec.com/homeredirect.html&logoutURL=https://mysymantec.symantec.com/buyingprogram/logout.gif&forwardURL=https://mysupport.symantec.com/index.html" target="content" class="bodylink" tabindex="4">Forgot your Password?</a>
            </p>
          </td>
        </tr>
        <tr>
          		          <td colspan="3" align="left" width="100%">
            <table width="100%" border="0" cellspacing="0" cellpadding="0">
              <tbody>
                <tr>
                  <td width="13"><img src='web/images/global/1x.gif' height="1" width="13" align="top" alt=""></td>
                  <td width="100%">
                    <input name="exception" size="1" maxlength="1" type="hidden" value="">
                                          <p  class="field_error_mys fontSize10 colorBlack"> </p>
                                      </td>
                  <td width="13"><img src='web/images/global/1x.gif' height="1" width="13" align="top" alt=""></td>
                </tr>
                <tr>
                  <td width="13"><img src='web/images/global/1x.gif' height="1" width="13" align="top" alt=""></td>
                  <td width="100%">
                    <p class="field_error_mys fontSize10 colorBlack"><span id="sessiontimeoutmessage"> </span></p>
                  </td>
                  <td width="13"><img src='web/images/global/1x.gif' height="1" width="13" align="top" alt=""></td>
                </tr>
              </tbody>
            </table>
          </td>
        </tr>
        <tr>
          <td colspan="3" align="center"><img src='web/images/i18n/en/login/gray_rule.gif' alt=""></td>
        </tr>
        <tr>
          <td colspan="3">
            <p class="login_header_mys">Don't have an account?</p>
          </td>
        </tr>
        <tr>
          <td> </td>
          <td colspan="2">
            <p  class="field_labels_mys fontSize11 colorGrayDark">
              <!-- PPM2119 : SYM Account Integration    -->
              <a href="https://symaccount.symantec.com/SymAccount/initCreate.do?returnURL=https://mysupport.symantec.com/index.html&logoutURL=https://mysymantec.symantec.com/buyingprogram/logout.gif&forwardURL=https://mysymantec.symantec.com/MyProducts/InitAuthenticatedAction.do" target="content" class="bodylink" tabindex="5">
                <img src='web/images/i18n/en/login/but_create_account.gif' border="0" alt="">
              </a>
            </p>
          </td>
        </tr>
        <tr>
          <td height="20" colspan="3"><img src='web/images/global/1x.gif' height="20" width="1" align="top" alt=""></td>
        </tr>
        <!-- PPM2119 : SYM Account Integration   mysupport.symantec.com  -->
        <input type="hidden" name="returnURL" size="5" maxlength="5" value="https://mysupport.symantec.com/homeredirect.html?z=ZKH&s=SKH&c=0">
        <input type="hidden" name="logoutURL" size="5" maxlength="5" value="https://mysupport.symantec.com/login.html">
        <input type="hidden" name="USER_SESSION" size="5" maxlength="5" class="org.springframework.web.util.WebUtils" value='[412061473][CD295C0AD97F22079B10006360C42945]' >
      </table>
    </td>
    </form>
That's just the relevant section for the logon form.

Already it makes me want to forget the SSO and tell my users to remember their passwords. There is a lot going on for such a small piece of screen real estate. However, we only need a few important variables. The question is how to go about identifying them? Let's start by looking at what makes a web form. Here is a skeleton of a form.
<form>
input elements
</form>
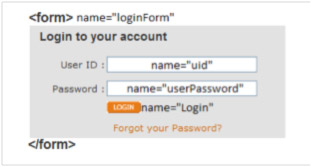
I prefer this version to the previous. If you scroll up you will see that the form HTML follows this skeleton. It starts with an open tag, followed by various elements, and finally a closing tag. Ok, now let's overlay this skeleton onto the form GUI.

There could be any number of elements inside the form, but one thing will always be consistent, and that is the fact that the form make up will rarely change and for our purpose we only need three of those elements. In fact, if the form has a "name=", you don't need to identify the "submit", or "login" element to submit the form with the SSO, since the logic for this is built right into the product. As long as you identify the form by its name, that part will be taken care of. I will however, use it for this example since more elements help me paint a bigger picture.
So I can clearly see now that I need to identify the following elements:
- Form name
- User ID :
- Password :
- Login <- This is a button
Here are the specific sections from the HTML.
Form name
<form name="loginForm" method="post"
The very first line contains the name right in the opening tag.
"loginForm"
User ID
<input class="header_mys" type="text" name="uid" maxlength="50" tabindex="1" value="" style="width:180px">
This is slightly trickier as you have to find the text of the element, then follow the HTML until you see its "input" and inside the input tag you will find the name and in this case it's:
"uid"
Password
<input class="header_mys" type="password" name="userPassword" maxlength="50" tabindex="2" value="" style="width:180px">
Using the same approach as user id, I can identify the password name:
"userPassword"
Login
<input name="Login" type="image" id="Login" onclick="loginSubmit();" src='web/images/i18n/en/login/but_login.gif' tabindex="3">
This button does not have a "text" value I can identify, as was the case with user id and password which has a name of the field and is followed to the right with the input field. However, I can clearly see that this line is my login because it has the instruction to submit "onclick". The name of this button is:
"Login"
Let's have another look at the GUI, but this time with the element names.
Ok, now we have everything we need to create the logon portion of the SSO. All we need to do now is to figure out where this goes in the SSO form. Let's take a quick look at the SSO form sections and finally put it all together to show just how simple it really is.
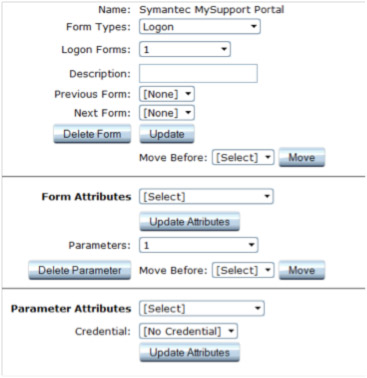
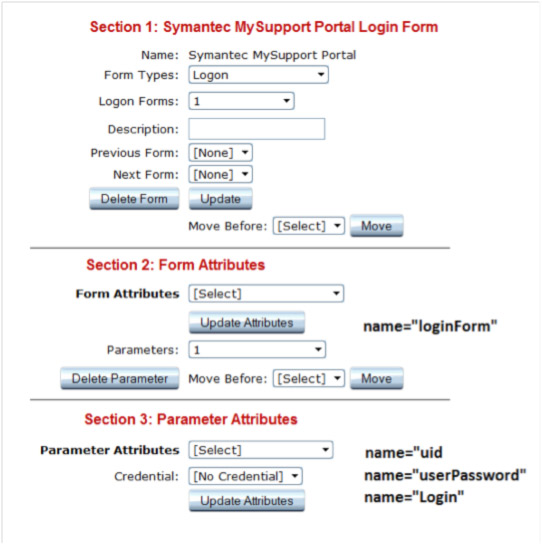
There are three sections and each one has a specific purpose. Starting from the top:
Section 1
This section identifies the form type. This has no direct impact as far as the application is concerned. It provides no data collection or input. Its relevance is to the SSO to tell it which form we are working with.
Section 2
This section is used to identify the form that contains the elements we need to input with the SSO.
Section 3
This section is used to identify the specific element names that we are working with and associate them to a credential. You will always have at least two parameters since logons generally have a user name and password.
Hopefully by now you've had an uh huh moment. If not, that's ok. Let's go further and bring all the pieces together starting with one more look at the GUI.
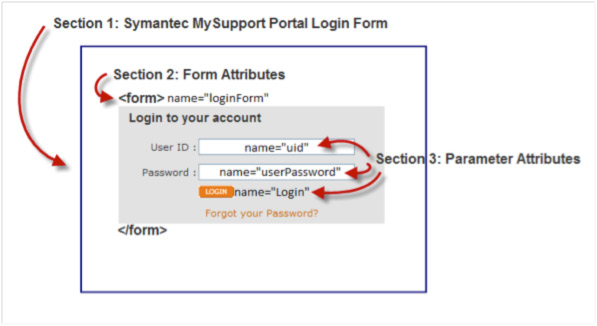
We have visually identified our form and all the requirements to create the login for our SSO.
When you take a step back and look at things visually, even the most complex problems become nothing more than a simple puzzle of fill in the blanks. Instead of worrying about what each section of the SSO form is supposed to do, I simply overlay the SSO form over the application and draw the picture. In most cases, whether it is a Web or even a Windows application, this same approach will work. Underneath the presentation, and the complex programming there is a common flow to all these programs. First you build the container, and then you place your functionality into this container. Lastly, you take Symantec Workspace Corporate and you build an SSO to allow your users to interact with this container in the simplest way possible.

Note: The above is the same logon form containing 2 parameters. One for "uid" and one for "userPassword". If the form did not have a name, I would have a third parameter that specifically identifies the login button and an instruction to click it.
The complete SSO also contains a form that identifies a successful logon as well as a form that identifies a failed logon, and allows the user to re-enter credentials. I have included the .xml for this SSO. You will need to create a new application, save it, and click the import button to browse to and import the SSO form.
Read Part 2 here: Single Sign-On: The Big Picture, Part 2