Introduction
Inventory Solution provides hardware and software details on devices in your environment. Understanding how Inventory works, and how to troubleshoot problems, will give you the confidence needed to report accurate, relevant data. This is essential when managing assets and software licenses in the environment. Know what you have and where you have it. This document strives to provide both an understanding of how Inventory works, and how to troubleshoot problems that may arise, enabling you to succeed.
Table of Contents
Data Processing
Server Logs
Invalid Characters (not values)
DateTime
NULLs
Deadlocks
Other
Duplicate GUIDs
Data Class Updates
ResourceUpdateSummary
Stand-Alone Inventory
Agentless Inventory
Adding MIBs to Agentless Inventory
Initial Network Discovery
Device Classification
Review Classifications
Setting up Classifications for Unknown Devices
Repeat Network Discovery
Managed Resource Criteria
Agentless Inventory Configuration
MIB Configuration
Creating New Data Classes
Configuring a New Table
‘Get Next’ – Understanding the method
SNMPutilg.exe – Testing against devices
Conclusion
Data Processing
Once the NSE lands in the queue, the transport process is complete. Essentially the Symantec Management Agent has successfully posted the file to the asp page and the data placed in the evtqueue. At this point it is up to the data loader to get the data into the database, but the process it uses isn’t as simply as inserting it directly.
- Check server logs for processing problems, typically “Failed to process NSE”
- Check bad folders, if enabled
- Profiler for tough cases
- Data based on GUID – duplicate GUID problems – HOWTO49693
- Check Data class updates
- ResourceUpdateSummary – Tech199812
Server Logs
When NSEs are processed errors may keep data from being calculated and inserted into the database. These errors will be displayed in the server logs as severity 1 messages. Depending on the error, the issue may be related to the NSE itself, or to conditions within the database, including poor database health. Issues include:
- Invalid Characters within the NSE throw exceptions -
- Incorrect data format for destination database columns in target tables
- NULL sent where no NULLs are allowed
- Deadlocks which cause data inserts to be rolled back and dropped
Invalid Characters (not values) –
The following errors or similar appear in the log when processing inventory NSEs.
Source: Altiris.NS.ResourceManagement.DataClassImporter.LoadInventory_Impl
Description: Failed to load inventory. ['?', hexadecimal value 0x03, is an invalid character. Line 2421, position 62.]

Source: Altiris.NS.StandardItems.Messaging.InventoryCaptureItem.OnMessage_Impl
Description: Failed to process NSE : ( Unhandled exception. Type=Altiris.NS.Exceptions.AeXException Msg=Failed to load inventory. ['?', hexadecimal value 0x03, is an invalid character. Line 2421, position 62.] Src=Altiris.NS
StackTrace=
  at Altiris.NS.ResourceManagement.DataClassImporter.LoadInventory_Impl(XmlReader reader, Boolean bProcessData, Boolean bForceSchemaValidation, Guid resourceGuidOverride)
 at Altiris.NS.ResourceManagement.DataClassImporter.LoadInventory(XmlReader reader, Boolean bProcessData, Boolean bForceSchemaValidation, Guid resourceGuidOverride)
 at Altiris.NS.ResourceManagement.DataClassImporter.LoadInventory(Guid resourceGuid, XmlReader reader)
 at Altiris.NS.StandardItems.Messaging.InventoryCaptureItem.OnMessage_Impl(String message, Boolean useFilename)
Inner exception. Type=System.Xml.XmlException Msg='?', hexadecimal value 0x03, is an invalid character. Line 2421, position 62. Src=System.Xml StackTrace=  at System.Xml.XmlScanner.ScanLiteral()

Source: Altiris.NS.LegacyInterop.ItemMessageDispatcherService.Dispatch
Description: ItemMessageDispatcherService::Dispatch ( Unhandled exception. Type=Altiris.NS.Exceptions.AeXException Msg=Failed to load inventory. ['?', hexadecimal value 0x03, is an invalid character. Line 2421, position 62.] Src=Altiris.NS
StackTrace=
  at Altiris.NS.LegacyInterop.ItemMessageDispatcherService.Dispatch(String message, Boolean useFilename)
Inner exception. Type=System.Xml.XmlException Msg='?', hexadecimal value 0x03, is an invalid character. Line 2421, position 62. Src=System.Xml StackTrace=  at System.Xml.XmlScanner.ScanLiteral()

Source: Altiris.NS.ClientMessaging.FileDispatcher.ProcessFileCallback
Description: An XmlException occured while processing the message D:\Program Files\Altiris\Notification Server\NSCap\EvtQueue\Process\nseD638.tmp. Replacing invalid characters and re-processing.

Source: Altiris.NS.ClientMessaging.FileDispatcher.ProcessFileCallback
Description: 1 invalid characters were replaced with the ? character.
Cause
The cause for this is simple there is a character in an XML file that we are not able to process. This can be because it is a reserved character for XML, it is a corrupt character that cannot be read or it could possibly be a space in a location that causes the XML to look invalid.
Solution
This warning message does not indicate a problem with the Notification Server or Altiris Agent. Because Notification Server is designed to replace the invalid characters with a ? then process the file again, there is rarely a problem with the file being processed.
If you wish to find out which computers and data classes are sending the events with the invalid character, you can query the data base Inventory classes for entries with question marks (?) in them.
See http://www.symantec.com/docs/HOWTO3916 for a stored procedure that will allow searching of the entire database for a ?
There will be several locations in the database that contain a question mark the one that is most likely of concern would be in one of the Inv_ tables. Even in these tables there could be valid question marks such as in a URL. Look for the ones that seem out of place.
DateTime
DateTime errors crop up occasionally. This occurs when a DateTime value does not adhere to the DateTime value supported by the Notification Server, or the column within the database. An example is shown below:
Invalid column [<column>] value [<Date>] (fixed [[NULL()]]) for resource <GUID>: 'SW Patch Windows' (<GUID>)
Process: AeXSvc (7308), Thread ID: 4, Module: AeXSVC.exe
Priority: 2, Source: DataClassRowCollection.SetColumn
Typically this occurs when an application is inventoried that might have a DateTime value that is from another Country that is different than standard US. If the OS is a different language, this can also occur. Check the knowledgebase for possible solutions. Often the loss is a row from Inventory, though other inventory should process OK despite this error.
NULLs
Another similar issue occurs when a NULL value is presented to the database when no NULL value is allowed. The symptoms caused by this are simply that data is dropped from being processed. Restriction on NULL values is intelligent, so data sent in this format should not be processed into the database. These are more rare than previously since improvements to the process have eliminated the sending of these NSEs, and less database columns hold this restriction.
Deadlocks
When the database is busy, or one process steps on another database process, Deadlocks can occur. General database health will improve avoidance of deadlocks. The difficulty with deadlock issues is that the data discarded or rolled back is not indicated in any logs. The only way to tell if this issue is occurring to Inventory is timing of the errors. The questions to ask are:
- Do deadlock errors show up when Inventory is scheduled to arrive at the server?
- Am I missing Inventory that I expect to be there? In other words, is inventory being sent that has no appearance to having made it to the database?
- Are there many deadlock errors during Inventory processing versus other times when they are rare or do not appear at all?
A Typical deadlock error is generic.
Transaction (Process ID n) was deadlocked on lock resources with another process and has been chosen as the deadlock victim. Rerun the transaction.
To help with deadlocks, there are two approaches. One is to track down the deadlock directly. This can be done using help from the following KB article:
http://www.symantec.com/docs/HOWTO7118
The second is to improve SQL performance, either by increasing resources such as RAM, CPU, and Disk I/O, or to use a maintenance plan or other improvements as detailed in the following KB article:
http://www.symantec.com/docs/HOWTO10723
Other
If you see other messages with the text “Failed to Process NSE”, it is advised to search on the extra messaging provided. For example review the following error:
Process: aexsvc.exe (920)
Thread ID: 4996
Module: AltirisNativeHelper.dll
Source: Altiris.NS.StandardItems.Messaging.InventoryCaptureItem.OnMessage_Impl
Description: Failed to process NSE : ( Unhandled exception. Type=System.Xml.XmlException Msg=This is an unexpected token. The expected token is 'NAME'. Line 74, position 1. Src=System.Xml
StackTrace=
  at System.Xml.XmlTextReader.SetAttributeValues()
  at System.Xml.XmlTextReader.ParseElement()
  at System.Xml.XmlTextReader.Read()
  at Altiris.NS.ResourceManagement.LegacyInventoryProcessor.ProcessXmlInventoryNode(XmlNode node, StringWriter classesXmlWriter, Int32 resourceRef)
  at Altiris.NS.ResourceManagement.LegacyInventoryProcessor.ConvertOldStyleInventoryToNew(String oldStyleInventory)
  at Altiris.NS.StandardItems.Messaging.InventoryCaptureItem.OnMessage_Impl(String message, Boolean useFilename) )
Note the message: ( Unhandled exception. Type=System.Xml.XmlException Msg=This is an unexpected token. The expected token is 'NAME'. Line 74, position 1.
You can use this message to search the KB or to derive what may be causing the issue.
Duplicate GUIDs
If data appears to be processing but the record is not updated, this may be due to Duplicate GUID problems.
Useful links and info, found in KB HOWTO49693:
A GUID is shared when two or more Symantec Management Platform (SMP) agents are using the GUID at the same time. This can cause some fairly odd behavior, see:
What are the effects of having duplicate GUID's?
http://www.symantec.com/docs/TECH133462
Preventing Shared GUIDs
How to Prevent Shared GUIDs
http://www.symantec.com/docs/HOWTO93988
Correcting Shared GUIDs
Shared GUID cleanup script
http://www.symantec.com/docs/TECH212345
Detecting Shared GUIDs
To check for shared GUIDs, run the attached SQL query, and review the results; or import the attached Altiris report into the Altiris console, run the report and review the results. The attached Altiris reports is based on the attached SQL query which is based on the query used in the SQL script used TECH212345, mentioned above.
The Altiris report has the additional feature that right-clicking on any row brings up a context menu for the particular Computer GUID.
To confirm whether two or more computers are using the same (shared) GUID, connect to those computers and check the SMP agent's GUID. This can be done using the SMP Agent UI, or using the Remote Altiris Agent Diagnostic (RAAD) tool, see:
Remote Altiris Agent Diagnostics (RAAD) 2.0,
http://www.symantec.com/docs/HOWTO21449
Query results details:
| Field |
Description |
| GUID |
the computer GUID |
| Name |
the current computer name associated with the GUID, not very helpful |
| IsManaged |
1 if computer is managed (e.g. has an Altiris agent installed), 0 otherwise |
| IsBlacklisted |
1 if computer GUID has been blacklisted, 0 otherwise |
| KeyAdd |
number of times the value of this key was set (for this GUID, during the time period) |
| Count |
Did the change a few times, and you can explain why it changed that many times?
Or, did the value change too many times for explanation? |
KeyAdd
Date |
first time and the last time this key value was to any value (for this GUID, during the time period) |
| Range |
Did the name change on just one day?
Or did it change on multiple days? |
| h |
number of unique host name values (extracted from KeyValue field)
Is there just one host name, such as when the computer joined the domain?
Is there just two host names, such as when the computer was actually renamed?
Is there many host names, as if the GUID is being shared. |
| d |
number of unique domain name values (extracted from KeyValue field) |
| t |
number of unique values for the "name.domain" field |
| KeyValue |
one value to which this key was set (for this GUID, during the time period)
Note: Multiple KeyValues are shown on sequential rows. |
ValueAdd
Count |
number of times this resource key was set to this value (for this GUID, during the time period) |
ValueAdd
Date Range |
first time and the last time this key value was to this value (for this GUID, during the time period) |
Data Class Updates
To see when data was last processed into a table (not necessarily sent, but when data was actually inserted or updated into the database), you can look in Resource Manager. To do this, follow these instructions.
- In the Symantec Management Console, browse under Manage > Computers > search for the computer you wish to review, and double-click on its record.
- Once the new Windows loads, go to View > Inventory (NOTE: Sometimes if you already have a second window open, the Resource Manager will load in that window.)
- In the middle pane, browse to the data class in question, for example Processor, and select it.
- When the right-pane loads, click on the Status tab.
- Review the Data Last Changed field. This is the last time data was inserted in the database. Also note the Data Last Received. This indicates when the Notification Server received inventory for this data class, for this system. If the Notification Server doesn’t think the data is changed, it will not insert it into the database. This leads us to the next section: ResourceUpdateSummary.

ResourceUpdateSummary
When data for a data class gets processed by the data loader, the first matter of business is validating if the data is already in the table or not. This avoids unnecessary inserts if the data is identical, and it a performance measure. Each Inventory-based data class contains a HASH that represents the data. In the table ResourceUpdateSummary that hash is stored, including reference to the Data Class and the Computer. If the hashes match, the data loader drops the data and moves on. If the hashes do not match, the data is inserted or updated in the table.
For the most part this works wonderfully, however there have been times when something causes the hash to not match what is in the table. Possible reasons include:
- Resource Merges
- Merge Scripts or processes
- Purging methods of data
- Direct SQL interactions that include deletes from Inventory tables
- Unknown
Correcting this means to blank out or NULL the data hashes in the ResourceUpdateSummary table.
- Verify that the affected machines are included in the Collect Full Inventory policy filter and that this policy has run on those machines. Also verify that all dataclasses are being collected in the policy.
- This can be checked by navigating to Manage > Policies > Discovery and Inventory > Inventory > Collect Full Inventory and clicking Advanced in the Policy Rules/Actions pane. Dataclasses to be collected should be checked (Hardware, Operating System, User and Group are checked by default in the Full Inventory).
- Run the following query to obtain the GUID of an affected machine. This will be used for testing.
Select * from vComputer
	Where Name = 'Name of the affected Computer'
- Copy the entry from the Guid column for future use.
- Run the following query to ensure that the GUID is valid and is included in this table. Some fields may still be NULL in the DataHash column while others contain will contain data.
Select * from ResourceUpdateSummary
	Where ResourceGuid = 'GUID from Step 2'
- Run the following command to delete all entries from the DataHash column for the test computer and reset them to NULL
Delete from ResourceUpdateSummary
	Where ResourceGuid = 'GUID from Step 2'
- Perform a Full Inventory on the test machine to repopulate the inventory data. All dataclass fields should now contain current and accurate data.
The best way to resolve this on a larger scale is to use the scripts found here:
http://www.symantec.com/docs/TECH202934
Stand-Alone Inventory
Stand-Alone Inventory is useful to gather inventory on devices that are not managed by the Symantec Management Agent. When using this type of inventory, be aware of the following items:
- By default the Stand-Alone process will try to post to the Server URL. If this URL is unavailable during the process the inventory will not be sent, essentially making it a failure. This includes if the server is busy.
- Records created by this Inventory are subject to Purging Maintenance, which can retire or delete computer records.
- Records created by this Inventory consume inventory licenses just like any managed endpoint.
- Stand-alone Inventory Packages (EXEs) should be updated with newer versions when the server is upgraded.
- In version 7.1 a Stand-Alone Inventory could not be run on a system installed with the Symantec Management Agent. In 7.5 this now works without an issue.
Agentless Inventory
This type of Inventory is SNMP network based. Not to be confused with Stand-Alone Inventory, Agentless is primarily meant for network devices.
Adding MIBs to Agentless Inventory
Obtaining updated or adding additional MIBs for Agentless Inventory is necessary for most newer devices. We provide many MIBs by default, but not all our MIBs are the latest, and not all manufacturers or available MIBs are included. Obtaining the MIBs desired is a process of checking with the manufacturers of your network devices. Web sites exist that carry many of the newest MIBs. It is up to the administrator to obtain the MIB files. Once obtained, the following method can be used to add or update MIBs into the MIB library.
Depending on how many MIBs you want to add, the following methods can be used. For one or many MIB file imports, follow these instructions.
- In the Symantec Management Console, select under Manage > Jobs and Tasks > in the left-hand pane browse to a folder you’d like the MIB import task to reside, for example under System Jobs and Tasks > Discovery and Inventory > Inventory.
- Right-click on the folder and select New > Task.
- In the left-hand pane where all task types are listed, look under the Monitoring and Alerting section and select MIB Import.
- Select the radial for either Import all MIB files, or Import ONE MIB file only. (NOTE: Some versions have issues with the multi-file import. If that is working, you may need to import them one at a time)

- Click OK to save the Task.
- Once the Task is saved and appeared in the main console, click the Browse button and browse to the MIB you wish to import.
- Click the Upload button. You will see the uploaded MIB shown in the task. This is only half the process, so don’t stop now!
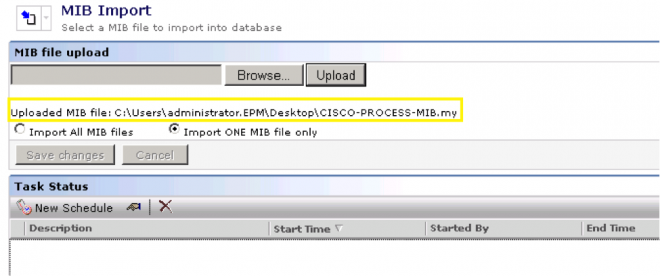
- Click Save changes! Without this step running the task will not upload the MIB. You can tell if this step hasn’t been done if the Save changes button is active.
- Now click New schedule. Leave it as Now.
- Click Schedule and let the MIB import. The MIB will now be available for use with Agentless Inventory.
Initial Network Discovery
Once you’ve added the MIBs for devices you know are on your network, no additional configuration items need to be done at this point. Run a Network Discovery using the following method:
- In the Symantec Management Console, select under Manage > Jobs and Tasks > in the left-hand pane browse to a folder you’d like the Network Discovery task to reside, for example under System Jobs and Tasks > Discovery and Inventory > Inventory.
- Right-click on the folder and choose New > Task.
- In the left-hand pane where all task types are listed, look under the Discovery and Inventory section and select Discover Network.
- Now choose a method to discovery network devices on your network. Note the following items when running Network Discovery:
- For the most complete results, use the Scan network Devices (ARP) and input the IP Address of a Seed Device (Router, Switch) that has access to the rest of the Network. Generally this device will query other switch/routers for additional device details.
- You can also use an IP Address range.
- More than one policy can be created for different segments on the Network.
- Usually the default settings for scan properties will suffice.
- Under the Connection profile, please include all applicable Community Strings for your network devices, common delimited. Without the proper strings, Inventory cannot later be collected from devices that do not respond to the provided Strings.
- To watch the progress of the discovery, in the Symantec Management Console browse under Home > Discovery and Inventory > Network Discovery. In the bottom pane you will see all listed Tasks for Network Discovery, including a Percentage Complete column.
Device Classification
Once you’ve discovered all devices on your network, the next step is to review the data and find what devices have not been correctly classified.
Review Classifications
Follow these steps to review classifications.
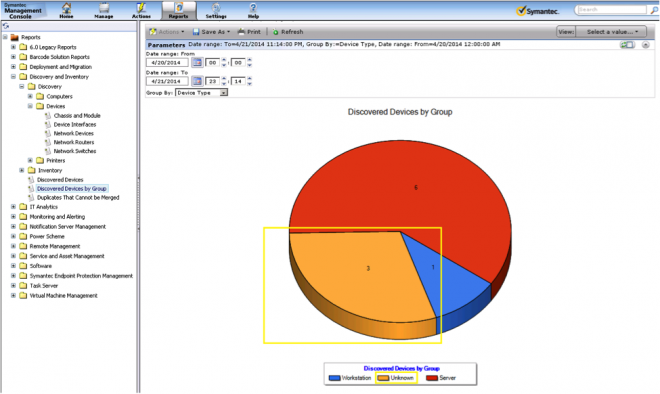
- In the Symantec Management Console, go to Reports > All Reports > browse in the left-hand tree under Discovery and Inventory > and select Discovered Devices by Group.
- Note that the default date range in the report may not provide all your devices. Make sure you adjust the date so that all Discovery tasks are accounted for.
- In the pie chart, find the category for Network Resource. Click on that part of the chart to be taken to the Discovered Devices report listing those devices. Another category to look at is Unknown.
- You can review the Device Name field to figure out what the device is. If you only have an IP Address, this makes it difficult to identify what type of device it is.
- Further information can be gathered by double-clicking on a row in the report to bring up Resource Manager. If you click under View > Inventory and review the Network Device data class data, you may be able to find more information.
- Devices that show no SysObject ID are not responding to SNMP and may be computers.
- If your device is not known and you cannot figure it out by what we gather, it is recommended to manually add the device types you know about in your network.
- Move on to the next section to add classifications.
Setting up Classifications for Unknown Devices
Use the following method to setup classifications for your devices. Note that before you run an Agentless Inventory you will want to run these steps to make sure your devices are properly setup and classified.
- In the Symantec Management Console go to Settings > All Settings > browse in the left-hand pane under Discovery and Inventory > SNMP Settings > and select SNMP Device Classifications
- Click the Add button.
- Provide the SNMP object ID. Note that if you do not know this, you may have to check with the Manufacturer’s documentation. Each make and model has a specific OID assigned to it in the SNMP tree.
- Under the Device Type, make sure you choose the correct type. This information will help you properly identify what type of device it will be reported as.
- Provide the Manufacturer and Device Model for reporting and tracking purposes.
- The Resource type is essential as this is the type of Resource this device will be created as within the Symantec Management Platform infrastructure. For switches and routers, Infrastructure Device is the appropriate category. These types can be viewed within the Resource Organizational Groups.
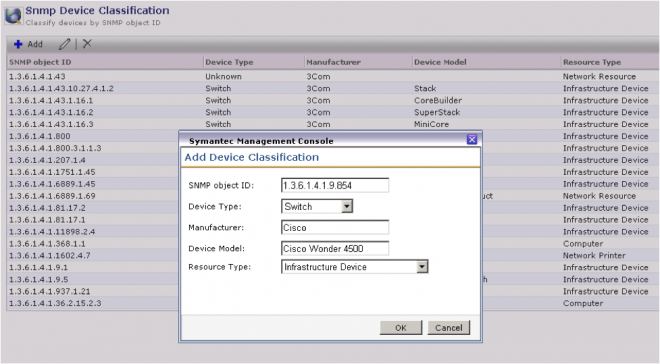
- Click OK when done.
- Repeat the steps for each make and model you own in the environment. These Classifications are necessary in order to capture Agentless Inventory for these devices. Without a matching classification devices will not pull additional SNMP data through the Inventory for Network Devices Tasks.
Repeat Network Discovery
A Discovery must be run again to properly classify those devices that match the classifications you configured in the above process. It is recommended to rerun all Discover Network tasks you ran previously to have the correct classifications set to them. This step is essential as setting up classifications does not retroactively change devices from Unknown or Network Resource to the new classification. Only running another Discover Network Task will do this.
Managed Resource Criteria
The Primary key can be one of three items captured by the Discovery.
- NetBios Information: Name.Domain (Note: It must be both halves: the name and domain)
- MAC Address
- GUID (assigned by the Notification Server)
If the discovered device doesn't provide the above information, the resource cannot be created into a "Managed" device. NetBios will be used as the primary key if present; otherwise the MAC Address will be used. The following items are also used when creating the resource to avoid potential Resource Device duplication:
Agentless Inventory Configuration
The following process should not be conducted until Network Discovery has been properly configured and run. This process details how to configure Inventory Solution for Network Devices (Agentless Inventory) to capture details on your network.
MIB Configuration
This process can be the most exhausting. Note that the desired MIBs should already have been imported into the system using the method detailed in the previous sections. MIBs can be added later, but it is recommended to have it done previous to this section since adding MIBs that contain the data you need must be imported to complete all the steps in this section.
Creating New Data Classes
The following processes can be used to create additional tables to hold data on SNMP calls you configure. Below are some considerations if you have a lot of data configured, or if you want to ensure you are not duplicating effort.
- The first thing that must be done before creating a table is to check to see if the OID you wish to map is already mapped in another table. The following query will accomplish this:
SELECT * FROM SNMPOidEntry
	WHERE oid = ‘<The OID number being queried>’
		Example:
		SELECT * FROM SNMPOidEntry
		WHERE oid = ‘1.3.6.1.4.1.1991.1.3.27.2’
- If the above query returns data, you can use the following process to determine where that OID is already being called from.
Using the above results, take an OID to discover the GUIDs of the tables the OID resides in:
SELECT DataClassGuid, Oid
	FROM SNMPTableMap
	WHERE Oid = ‘<OID taken from step 1 query>’
- Take the GUIDs from the above query and use the following query to obtain the Table name:
SELECT [Name], Guid
	FROM Dataclass
	WHERE Guid = ‘<Guid from step 2 query>’
Configuring a New Table
To add a new table, and thus configure the engine to capture additional SNMP information, use the following process.
- In the Symantec Management Console go to Settings > All Settings > browse in the left-hand pane under Discovery and Inventory > SNMP Settings > and select SNMP Data Mapping Tables.
- Click the New button in the upper left of the right-hand pane.
- Give the table a name (NOTE: For consistency purposes, it is recommended you use SNMP as the prefix to your tables). The name cannot be an existing table name in the Symantec database. Whatever name is provided, the resulting name will be converted as indicated:
- Name provided: SNMP My Data
- Actual table name: Inv_SNMP_My_Data
- Click the New button under the Table columns section. This is essentially adding columns to your table, and providing details of what to gather via SNMP to put in those columns.

- Provide a name for the column. This will be the literal column name within the database.
- Provide the Type. String works for most data. These are data types known to SQL, and specific data types will provide useful functions for queries and other SQL transactions.
- The Length field needs to be long enough to hold the data captured. If you are uncertain, provide a larger number as a buffer.
- The Key box typically will not be checked. The table will inherently already have a key field, that of the GUID of the device. Only data that is essentially to be unique to a system, such as the Serial Number, should be marked as Key. This also sets the column to not allow NULLs.
- Click the hyperlink Select OID to launch the Object ID Selection Tool.
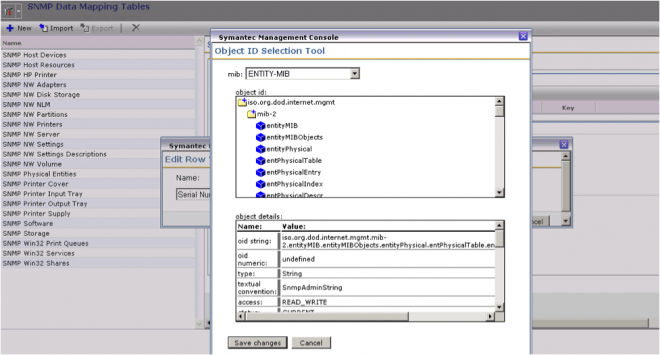
- Use the mib dropdown to find the MIB you wish to query from. If it is not in the list, you may need to repeat the steps to import the proper MIB.
- In the object id: section, click on the folders to expand the section. The blue-box items represent OIDs via their names. When you click on one the details will appear in the object details: section. Once the value is found, click the Save changes button to apply the current selection.

- Note that the Object ID is now displayed. Double-check to ensure this is the value you wish. Consult the manufacturer’s documentation for further guidance, since the name and OIDs themselves do not provide a lot of data on what will be gathered.
- Repeat the steps for every column required for the table. Note that if there are many desired values, do not put them all in one table. Limit a table to 10 or so columns. This will achieve the following:
- Helps the Notification Server more easily process the incoming NSEs that contains the captured data
- Avoid limits imposed by the Data Loader and SQL on the amount and length of the columns
- Once complete, Save changes on the table to save our progress.
- Now click on the Data mappings tab.
- THIS STEP IS ESSENTIAL! In this list are all the data mappings available. You must select every device type you wish to capture data for this data class. Without any selection, no data will ever make it into this table.
NOTE: Make sure you apply everything you want, as any Save changes after the initial save will cause the table to be recreated, dumping any data that might already be in it.
‘Get Next’ – Understanding the method
Inventory Solution for Network Devices (Agentless Inventory) uses the ‘Get Next’ call to obtain the value for a supplied OID. This is used to avoid issues with improper responses to a ‘Get’ request. However we use a ‘Walk’ method within the same SNMP branch to traverse for the next value. See the below Examples for clarification.
Example 1 – Next value in the same branch
This example shows the next value that we will return should the supplied OID not provide a response:
1.3.6.1.2.1.4.21.1.8 = No Response → 1.3.6.1.2.1.4.21.1.9 = No Response → 1.3.6.1.2.1.4.21.1.10 = Value.
Note that this value resides in the same branch as the supplied OID. We do capture the value.
Example 2 – Next value not in the same branch This example shows the next value that we will not return should the supplied OID not provide a response:
1.3.6.1.2.1.4.21.1.8 = No Response → 1.3.6.1.2.1.4.21.1.9 = No Response → …1.3.6.1.2.1.4.46.2.1 = Value.
Note that the branch is different, meaning 1.3.6.1.2.1.4.46… does not reside in the 1.3.6.1.2.1.4.21 branch. We will not capture this value.
SNMPutilg.exe – Testing against devices
This utility can be used to test OIDs against a particular device. Other utilities are available that can test SNMP queries. To obtain this utility, access this KB article:
http://www.symantec.com/docs/HOWTO5103
Use the ‘Get’ method to see if the OID you are supplying returns any data. If not, switch to the ‘Get Next’ method to see what the next OID is. If it’s outside of the current branch, Altiris will not capture that OID. You can see what results, and if it’s the value you’re looking for, use the returned OID.
NOTE! Using this utility you need to put a ‘.’ at the beginning of the OID you are querying, and a .0 at the end. This is usually required!
This section only covers the basics for creating new Inventory Solution for Network Devices data classes/Tables. Any added tables should be tested before being rolled out in a Production environment.
Conclusion
This document did not cover UNIX, Linus, and Mac devices, nor any Application Metering functionality that are both part of Inventory Solution. I hope this helps when troubleshooting Inventory Solution issues. Feel free to distribute this document/article as it is provide for use. Note that this document is not provided with any guarantees or implied support, and should be used as a reference resource.
Return to Part 3: Troubleshooting Inventory Solution 7.5 (also 7.1), Part 3
Read Part 1: Troubleshooting Inventory Solution 7.5 (also 7.1), Part 1
Read Part 2: Troubleshooting Inventory Solution 7.5 (also 7.1), Part 2