Troubleshooting issues with the Intel® AMT setup and configuration process can be a daunting prospect. This series walks through the troubleshooting methods to pinpoint where problems originate and how to fix them.
The following sections are provided within this series:
This should cover all major points when using vPro within the Symantec Management Platform.
Part 1: Setup and Configuring Client Systems
Versioning
Amt Setup
Troubleshooting Tools
AMT Logs
OOB Trace Logging
Wireshark
Symantec Endpoint Management Knowledgebase
Symptoms
System Missing
Setup and Configuration Server
There are several modes a vPro capable system can be in when it arrives at the customer site. The modes are:
- AMT disabled
- AMT enabled, not in Setup Mode (factory default)
- AMT enabled, not in Setup Mode (Password has been changed in the MEBx)
- AMT enabled, in Setup Mode for TLS-PSK
- AMT enabled, in Setup Mode for Remote Configuration
- 4 and 5 in 'Hello' Packet Mode disabled
Each of the modes have their own quirks, and understanding the modes will help determine what state a system is in, and how to change a system from one state to another.
Versioning
It is important to understand the different versions of not only the local AMT build, but of Altiris' Out of Band Management with the Intel SCS Component. See the following table:
| OOBM |
Intel SCS |
AMT |
| 7.0+ |
5.0+ |
2.0 |
| " |
" |
2.1 |
| " |
" |
2.2 |
| " |
" |
2.5 |
| " |
" |
2.6 |
| " |
" |
3.0 |
| " |
" |
3.1 |
| " |
" |
4.0 |
| " |
" |
5.0 |
| 7.0 SP3 |
5.3 |
6.0 |
NOTE: Out of Band Management 7.1 will install SCS 5.4 and provide greater support for AMT 6.0. Version 7.0 SP3 has limited support for 6.0. Please see the release notes for this release for more information.
Note the following points when working with the different versions:
- Versions 2.0, 2.1, 2.5 do not support Remote Configuration
- Versions 2.5 and 2.6 represent notebooks
- Versions 2.2 and 2.6 represent upgrades to versions 2.0, 2.1 and 2.5 respectively and provide the additional functionality of using Remote Configuration for Setup and Configuration.
- Versions 3.0 and 3.1 represent desktop systems.
- Version 4.0 represents notebooks, and includes RCFH (Remote Call For Help) technology, formerly known as CIRA (Client Initiated Remote Access).
- Version 5.0 represents desktops and contains KVM functionality.
- Version 6.0 will represent both desktops and laptops and contains KVM full remote control features.
AMT Setup
Each mode for AMT sets the system in a specific state. See the brief descriptions below of how AMT acts in each state:
- AMT disabled - In this situation AMT must be enabled either manually by looking into the Intel MEBx (Ctrl+P at startup) or by using the Activator Tool. The following article covers the use of this tool, including data on the command-line switch that can be used to enable AMT:
- AMT enabled, not in Setup Mode (factory default) - This is the required mode to use USB One-Touch for setup and configuration. If a user or the OEM has logged into the MEBx and changed the password, the system is no longer in factory default and the One Touch method will not work.
- AMT enabled, not in Setup Mode (Password has been changed in the MEBx) - One Touch will not work, but manually entering the PSK or setting into Remote Configuration mode will allow the system to enter Setup Mode.
- AMT enabled, in Setup Mode for TLS-PSK - All setup and configuration is encrypted using TLS, however the inner security workings can differ. For Pre-shared Key (known as PID PPS) a public and private key are used. The manufacturer can set a specific PID PPS on the system or a user can auto-generate them. The key is that both the client and server have to have the key in order for authentication to work.
- AMT enabled, in Setup Mode for Remote Configuration - All 2.2, 2.6, 3.0, 3.1, 4.0, 5.0, 6.0 versions AMT systems come in this mode unless the OEM is explicitly instructed to set it differently. The point of Remote Configuration is to avoid visiting the AMT system in order to get it configured for manageability use.
- Modes 4 and 5 in 'Hello' Packet Mode disabled - This is common if the system is not immediately hooked up to the production network. All systems will fall into this state if they transmit the 'hello' packet for 24 hours.
Troubleshooting Tools
Before we get into the actual symptoms, we'll cover the tools used to determine where the problem is coming from. While not easy to use, the logging capabilities allow us to verify if the correct processes are functioning on the local system.
AMT Logs
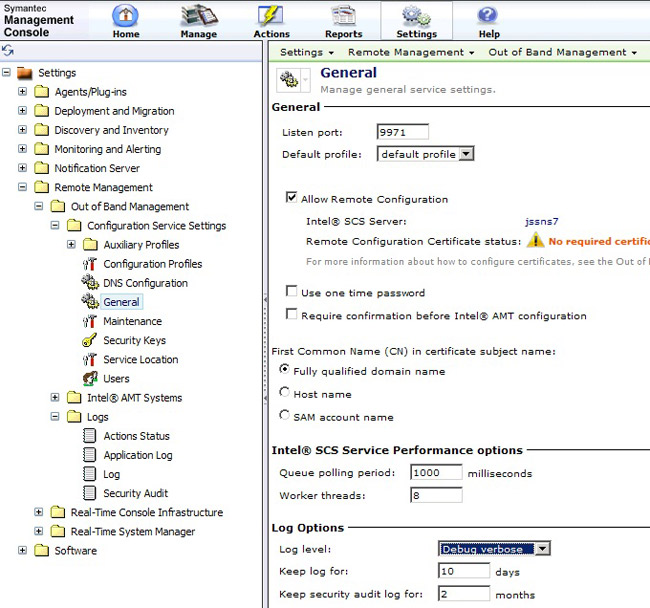
The Altiris Console has direct ties into the AMT Logs captured in the IntelAMT database as a normal part of operation. The Logging level is set in the Symantec Management Console under Settings > All Settings > Remote Management > Out of Band Management > Configuration Service Settings > and select General. Debug Warning is recommended so you get both Errors and Warnings.
The logs are accessed from Out of Band Management > Logs > and select 'Log'. Entries here will reveal problems during the setup and configuration process and other Intel SCS functions.
OOB Trace Logging
Out of Band Management has the ability to log trace details to a debugging program. Trace logging can be invaluable in discovering the cause of any generic error message, or for issues where something does not work but no visible errors are thrown. While the trace data can often be difficult to sift through, it is the place to discover the true cause of the issue.
Setting Up the Trace
To enable trace logging in Out of Band Management, follow these steps:
- Go to Start > Run, type Regedit, and click OK.
- Browse to HKEY_LOCAL_MACHINE > SOFTWARE > Altiris > eXpress > Notification Server > ProductInstallation.
- Use Ctrl + F to open a search window.
- Type Out of Band Management and search for matches. One will be the latest version of Out of Band Management (the Name value of the GUID folder will let you know if you've found the right one).
- Under the GUID folder found, create a DWORD value within the key labeled: TraceLevel (case sensitive).
- Set the value at FF hex, or 255 decimal, as shown in this screenshot:
- Download dbgview.exe (DebugView from Sysinternals/Microsoft) from www.sysinternals.com (you'll be redirected to Microsoft), click into the Miscellaneous section, and download Debugview. Note that you can use another debugger program to capture the trace elements, but this utility is free to download and easy to use.
- Execute dbgview.exe or preferred debugger.
- Ensure all Capture options are checked under the 'Capture' menu.
- Leave the trace running and when the error or problem is manifest, there should be corresponding entries in the trace.
- Use the Save command when trace logging in complete.
Tips for examining the log
The trace elements are not user friendly to read, but text messages should appear. The following details provide assistance when reading the trace data in conjunction with errors:
- Do not actively use the Setup and Configuration nodes in the Symantec Management Console while capturing as this will generate a lot of trace data.
- Search for terms that relate to your issue, such as 'OOBProv' to find entries related to the Properties Script Failed error.
- As a reference, here is an entry concerning problems finding the FQDN during configuration:
00012371  2741.16528320  [736] [D][44424] Searching by uuid = 'FA535827-ECD4-11DB-BBDA-4BC2BCEE001A'...
00012372  2741.16528320  [736] [D][44424] Executing 'sp_OOBSC_FindResource', parameters:
00012373  2741.16528320  [736] [D][44424] @UUID: FA535827-ECD4-11DB-BBDA-4BC2BCEE001A [String]
00012374  2741.16552734  [736] [D][44424] @FQDN: [String]
00012375  2741.16552734  [736] [D][44424] @HostName: [String]
00012376  2741.16577148  [736] [D][44424] @IP: [String]
00012377  2741.16577148  [736] [D][44424] @MAC: [String]
00012378  2741.28198242  [736] [D][44424] Result:
00012379  2741.28222656  [736] [D][44424] Executing 'sp_OOBSC_FindResource', parameters:
00012380  2741.28222656  [736] [D][44424] @UUID: 275853FA-D4EC-DB11-BBDA-4BC2BCEE001A [String]
00012381  2741.28295898  [736] [D][44424] @FQDN: [String]
00012382  2741.28295898  [736] [D][44424] @HostName: [String]
00012383  2741.28295898  [736] [D][44424] @IP: [String]
00012384  2741.28295898  [736] [D][44424] @MAC: [String]
00012385  2741.32055664  [736] [D][44424] Result:
00012386  2741.32275391  [736] [D][44424] Can't find resource for 'FA535827-ECD4-11DB-BBDA-4BC2BCEE001A'
00012387  2741.32275391  [736] [D][44424] No FQDN/ADOU found in NS DB for 'FA535827-ECD4-11DB-BBDA-4BC2BCEE001A'
00012388  2742.61450195  [736] [D][44424] No FQDN/ADOU found for 'FA535827-ECD4-11DB-BBDA-4BC2BCEE001A', new AMT mapping can't be created
*Note that the FQDN search would find this entry.
Useful Search strings include:
- FQDN - Since FQDN discovery is a common cause of this issue, this becomes a recommended search.
- UUID - Altiris SCS uses the UUID as the prime identification of a system, and problems associated with it are important to find.
- Can't - This can reveal messages relating to failed functions.
- Error - A generic but effective search string.
- Exception - Exceptions in the code are important to find.
- OOBprov - As this is the primary tool used to configure AMT systems by Out of Band, it is a good search term to use.
- Failed - If the process fails at something, it's good to know.
Wireshark
While the two above tools are distinctly for Out of Band Setup and Configuration, Wireshark tells the whole story of what is coming and going across the wire. It's important to know what the AMT clients are sending, especially in the 'Hello' packet, and what the server is responding with.
Wireshark can be obtained from: http://www.wireshark.org/. While this is the recommended tool, any network trace capture program can be used to examine the network traffic between the AMT client and the Setup and Configuration Server.
Symantec Endpoint Management Knowledgebase
All know errors and issues we've run across have been documented in the Symantec Knowledgebase. If you have a specific error, search in the KB and see if we have a documented fix for it. Access it directly here:
- http://www.symantec.com/business/support/index?page=home
Symptoms
The following symptoms point to problems with the local AMT system or its ability to communicate to the Setup and Configuration Server so that configuration can occur.
System Missing
A common symptom for new AMT client systems is that the system, even if believed to be in Setup Mode, doesn't show up in the Symantec Management Console under Intel® AMT Systems. The causes vary, but the following methodology should help pinpoint where the problem originates.
Is the system sending 'Hello' packets? Walk through this procedure to determine if it is or not:
- Does the AMT Log contain entries for the system requesting setup and configuration? The identifier in the logs is the UUID. One example of an error that would prevent a system from showing up is 'failed to find PID mapping', meaning the requesting system is trying to authenticate with a PID that the Server does not have. Either import any keys provided by the OEM or other provider, or manually enter in the PID PPS under the 'Security Keys' section of the Setup and Configuration Symantec Management Console.
- If no entry appears for the system, place Wireshark on both the AMT client and the Server. Now initiate a restart of the 'Hello' packet sequence by turning the AMT client off and unplugging it from power. Drain the capacitors by pressing the power button while unplugged. Generally the power LED will light for a moment before fading dark. Plug the system back in. Does the Server show hello packets (sending on port 16994, with destination port 9971) coming in from the system?
- If the server doesn't show any incoming 'Hello' requests, fire up Wireshark on the local system to see if we see any 'Hello' packets heading out. If they are actively leaving, something is blocking the traffic from reaching the Notification Server. These ports are standard TCP calls. See the next section labeled 'Setup and Configuration Server'.
- If no 'Hello' packets are being sent, the system may be in a non-Setup State. At the AMT system access the Intel MEBx by pressing Ctrl+P at startup. Is the password what was setup during Setup Mode, or will it only accept Admin? If none of the valid passwords work, this machine may be in an unworkable state. Unplug the CMOS battery for 15 seconds to put the machine back in Factory Default Mode, and Setup as necessary.
Setup and Configuration Server
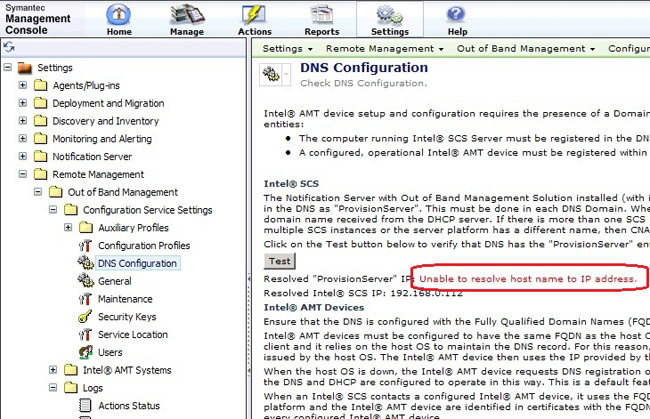
With Wireshark we can prove a system is sending 'Hello' packets out on the wire. The destination is an important distinction as usually this will be simply the name ProvisionServer. By default, Remove Configuration and TLS-PSK will target the simple name ProvisionServer. It's up to the administrator to properly direct that Hello packet to the Notification Server.
- If you ping ProvisionServer from a command-prompt, do you get the IP Address of the Notification Server? A CNAME record needs to be created in DNS to correctly direct the hello packets. Check page 21 of the Admin guide located at this KB article: http://www.symantec.com/business/support/index?page=content& id=DOC1503 for more information.
- Another place you can test the DNS functionality is under Setup and Configuration in the Symantec Management Console. Select the 'DNS Configuration' node. Click the 'Test' button to initiate the test. A correct IP Address signifies that DNS is working correctly from the Notification Server. The ping test is still important to signify that the client can also resolve the name.
- If the network cannot support this CNAME, only two methods remain. You can set the Setup and Configuration Server IP in the MEBx directly. You can also use the Activator Tool to simulate the Hello packet and send it to the NS directly (see the previous link under AMT Setup for details on the Activator Tool).
Read Part 2: Setup and Configuration - Intro to Server Components