Content:
- What is vShield-enabled Shared Insight Cache?
- Software requirements and prerequisites
- Installing vShield Endpoint on ESXi hosts
- Configuring the Symantec Endpoint Protection Security Virtual Appliance installation settings file
- Installing a Symantec Endpoint Protection Security Virtual Appliance
- Installing the EPSEC driver on GVMs
- Enabling Symantec Endpoint Protection clients to use a vShield-enabled Shared Insight Cache
- About vShield
- About vShield-enabled Shared Insight Cache
- How to upgrade the Symantec Endpoint Protection Security Virtual Appliance 12.1.2 to 12.1.5
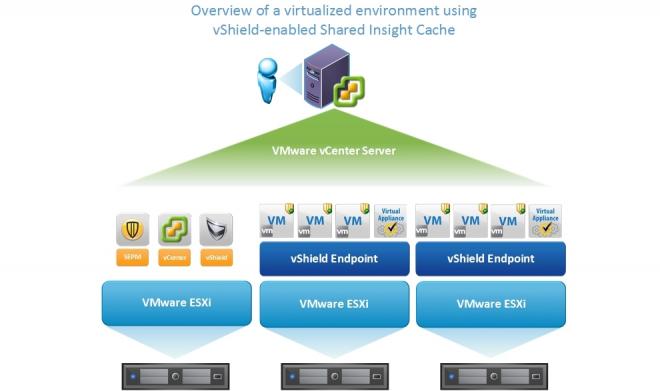
What is vShield-enabled Shared Insight Cache?
Virtual clients in a VMware vShield infrastructure can use a vShield-enabled Shared Insight Cache to reduce scan loads. A vShield-enabled Shared Insight Cache runs in a Symantec Endpoint Protection Security Virtual Appliance. You must install the appliance so that Windows-based Guest Virtual Machines (GVMs) can use VMware vShield Endpoint to access the Shared Insight Cache.
A Symantec Endpoint Protection Security Virtual Appliance is a Linux-based (CentOS 6.2) virtual appliance that you install on a VMware ESX/ESXi server. Symantec Endpoint Protection Security Virtual Appliance integrates with VMware's vShield Endpoint and hosts the Symantec Endpoint Protection Shared Insight Cache server. Shared Insight Cache lets Guest Virtual Machines (GVMs) share scan results so that identical files need to be scanned only once across all GVMs on the ESX/ESXi host. Shared Insight Cache improves performance of full scans by reducing disk I/O and CPU usage.
Symantec Endpoint Protection vShield-enabled Shared Insight Cache eliminates the need to scan the files that Symantec Endpoint Protection has determined are clean. When a Symantec Endpoint Protection client scans a file for threats and determines that it is clean, it submits that information to Shared Insight Cache. When the same or another client subsequently needs to scan the same file, the client queries the cache to determine if it is a known clean file. If the file is known to be clean, the client can bypass virus scanning on that particular file. If the file is not known to be clean, the client scans the file for threats and submits those results to Shared Insight Cache.
Notes:
- Symantec supports the use of the Security Virtual Appliance only in VMware ESX/ESXi infrastructures
- Shared Insight Cache is only used for scheduled scans and manual scans.
- Symantec supports the use of the Shared Insight Cache feature only in virtual infrastructures.
Software requirements and prerequisites
VMware software requirements and prerequisites for installing a Security Virtual Appliance
VMware ESXi server software:
- From ESX 4.1 with Patch ESX410-201107001 and/or later.
VMware vShield software:
- VMware vShield Manager 5.0 Update 1 or later.
See VMware downloads at https://my.vmware.com/web/vmware/downloads.
Symantec software requirements and prerequisites for SEP clients to use the Symantec Security Virtual Appliance (SVA)
Symantec Endpoint Protection software:
- Symantec Endpoint Protection 12.1 RU2 or later (clients and server).
Symantec Security Virtual Appliance:
- Symantec_Endpoint_Protection_12.1.5_Security_Virtual_Appliance_ML.ova
Symantec Security Virtual Appliance Installer:
- Available from the Tools package in folder Virtualization\SecurityVirtualAppliance.
See Symantec downloads at https://symantec.flexnetoperations.com/control/symc/registeranonymouslicensetoken.
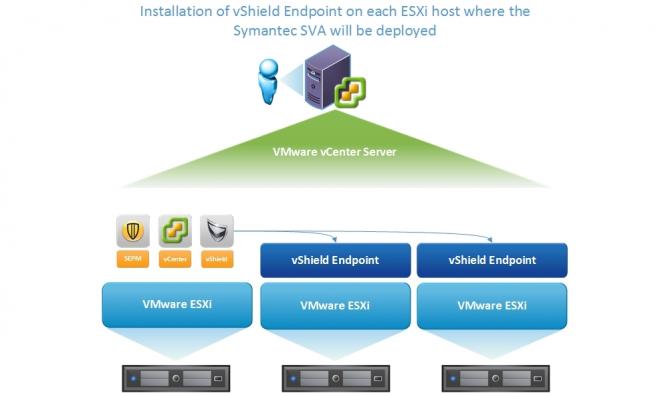
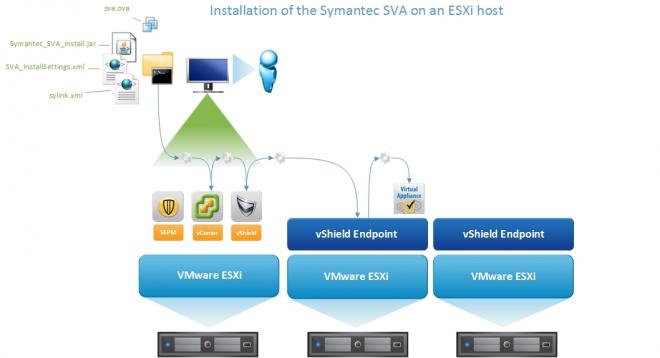
Installing vShield Endpoint on ESXi hosts
To install and register the Symantec Security Virtual Appliance with vShield Manager, vShield Endpoint must be installed on each ESXi host where you plan to deploy the SVA.
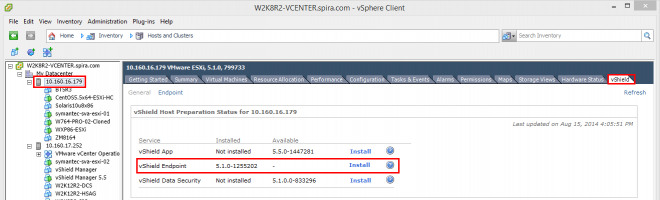
- From the vSphere Client, select the ESXi host,
- From the vShield tab, click on the Install link next to vShield Endpoint to start the installation.
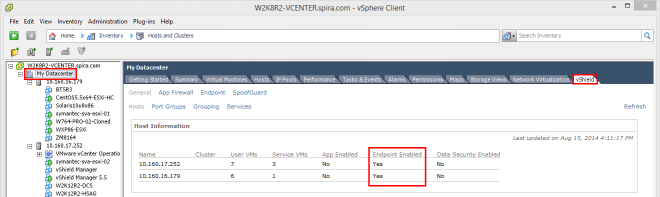
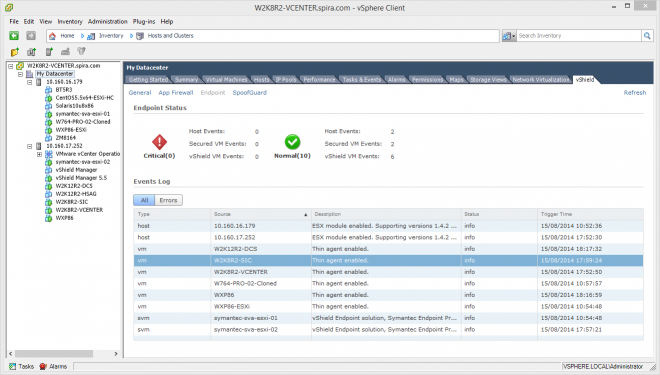
From the vShield tab of your the datacenter, the host is shown with Endpoint Enabled as Yes:
Configuring the Symantec Endpoint Protection Security Virtual Appliance installation settings file
To install the Symantec Endpoint Protection Security Virtual Appliance, a Sylink.xml file from the client group that you plan to use for your Guest Virtual Machines (GVMs) is required for the SVA to register with the SEPM server.
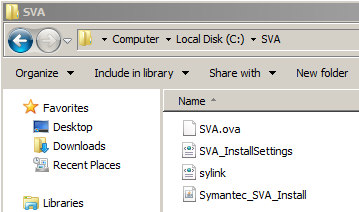
You must then configure the SVA_InstallSettings.xml file before you can install the Security Virtual Appliance. This file is located in the Virtualization\SecurityVirtualAppliance folder of the Tools product disc.
For convenience, you may want to copy all the files to the same folder on the computer from which the installation will be performed. Below example from a Windows system:
Note: All settings are mandatory for installation unless explicitly marked as optional.
|
Setting
|
Description
|
|
VMware vCenter information
- IP address
- User name
- Password
|
Set the VMware vCenter IP address, user name, and password for the Security Virtual Appliance installation.
<vCenter>
<ip_address>192.168.x.x</ip_address>
<username>username</username>
<!--
<password>password</password>
-->
</vCenter>
|
Note:
|
vCenter Administrator user name and password are required to install the Security Virtual Appliance. If you do not configure the password in this settings file, then the installation prompts you for the password.
|
Note that to install or uninstall the Security Virtual Appliance, the vCenter Administrator account that you use must have permissions in the following privilege categories:
- Datastore (All privileges)
- Network (All privileges)
- vApp (All privileges)
- Virtual Machine (All privileges)
- Global > Cancel Task
You cannot set these permissions from the Symantec Endpoint Protection Security Virtual Appliance installation settings file.
|
|
VMware vShield Manager information
- IP address
- User name
- Password
|
Set the VMware vShield Manager IP address, user name, and password for the Security Virtual Appliance installation.
|
Note:
|
vShield Administrator credentials are required to install the Security Virtual Appliance. If you do not configure the password in this settings file, then the installation prompts you for the password.
|
<vShield>
<ip_address>192.168.x.y</ip_address>
<username>admin</username>
<!--
<password>default</password>
-->
</vShield>
|
|
Installation settings
- Symantec Endpoint Protection Security Virtual Appliance OVA file location
- ESXi host IP address
sylink_xml file location- Datastore prompt
|
Provide the information that guides the Security Virtual Appliance installation.
The installation package is the Symantec Endpoint Protection Security Virtual Appliance OVA file that you download from File Connect at https://fileconnect.symantec.com. To access File Connect, you need to have the activation serial number that is part of your license certificate available.
The sylink.xml file contains the client group communication settings that you exported from the Symantec Endpoint Protection Manager.
You can change the datastore prompt to zero if you want to install automatically on the first datastore for the ESXi host.
<Installation>
<location_of_package>path to OVA file</location_of_package>
<esx_ip_address>192.168.x.z</esx_ip_address>
<sylink_xml>./sylink.xml</sylink_xml>
<datastore_prompt>1</datastore_prompt>
</Installation>
|
|
Security Virtual Appliance information
- SVA host name
- SVA admin password
- SVA network settings
(Optional)
- IP address
- Gateway
- Subnet
- DNS
|
Set the Security Virtual Appliance host name. The host name must be unique within the vCenter. The host name is limited to alphanumeric characters and the hyphen character.
The login account name for the Security Virtual Appliance is admin.
|
Note:
|
If you do not configure the admin account password in this settings file, then the installation prompts you for the password.
|
Optionally, you can configure the Security Virtual Appliance network settings. By default the network settings are commented out and installation defaults to use DHCP. You are not required to use network settings to install a Security Virtual Appliance.
|
Note:
|
If you want to specify one of the Security Virtual Appliance network settings, you must uncomment and specify all four of them. If you specify only one to three of the network settings, the installation fails.
|
<sva>
<hostname>Symantec-SVA</hostname>
<admin_password>symantec</admin_password>
<!--
<ip_address>192.168.x.w</ip_address>
<gateway>192.168.x.v</gateway>
<subnet>255.255.255.0</subnet>
<dns>192.168.x.u</dns>
-->
</sva>
|
Installing a Symantec Endpoint Protection Security Virtual Appliance
After you have met the prerequisites, you can install the Security Virtual Appliance. You use the Security Virtual Appliance installation tool from the command line.
You must install a Security Virtual Appliance on each ESXi host if you want the GVMs on the host to use vShield-enabled Shared Insight Cache.
To install or uninstall the Security Virtual Appliance, the vCenter Administrator account that you use must have permissions in the following privilege categories:
- Datastore (All privileges)
- Network (All privileges)
- vApp (All privileges)
- Virtual Machine (All privileges)
- Global > Cancel Task
Note: As part of the installation process, the Security Virtual Appliance and its associated ESXi host registers with vShield Manager. For this reason, you should not use vMotion with the Security Virtual Appliance. A best practice is to use the sva_install.jar utility to uninstall and reinstall the Security Virtual Appliance.
Note: The Java Runtime Environment 7 or later is required to run the Security Virtual Appliance installation tool.
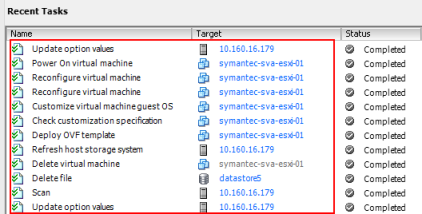
To install a Security Virtual Appliance:
- Take a snapshot of the vShield Manager. During installation, the Security Virtual Appliance registers with the vShield Manager. A snapshot ensures that you can revert to the previous state, in case any Security Virtual Appliance installation issues occur.
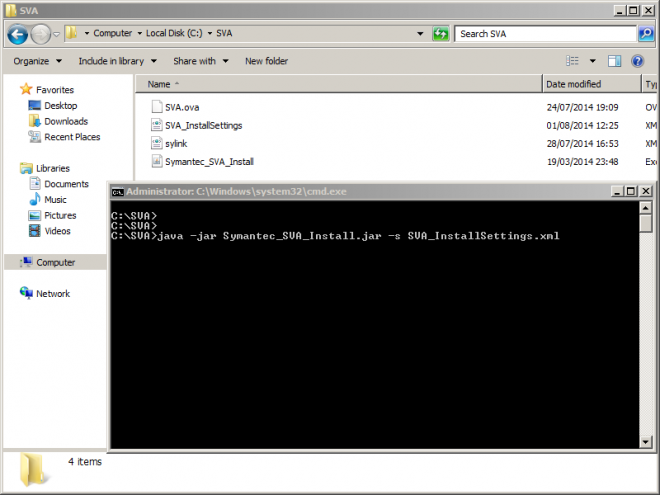
- Open the command line from the folder that contains the Symantec_SVA_Install.jar (Shift + right click > Open command window here) and type the following command:
java -jar Symantec_SVA_Install.jar –s SVA_InstallSettings.xml
- Enter the requested information to complete the installation.
By default, if there is more than one datastore available the installation prompts you to select one. If there is more than one network, the installation prompts you to select one.
Errors and other installation output are written to the SVA_Install.log file. This log file is created in the same directory where you executed the installation command.
Note: In a few instances, the write to that directory may fail. In these cases, the file is written to the /temp directory and is named SVA_Installxxx.log, where the system replaces xxx with a random number.
You can perform the following actions to recover from an incomplete Security Virtual Appliance installation or an aborted Security Virtual Appliance installation.
To recover from an incomplete installation or an aborted installation:
- Check to see if the Security Virtual Appliance is listed under the ESXi host.
- If it is listed, turn off the Security Virtual Appliance and delete it from the disk.
- Revert the vShield Manager to the snapshot that you took before you tried to install the Security Virtual Appliance.
- Reinstall the Security Virtual Appliance.
Once you have installed a Security Virtual Appliance, you can log in with the admin account.
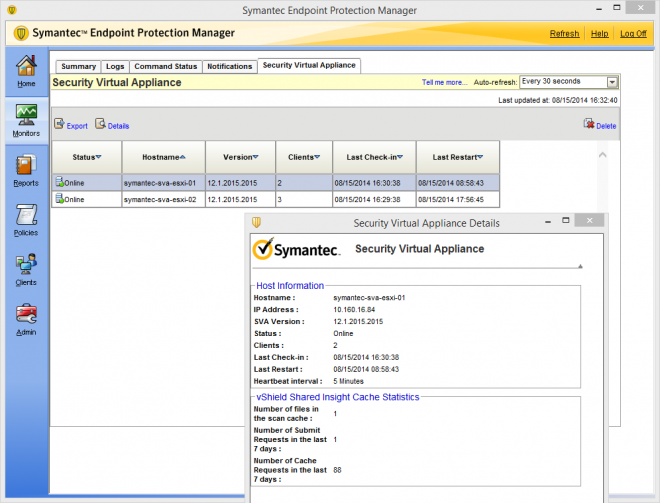
SVAs status from SEPM once the installation and configuration is completed:

Installing the EPSEC driver on GVMs
In order for the GVMs to communicate with the SVA, the VMware EPSEC driver must be installed on all GVMs.
To install the VMware EPSEC driver:
- Select the GVM from the vSphere Client inventory,
- Choose Install/Upgrade VMware Tools,
- On the GVM, choose Custom installation,
- Select VMCI Drivers for installation,
- Restart the GVM when prompt.
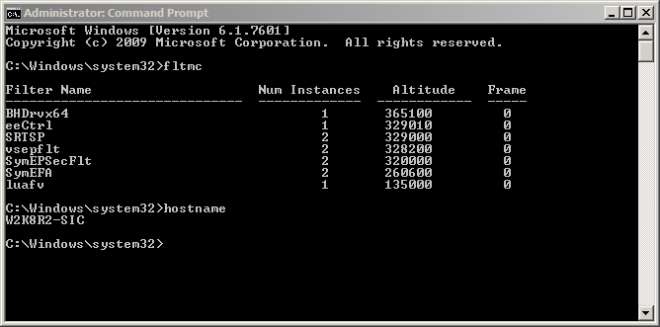
Once installed, run fltmc to confirm the driver SymEPSecFlt is installed and running:
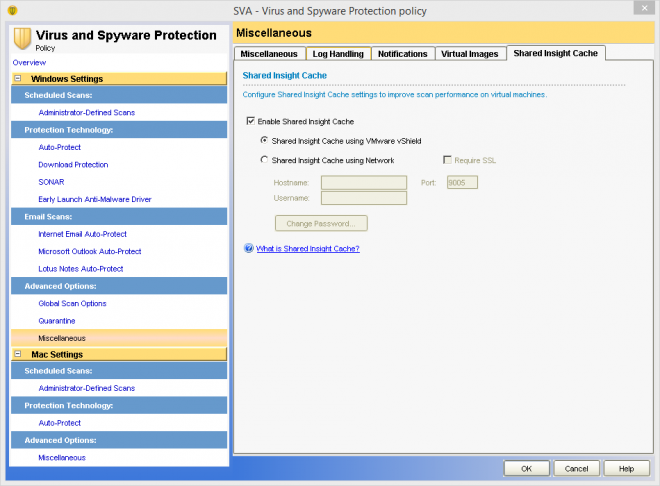
Enabling Symantec Endpoint Protection clients to use a vShield-enabled Shared Insight Cache
To enable clients to use a vShield-enabled Shared Insight Cache:
- In the Symantec Endpoint Protection Manager console, open the appropriate Virus and Spyware Protection policy and click Miscellaneous.
- On the Miscellaneous page, click Shared Insight Cache.
- Check Enable Shared Insight Cache.
- Click Shared Insight Cache using VMware vShield.
- Click OK
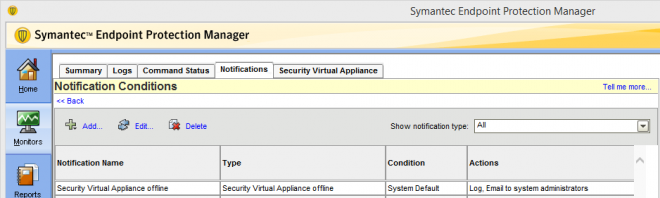
After you enable GVM clients to use a vShield-enabled Shared Insight Cache, you can optionally configure administrator notifications for Security Virtual Appliances that go offline.
GVMs status from SEPM once the installation and configuration is completed:
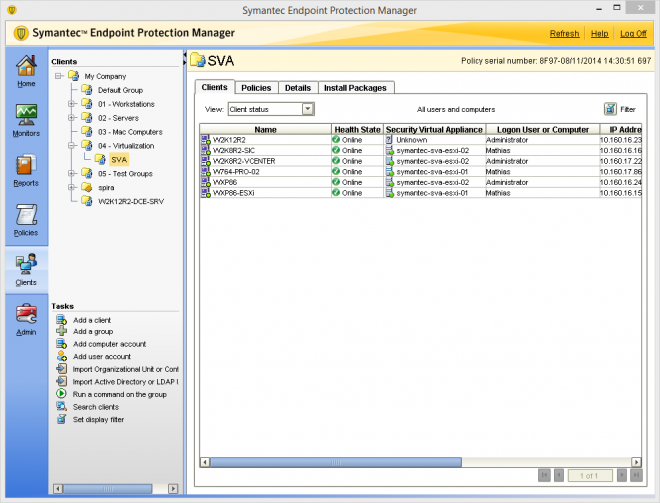
SVA status details from SEPM once SEP clients have registered with their SVA:
From vSphere Client, you can now see your GVMs and SVAs under your Datacenter vShield tab:
About vShield
VMware Tools on vShield Components
Each vShield virtual appliance includes VMware Tools. Do not upgrade or uninstall the version of VMware Tools included with a vShield virtual appliance.
Ports Required for vShield Communication
vShield requires the following ports to be open:
- vShield Manager port 443 from the ESX host, the vCenter Server, and the vShield appliances to be deployed
- UDP123 between vShield Manager and vShield App for time synchronization
- 902/TCP and 903/TCP to and from the vCenter Client and ESX hosts
- 443/TCP from the REST client to vShield Manager for using REST API calls
- 80/TCP to 443/TCP for using the vShield Manager user interface and initiating connection to the vSphere SDK
- 22/TCP for troubleshooting the CLI
About vShield-enabled Shared Insight Cache
Stopping and starting the vShield-enabled Shared Insight Cache service
Once you have installed a Security Virtual Appliance, the Shared Insight Cache service starts automatically. If you want to change the settings in the Shared Insight Cache configuration file, you should stop the service before you edit the file.
To stop the vShield-enabled Shared Insight Cache service:
- Log in to the Security Virtual Appliance as admin with the password that you assigned in the installation settings file.
- On the command line, type the following command:
sudo stop vsic
To start the vShield-enabled Shared Insight Cache service:
- Log in to the Security Virtual Appliance as admin with the password that you assigned in the installation settings file.
- On the command line, type the following command:
sudo start vsic
Service commands for the vShield-enabled Shared Insight Cache
To issue service commands, you must log on to the Security Virtual Appliance using the admin account. The default password is symantec, but you were prompted to change the password the first time that you logged in.
|
Command
|
Description
|
|
sudo start vsic
|
Starts the vShield-enabled Shared Insight Cache service.
|
|
sudo stop vsic
|
Stops the vShield-enabled Shared Insight Cache service.
|
|
sudo restart vsic
|
If the vShield-enabled Shared Insight Cache service is running, stops the vShield-enabled Shared Insight Cache service and then starts it again.
|
|
sudo status vsic
|
Returns the status of the vShield-enabled Shared Insight Cache service.
|
How to upgrade the Symantec Endpoint Protection Security Virtual Appliance 12.1.2 to 12.1.5
The process to upgrade an existing Symantec Endpoint Protection Security Virtual Appliance 12.1.2 to 12.1.5 is actually a new deployment of the 12.1.5 SVA.
See Configuring the Symantec Endpoint Protection Security Virtual Appliance installation settings file and Installing a Symantec Endpoint Protection Security Virtual Appliance.
Notes:
- Before deploying the new SVA, make sure to stop the running one, otherwise the installation will fail.
- Once the SVA is powered off, run the installation. It will initiate a scan on the ESXi server and remove the existing SVA before deploying the new one.
- Remove the old SVA entry from the SEPM to complete the process.