Description:
This article provides the way to capture and deploy a partition image of Windows machine by modifying the command line option in create and deploy image tasks via GSS and DS 6.9 console. Below illustration is based on GSS 3.0 console.
How to capture and deploy the partition image of client machine
This article demonstrates:
1. Partition image create and restore to/from default image path on GSS server
i.e. \Program Files x86\Altiris\eXpress\Deployment Server\Images\Windows.
2. Partition image create and restore to/from locally attached disk/partition
3. Create Hot image of partition on locally attached disk/partition
Setup information:
Following machine configuration taken to perform partition imaging.
Physical or virtual machine with 2 hard drives with 500GB each
Drive 1: Windows 7 x64 bit operating system with four partitions –
Partition 1: System reserve partition (hidden)
Partition 2: operating system 402 GB
Partition 3: data partition of 50GB
Partition 4: data partition of 25 GB
Kept different files and folder on each of the partitions.
Drive 2: Data partition (500GB)
Ghost binaries - Ghost version 12.0.0.8008 or greater.
- Partition image create and restore to/from default image path on GSS server
i.e. \Program Files x86\Altiris\eXpress\Deployment Server\Images\Windows.
Steps to follow:
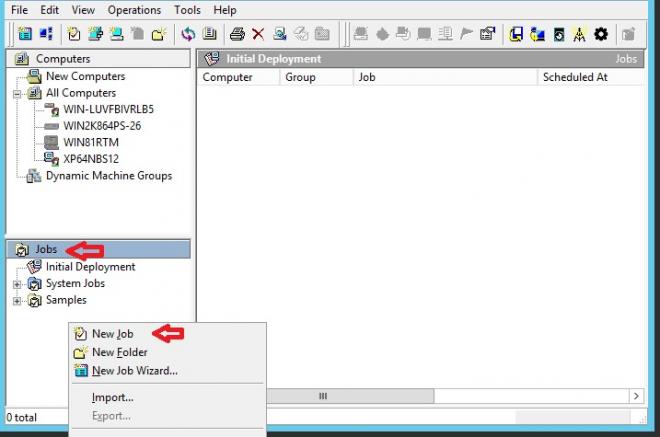
- Open GSS console and go to Jobs section in left pane.
- Right click in pane and select New Job option.
- Click Add button in right corner of job and select Create Disk Image option. Give appropriate name to the Job.

- Create a capture image Job with two tasks which would eventually capture two data partitions simultaneously.
- First task is to create partition image of data partition of 50GB i.e. partition 3. Select Symantec Ghost as imaging tool. Provide the appropriate image name e.g. part3.gho

- Go to the additional parameters section. Default command line is
“-clone,MODE=create,SRC=1,DST=%IMAGE_FILENAME% -sure”.
Change the command line to
“-clone,MODE=pcreate,SRC=1:3,DST=%IMAGE_FILENAME% -sure”.

- Add another task which is to create partition image of 25GB partition i.e. partition 4. Default command line in addition parameters is
“-clone,MODE=create,SRC=1,DST=%IMAGE_FILENAME% -sure” .
Change the command line to
“-clone,MODE=pcreate,SRC=1:4,DST=%IMAGE_FILENAME% -sure”. Provide the appropriate image name e.g. part4.gho
- Execute the job on client machine. Machine would boot into automation environment and start capturing the partition images. Please note that machine boots into automation for each partition image capture.
- Once the job execution is successful, machine again boots into production.
- Open the images via ghost explorer tool and ensure that the correct partition image is captured.
- For verification purpose, delete some files from each partitions on actual machine before restoring the partitions. This will ensure that after partitions restore the files are intact to original and restore operation is successful.
- Create the deploy image job with two tasks. First one to restore the partition of 50GB and second one to restore the partition of 25 GB.
- Right click in pane and select new job. Click Add button in right corner of job and select Distribute Disk Image option. Provide the appropriate name for Job.

- Create a distribute disk image Job with two tasks which would eventually restore two data partitions simultaneously.
- First task is to deploy partition image of data partition of 50GB i.e. partition 3. Select part3.gho from image location.

- Go to the additional parameters section and default command line is
“-clone,MODE=restore,SRC=%IMAGE_FILENAME%,DST=1 –sure”.
Change command line to
“-clone,MODE=prestore,SRC=%IMAGE_FILENAME%:1,DST=1:3 –sure”.
- Add another task which is to deploy partition image of 25GB partition i.e. partition 4. Select part4.gho from image location.
- Go to the additional parameters. Default command line in addition parameters is
“-clone,MODE=restore,SRC=%IMAGE_FILENAME%,DST=1 –sure”.
Change the command line to
“-clone,MODE=prestore,SRC=%IMAGE_FILENAME%:1,DST=1:4 –sure”.
- Execute the job on client machine. Machine will boot into automation environment and start deploying the partition image. Please note that machine boots into automation for each partition image deployment.
- Once the job execution is successful, the machine boots into production.
- Check the partition status once the machine is booted into production.
- Ensure that both the partitions restored successfully and data found be in-tact which was there earlier.
- Similarly you can follow the same procedure to create and deploy image operations for operating system partition i.e. partition 2.
- Command line to capture OS partition i.e. partition 2 would be
“-clone,MODE=pcreate,SRC=1:2,DST=%IMAGE_FILENAME% -sure”.
Command line to restore OS partition would be
“-clone,MODE=prestore,SRC=%IMAGE_FILENAME%:1,DST=1:2 –sure”.
2. Partition image create and restore to/from locally attached disk/partition
Steps to follow:
Create image procedure:
- Set the automation environment first in create image task
- Change the command line to “-clone,MODE=pcreate,SRC=1:2,DST=1:3\ospartition.gho -sure”. In this command we are trying to create image file of OS partition on 3rd partition of same drive.
- Provide the image name as placeholder.
- Execute the job on client machine.
Restore image procedure:
- Set the automation environment first in destribute disk image task
- Provide the image name as "ospartition.gho" created above in “Select the image file” option as a placeholder. Select “disable image path validation” option.
- Change command line to restore OS partition as
“-clone,MODE=prestore,SRC=1:3\ospartition.gho:1,DST=1:2 –sure”.
3. Create Hot image of OS partition on locally attached disk /partition
Steps to follow:
- Go to hot imaging job under sample jobs.
- Create copy of hot image job. I have selected x64 job for that matter.
- Existing script is
“\\%GSS_SHARE_IP%\eXpress\Ghost\ghost64.exe -clone,MODE=create,SRC=1,DST=\\%GSS_SHARE_IP%\eXpress\Images\Windows\%COMPNAME%\%COMPNAME%.gho -sure -blind”
“\\%GSS_SHARE_IP%\eXpress\Ghost\ghost64.exe -clone,MODE=,SRC=1:2,DST=1:3\hotospart.gho -sure -blind -z9” (-z9 used for image compression).
Important Note:
- For partition imaging operations, user needs to be very careful as any wrong parameter given to ghost executable would result into loss of data. Symantec advise user to take the full disk image as a backup to do partition imaging operations.
- User should follow the pre-requisites required for hot imaging mentioned in user guide.