This blog explains the process to use the SEPprep tool to uninstall SEP.cloud in a semi-automtated way and then automatically install the SEP 12.1.x client. SEP.cloud does not have an automated uninstallation tool. This can be a challenge if you have to migrate from SEP.cloud to another endpoint security client.
I used this process to semi-automate the process to migrate ~2000 server and workstation computers from SEP.cloud to SEP 12.1.6.
Requirements:
- Endpoints with SEP.cloud
- SEP 12.1.x Management Server installed and configured
- SEP 12.1.x installation media
- File server to host the SEP 12.1.x client
Preparing the SEPprep tool and SEP 12.1.x client
1. On a computer that is accessible to the network, create a folder called SEPPrepInstall.
2. Share SEPPrepInstall.
3. Create a sub-folder called InstallLogs.
4. With the SEPM console, export an unzipped SEP client installation package into SEPPrepInstall.
Note: This SEP client package will be for workstations or servers and 32-bit or 64-bit.
5. Navigate to \\FileServerName\SEPPrepInstall\SEPClientPackageName and change the name of the SEP client installer from setup.exe to SEPSetup.exe.
6. From the SEP installation media open \SEPInstallMedia\Tools\NoSupport\SEPprep, copy SEPprep.exe or SEPprep64.exe (depending on the endpoint architecture) and SEPprep.ini to \\FileServerName\SEPPrepInstall\SEPClientPackageName\.
Note: The \SEPInstallMedia\Tools\NoSupport\SEPprep also contains the SEPprep documentation called SEPprep.pdf.
7. Change the name of SEPprep.exe or SEPpre64.exe to setup.exe.
8. Open SEPprep.ini and update the replace the contents below. Modify to suit your environment.
[Settings]
ShowGUI=N
ShowMessageBox=Y
MessageBoxText=Prepairing your system for Symantec Endpoint Protection 12.1.x  During this process other antivirus products will be removed.\n\nIf you are prompted please fully remove these products.
AutoRunAfterUILoads=Y
AskBeforeRemoval=N
SilentMSIInstaller=Y
RemoveSymantec=Y
CheckDiskSpace=Y
ResumeAfterReboot=Y
EnableLogging=Y
LogPath=\\FileServerName\SEPPrepInstall\InstallLogs
RunBeforeRemoval=reg add HKEY_LOCAL_MACHINE\SOFTWARE\Microsoft\Windows\CurrentVersion\RunOnce /t REG_SZ /d \\FileServerName\SEPPrepInstall\Servers_WIN64BIT\SEPsetup.exe
RunAfterRemoval=

[ProductNames]
Symantec.cloud
Note: The path the InstallLogs folder will change based upon where the InstallLogs folder is hosted.
Note: The path to SEPsetup.exe will change based on where SEPsetup.exe is hosted.
9. Administrators can now run setup.exe from the SEPPrepInstall folder or deploy it with SCCM.
Running The Migration Process
1. On the endpoint running SEP.cloud, run setup.exe from \\fileservername\SEPPrepInstall\SEPClientPackageName\ or SCCM.
2. An Information popup will appear on the endpoint. Read the content of the popup and click OK.

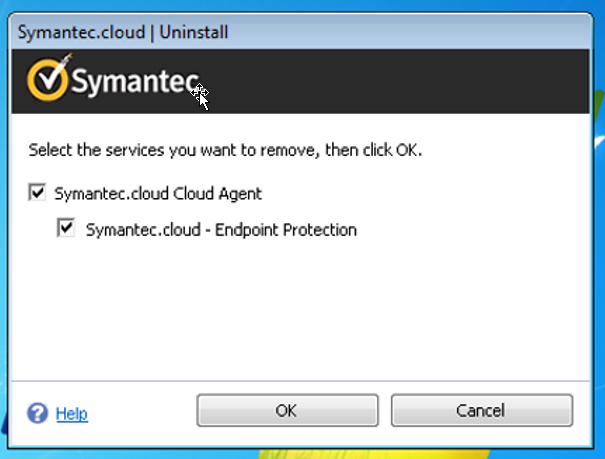
3. A second popup will appear asking the user to select which software to uninstall. The user must select Symantec.cloud Cloud Agent. This will automatically select Symantec.cloud – Endpoint Protection. Click OK (if Symantec.cloud – Endpoint Protection is not automatically selected, select it and click OK.)

4. While the Symantec.cloud client is being uninstalled refrain from using your computer.

5. When asked to restart your computer click Restart Now.

6. Upon reboot the new Symantec Endpoint Protection client will be installed.
7. While Symantec Endpoint Protection client is being installed refrain from using your computer.
8. When asked to restart your computer click Restart Now.

Note: If you see a pop up warning about other users potentially using your computer click Yes.

9. When your computer restarts use it as normal.