Providing desk-side IT staff with up-to-date information on PC build process is critical for establishing deployment confidence. To address the requirement for timely access to build progress, deployment server administrators often grant console access to all desk-side technicians engaged in the deployment process. This method of keeping your technicians informed however is not ideal; it increases server load and is suboptimal as it imposes a significant number of steps between the technician and the data they need.
To address this concern, we built a few years ago a client-side HTML Application (HTA) we call JobMon.
1. Quick Preview
2. Credit
3. Background
4. Installing JobMon for DS6.9
5. The Job Monitor Sample
6. What Next?
7. Any Gotchas?
8. Under the Hood –How JobMon Works
8.1 The HTA
8.2 Delivering the HTA
8.3 Delivering updated JobMon.txt Files
1. Quick Preview
This Job Monitor displays on the Windows Logon screen each computer’s progress through the provisioning process,
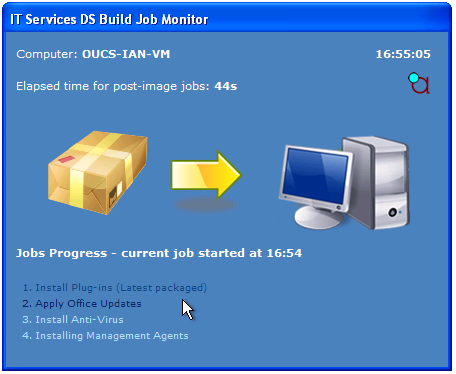
Here we can see at a glance the following,
- The computer name
- The current time (can't assume we all wear a watch!)
- Which job is currently executing and when that started
- Any jobs which have already executed
- Any jobs still scheduled for execution
- AClient/DAgent connectivity status
So, all a tech now has to do is take a casual glance at a computer being provisioned to be assured first that the deployment is indeed in progress and secondly that it will finish in a timely manner.
The value of JobMon in the end went far beyond fulfilling the timely information requirement of our technical staff. It had the additional benefit of increasing confidence in the deployment framework and the business process they underpin. We therefore consider JobMon to be a critical cornerstone of our deployment process.
2. Credit
Like much of what we do here, our creations are a team effort. Whilst I am the proud father of the SQL wizardry worked into JobMon, the client-side HTA is the brain child of our lead packager and automation guru, Darren Collins.
3. Background
Community provided deployment splash screens are not new; I’ve seen many incarnations over the years, all built by Altiris Administrators who saw need to know at a glance whether a computer was still in the active provisioning process.
On of the more elegant of these was published to Symantec CONNECT by Rhys Paterson back in 2011 in this most excellent article Deployment Splash. This provided Altiris administrators a sound basis for building deployment-time progress display. In his HTA, deployment progress was divined using ADODB (ActiveX Data Object for Databases) connections to the Deployment Server database.
A good question is why did we create a Deployment Splash? Two reasons,
- Security
We are part of a highly distributed IT environment and PC provisioning must be viable across even our less trusted networks. Opening up our SQL ports to our entire network was frankly a worry.
- Server load
Our techs ideally wanted the information on the splash to resemble what they’d see if they logged into the Deployment Console directly. This means detailed T-SQL queries. Add to this the need to provision up to 50 machines daily, then another concern appears; Deployment Server Console performance could well be compromised by clients splash screens hitting the database every three seconds.
The solution we hit upon was to use DS tasks to serve updates directly to the HTA. Although this would result in deployments hosting additional DS tasks it would have the benefit of,
- Preventing clients pressing the database with excessive ADODB connections
- Not leaving a potential security hole by opening up the Deployment Server SQL Service to the entire PC estate
- Providing a measure of control over what status messages would be sent to the client through the use of separate jobs to update the HTA (our change control process often results in some interesting job names)
To simplify progress tracking, we decided to store client progress using a new database table. This subsequently necessitated the creation of a stored procedure to update the table from a DS task and then a simple function to read from it.
4. Installing JobMon for DS6.9
Attached to this download you’ll find a zip that contains,
- A JobMon folder
This contains the client HTA folder
- StoreEvents2.sql
This is the SQL Stored procedure which we call to build a table of events which we are going to expose through JobMonitor
- GetEvents2.sql
This is the function which retrieves the list of events scheduled on a PC with their progress
- JobMon_Example.bin
This is a import file which will help you get started with JobMon
The steps to get going with JobMon are,
- Copy the JobMon Files to your Deployment Share
Create the folder path on your eXpress Share ./apps/JobMon and copy the JobMon files into it. Add to the folder Mark Russinovich’s psexec v1.98.
When you’ve done this, your JobMon folder should look like this,
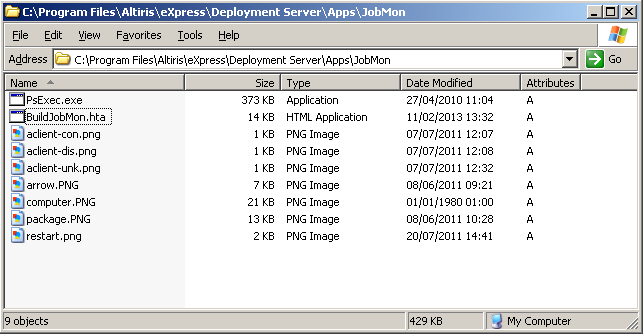
Note: If you have multiple deployment servers and have a common file server path for apps and utilities then use this. Just be sure to amend the file source in the ‘Build’ job I show later accordingly!
- Add the SQL JobMon Stored Procedure and Function to the Deployment Server Database
Open up SQL Server Management Studio on the SQL Server hosting your eXpress database (this will typically be your Deployment Server). Copy the T-SQL in the .sql text files one at a time into a query window and execute on your Deployment Server database (by default named ‘eXpress’).

You should receive a message “Command(s) completed Successfully” in both cases.
- Authorise The JobMon Stored Procedure in the Deployment Console
As a security precaution, Symantec limit the stored procedures which can be executed by the DS engine. In order for JobMon to work, we’ll need to authorise this stored procedure.
1. In the DS Console, click “Tools” on the menu bar and select ‘Options’
2. In the “Program Options” window that appears, select the ‘Custom Data Sources’ tab
3. Click the button ‘Allowed Stored Procedures

4. Select the Custom_JobMon_GetEvents2 stored procedure in the ‘Available Stored Procedures’ pane and add it to the ‘Allowed Stored Procedures’ pane and click ‘Apply’ and ‘OK’.

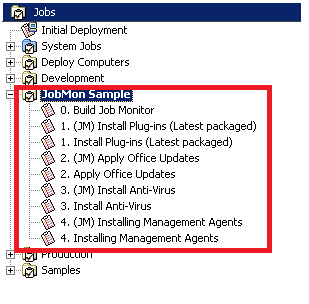
- Import the JobMon sample binary
Select the job pane in the Deployment Console and click ‘Import Jobs’ from the file menu. Navigate to the jobmon.bin file from your downloaded zip and import it. You should have a sample folder which looks like this,
And that’s it. JobMon is now installed and you’re ready to go.
5. The Job Monitor Sample
In the sample job list that you imported, you’ll find three classes of jobs,
- The ‘Real ‘ Jobs
These are the jobs like ‘Install Plugins (latest packaged)’ and ‘Install Anti-virus’. For the purposes of getting a demo up and running the jobs imported here just execute a 30 second pause.
- The JobMon ‘tag’ Jobs
These Jobs which contain a ‘(JM)’ tag in the job name are JobMon markers. They consist of two tasks, one tasks dumps where the computer currently is in the JobMon schedule to the express share, and the second task copies this to the client for the HTA to read.
We call these jobs JobMon markers as they name the stages in your deployment process that you want exposed through JobMon. In this example we’ve created a JobMon marker job to pair up with each real deployment job. This is not essential however, you could have a set of 5 jobs for software and then one JobMon marker to precede them all named ‘Installing Software’. It’s your choice what you text you expose to the HTA and when.
To create markers, just copy/paste the ones in this sample and rename.
- The JobMon ‘Build’ Job
This job builds the data for the JobMon interface and fires up the HTA on the client’s WinLogon screen.
It consists of a 5 tasks, the most important being the first task which builds the list of Job ids for the HTA to monitor.

Now let’s test JobMon. Drop the Job Monitor sample folder onto a client machine (one that isn’t logged into) and see what happens. The jobs in this sample are client-safe; they don’t actually perform any action on the client apart from a ping.
After a few seconds you should see the following on the target’s logon screen,
And that’s it. JobMon is now working for you.
6. What Next?
If JobMon looks useful to you, you'll now need to modify a test deployment so it present the Job Monitor and update the source txt file at regular intervals in your deployment. Generally speaking you’ll need to,
- Put in a JobMon Build job as the first ‘production’ job after the PC has been imaged (so the HTA comes up as soon as possible once Windows has booted)
- Put in a JobMon Build job after every reboot if you want the HTA to re-appear. Conversely, once your deployment has completed, use either a reboot or a taskkill command will remove the JobMon display.
- Put in the JobMon Marker jobs in places that make sense to you. You can choose here to mark each and every software deployment by name and version, or perhaps have one marker represent a job group. For example, you might want to represent a bundle of jobs that action registry tweaks, firewall changes and filesystem permission updates as something as simple as “Configuring Computer” or you might even want to specify each one independently.
7. Any Gotchas?
Yes there is. This incarnation of JobMon only indexes the ‘(JM)’ tagged jobs which are scheduled at the time the build job is executed. It therefore works fine when you deploy job folders that contain your deployment jobs and tasks from start-to-finish, but will entirely neglect to note any jobs you decide to drop on later while deployment is in progress (even if they contain ‘(JM)’ tags).
JobMon is therefore not well suited to environments where machines are deployed by techs scheduling jobs from different areas of the console piecemeal to provision machines. Conversely, Jobmon works best in environments that provision machines using a single drag’n’drop of a job/folder hierarchy, such as environments that use ImageInvoker.
As an item of future work, we aim to remove the intermediary table and push the SQL work into a more complex status retrieval function. This would remove this little gotcha.
8. Under the Hood –How JobMon Works
For those out there who’ve tried out JobMon and perhaps what to amend it a little more to suite their environment here is a rough guide to how JobMon works.
8.1 The HTA
JobMon is in essence an HTA which polls for input from the text file JobMon.txt which is located in %WINDIR%\Temp. When the HTA loads, the following code is executed,
    Sub window_OnLoad
        strAppName = oHTA.APPLICATIONNAME & " " & oHTA.VERSION
        PreFlight()
        Updatemonitor()
        StartFlashCurrentSub()
        AnimateArrow()
        AClientConCheck()
    End Sub
As this stands it’s hard to see how this execution of these 5 subroutines can result in this highly animated HTA. The trick to keeping the HTA ‘live’ is for some of these subroutines to create timers which ensure that after a specified timeout they will be automatically re-run using.
To create these timers, we use the HTA method SetTimeOut. The syntax for this is,
setTimeout (code,millisec,lang)
Where code is the function you want executed after the timeout, millisec is the number of milliseconds to wait before executing the code, and lang is an optional argument which allows you to define the scripting language.
The last lines of the following functions configure the timers as followings,
- Updatemonitor()
The last line is,
iTimerID = window.SetTimeOut("Updatemonitor()", intUpdateFreq * 1000)
This ensures the Updatemonitor() subroutine which reads JobMon.txt and populates the HTA with job data is polled every 5 seconds (intUpdateFreq is set to 5 in the HTA variable declarations area).
- StartFlashCurrentSub()
The last line is,
iTimerID = window.SetTimeOut("StartFlashCurrentSub()", 500)
This ensures the StartFlashCurrentSub() subroutine which flashes the currently active job is polled every half second.
- AnimateArrow()
The last line is,
iTimerID = window.SetTimeOut("AnimateArrow()", 10)
This is the sub which moves the arrow, pixel by pixel every 10ms, from the package graphic to the computer. This is what gives JobMon that ‘live’ feel.
- AClientConCheck()
The last line is,
iTimerID = window.SetTimeOut("AClientConCheck()", 5000)
This sub executes every 5seconds and checks whether we have an outgoing TCP connection established on port 402. Depending on this state, we set the AClient symbol on the top-right of the HTA to either an active or inactive graphic.
For more details of how each sub performs its allocated task, just open up the HTA code in your favourite text editor and delve away!
8.2 Delivering the HTA
The Job that takes note of any ‘JM’tagged scheduled on the client and activates the client HTA in our example is “0. Build Job Monitor”. It consists of the following 5 tasks,
- Server-side ‘Run Script’ task to Create Job ID Row in Custom Table
This server- side creates the table Custom_Event_Table (if not already present ) and updates the table with row containing the computer ID and a comma delimited list of any ‘(JM)’ tagged job IDs scheduled on that machine. To keep the table trim, any pre-existing data for that client is removed prior to the table update. The server-side code that does this is,
REM Inserts Scheduled Events into Database
REM %#*"{ call Custom_JobMon_StoreEvents2( %ID% ) }"%
Here’s we’ve used the fabulous custom token replacement feature of DS to execute raw T-SQL stored procedure. All you have to do is wrap your T-SQL stored procedure call like this,
%#*"{call <INSERT STOREDPROCEDURE HERE>}"%
If we’ve made sure we’ve authorised the stored procedure (as detailed in the installation steps above) at script delivery time the DS engine will execute the stored procedure and update the database accordingly.
- Server-side ‘Run-Script’ task to extract job ID row from custom table and add Status
This ‘Run Script’ task reads our custom table to retrieve the list of Job IDs that should be presented in the HTA for the target machine. So we can tell the HTA where we are in the queue here, the Job IDs are translated to names and a status execution flag is added.
The contents of the script is simply the following two lines,
REM Output event data to express share
echo=%#*"select dbo.Custom_JobMon_GetEvents2(%ID%)"% > .\temp\%ID%.evt
Where here we use the custom token replacement feature of DS6 to execute a T-SQL SELECT. All you have to do is wrap your T-SQL like this,
%#*"<INSET SQL SELECT HERE>"%
At script delivery time the DS engine replaces such token with the SQL result (no need to authorise functions as they don’t change info in the database). In the case of the T-SQL function we’ve used here, Custom_JobMon_GetEvents2, what we have echoed into the .evt file is a long string. This string details the status of JobMon tagged job along with its name.
- A Copy-File Task to push JobMon.txt to client
This task simply copied the %ID%.evt file to the client as JobMon.txt
- A Copy File Task to Push the JobMon HTA to client
Here we use the DS file copy task to copy the JobMon HTA folder to the client under C:\temp\JobMon
- A Client-side Run-Script task to execute the JobMon HTA
Here we a client-side script to start the Microsoft HTA application using psexec,
REM DS Build Job Monitor
SET JMFLDR=C:\temp\JobMon
Start "" /MIN "%JMFLDR%\PSexec.exe" -accepteula -s -x mshta.exe "%JMFLDR%\BuildJobMon.hta”
This should start the HTA on the WinLogon screen and it should have a JobMon.txt file ready and waiting for it to begin providing instantly a useful display.
8.3 Delivering updated JobMon.txt Files
As we’ve seen, the only data feed the JobMon HTA accepts comes from polling the JobMon.txt file every 5 seconds. In order to refresh the HTA with updated data we must therefore update this text file.
This is the reason for the need of the separate HTA update jobs within the job execution chain. The anatomy of the HTA updates job is as follows,
- A ‘(JM)’ tag in the name
This tag identifies to the SQL code behind JobMon that this job is a HTA update job.
- A Server-side Script task
This script task creates within the express share’s temp folder a .evt file which is named using the client’s unique ID.
The contents of the script is simply the following two lines,
REM Output event data to express share
echo=%#*"select dbo.Custom_JobMon_GetEvents2(%ID%)"% > .\temp\%ID%.evt
Where here we use the custom token replacement feature of DS6 to return the result of the embedded T-SQL SELECT.
- A Copy-File Task
This task simply copied the %ID%.evt file to the client as JobMon.txt
So to use JobMon all you need to do is clone this Job, rename to the text you’d like displayed on the HTA, and insert it accordingly into the job execution chain.