When I went to create a win10 base image, I couldn't find a writeup to follow on Connect, so I wanted to share my process in case it helped others. I also point out some potentially wrong/outdated info that is out there on Connect regarding deploying win10.
Note: to follow this walk through, you'll need to be on at least CMS/ITMS 8.0 HF4, have a copy of VMWare workstation, have available hard drive space (I make sure to have 60GB available), and win10 iso available (I tested with edu and ent versions from the Microsoft volume licensing center).
Latest update: I tested with win10 version 1511,1607, 1709, 1809 64bit versions using VMWare workstation pro v12-v14. Unless your testing how to deploy feature updates (which is a whole other issue), I tested restore on various Dell Optiplex and Latitude models in both legacy BIOS and UEFI mode. You'll want to the clients you're deploying to in UEFI to take advantage of secure boot.
Steps to set up the initial VM
In VMWare, select create new virtual machine. Select custom & select “installer disc image file (iso) and browse to your saved iso, select next.
Choose Microsoft Windows, and Windows 10 x64 (or just windows 10 if you don’t want x64) – select next.
Name virtual machine something descriptive, such as Windows 10 EDU 1703 x64 and save it in a location where you have space allocated for VMs.
- For firmware, I left default of UEFI selected. We have moved on to iPXE in CMS. In the past, I had issues getting VMware to PXE boot when using UEFI mode, so I do my captures with standard BIOS. It seemed to restore to clients using UEFI ok.
- For Processors, I left default of 1 and 1 core.
- For RAM, I selected 4GB.
- For Network Type, I selected bridge, otherwise PXE won't work in my environment.
- For I/O Controller, I selected LSA Logic SAS, the default
- For Virtual Disk Type, I selected default SCSI
- At the select disk screen, I selected create a new virtual disk and selected the default of 60GB, leaving ‘split virtual disk into multiple files’ selected. Select next & next again.
Power on the VM. At the prompt to enter a key to boot from CD, tap a key on the keyboard. Follow prompts to install Windows 10. When prompted if you're upgrading, select custom and select the VMware unallocated 60GB drive. Windows install begins.
Once Windows is installed, click "finished installing" prompt in VMware. Select region, keyboard layout. When prompted for Microsoft account, select join domain instead. Creat admin account.
Windows install begins and prompts for admin user creation. If you don't want to set up security questions for your admin account (at least for me in v1809), do not enter a password during setup for admin password (will set later). Decline cortana, activity history, and set privacy settings as desired. It should auto log you in to your admin account and prompt if you want your PC to be discoverable, we select No.
Right click on "This PC" and select manage and navigate to Local Users and Groups, Users, and find your admin user and set password. Restart to confirm you are prompted to login with a password.
Set date/time/time zone and verify time is correct. Rename the VM computer name to something that will be obvious in console such as win10ent1809.
Do not install VMWare tools.
Installing CMS/ITMS agent
We have our agent set up for https communication, and our machines usually get required certs when they join the domain. Since the base image is not yet on the domain, I first copy our company Trusted root cert and intermediate cert onto the base image (exported from any domain machine via mmc.exe and selecting computer certificates).
Once certs are installed in the VM (via mmc.exe, computer certificats, and import), my preferred method to get the agent on the base image is to go to the CMS server and copy AexNSC.exe from the NS server (on the CMS server in Altiris\Notification Server\NSCap\bin\Win32\X86\NS Client Package) and then run the following at the command line "C:\Users\Admin\Desktop\CMS Agent\AexNSC.exe" /install /ns=cms.company.com (where Admin is the chosen admin name I set up and AexNSC.exe is on the desktop). After agent installs, delete the installer from the desktop.
This pulls down the initial install of the agent, but the various plugins still have to come down. Make sure that your plugin install policies are properly enabled. Since the agents need some time to initialize and install, I move on to windows update to get those started.
Note: When I asked support for articles/help for creating a win10 image, they told me it was necessary to not run any windows updates and instead the service needed to be disabled on the base image (howto125161). I found this to be untrue & I would recommend ignoring that howto. It may come into play if you're running a feature update on the VM, but I'd suggest starting with a fresh ISO in that case.
Go to Windows updates - settings - advanced - check box to give me updates for other MS products when I update windows & defer feature updates. These settings will be forced via GPO later in our environment, but I also set them on the base image.
Click back button to get back to windows update - run check for updates.
While windows updates are installing, make sure Symantec installed all plugins. In order to get all plugins installed, I usually run resource membership update from CMS (settings, notification server, resource membership update – delta update schedule – run now). Then on VM in the agent, under software delivery I usually temporarily check the boxes under options to see internal and scheduled tasks in order to force through agent installs by manually starting them.
For some reason Software Update Plugin install fails for me often, but if I install all the other plugins and manually run C:\Program Files\Altiris\Altiris Agent\Agents\SoftwareManagement and find the Altiris_PatchMgmtAgent_Win64 – it seems to install ok. Count how many plugins are installed on a production machine (for me it's 11) and make sure your base image has the same total and versions.
Once all plugins are installed, navigate back to software delivery tab and uncheck ‘show internal tasks.'
If you want "This PC" to show up for users on their desktop, you can enable it for the admin user and use copyprofile in your unattend and it will be there by default for all admin users (tested in win10 1709). Consider customizing the taskbar and/or background photo if you wish. I leave the installed windows apps alone and block access to them via applocker. I also customize the start meny layout via GPO.
Once windows update is complete, restart the VM to complete install of any updates requiring the restart.
Final image customizations & capture
Click ignore or cancel on any popups for Onedrive throughout the build process. These will be addressed via GPO on deployed machines when we disable OneDrive all together.
In Internet Explorer and Edge, I set homepage to our company home page and turn off pop up blocker & a few other settings. These are settings I prefer to set locally so users can change if they have to. Clear IE cache/cookies, etc.
After struggling with DeployAnywhere many years ago, I now use this method for driver deployment. In order to take advantage of it, on the base image VM, I navigate to regedit and then [HKEY_LOCAL_MACHINE\SOFTWARE\Microsoft\Windows\CurrentVersion] where I add ;c:\drivers to "DevicePath" as shown. below:

If you are going to install office on every computer you support, you can add that to your base image. Check out the Office Customization tool for some enterprise install options (could also be installed as part of post image software task). If you install office on the base image, make sure to rearm office right before running your capture ("%PROGRAMFILES(X86)%\Microsoft Office\Office16\OSPPREARM.exe"). Note: As of office 2019, the office customization tool is available online at https://config.office.com/
Restart a final time and check and make sure that the restart is not installing any windows updates. You want to make sure to have a clean restart before capturing the image. This is also a good time to make sure your VM is setup properly for PXE booting. For me, I had to hit F2 very quickly at boot screen to move network boot up in boot options and be on appropriate VLAN for imaging.
Once your confident that PXE is working approriately, shut down the VM completely and take a snapshot (I call the snapshot presysprep). Power VM back up, login, and confirm that the Symantec agent is loaded.
Confirm you have enough space on the CMS/ITMS server for the new image before proceeding to capture the image.
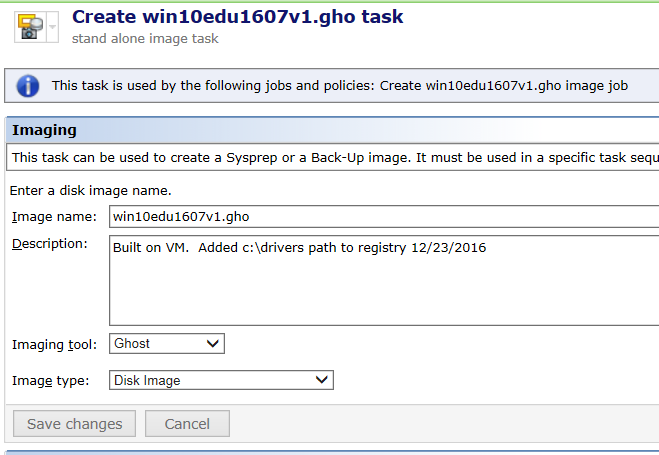
Run the Create image job, here are screenshots of my job and the indivual tasks in the job. Note, the key below in the prepare task is the KMS win10 product key and admin username/password are required for win10. Before creating your create jobs, make sure to add appropriate product keys under Settings – OS Deployment. The key pictured here is for win10 Edu. More info on KMS product keys at this Microsoft site.
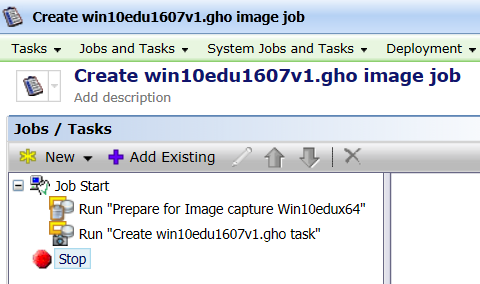

Once you run the image creation job on the VM, you should see the symantec agent receive the task, sysprep will run (you can see it in task manager), and then the machine will prompt and auto reboot to PXE without you touching the machine. Ghost will launch and create the image.
Note if you're using UEFI, you may need to manually tap F2 and select the network boot option as computer restarts during prepare task.
At this point, I shut down the VM and restore the VM to the captured presysprep snapshot (and leave it shut down). The VM will be in a state ready for updates or changes should you need to recapture. At this point, I also copy the whole VM folder to an external drive to have a 2nd copy of it in case my machine should fail.
Don't forget that the captured image will need time to replicate out before restoring it to a test client.
Note: When I asked Symantec support for win10 image creation documentation, I was sent to TECH223595 which goes through some steps including enabling the built in administrator account. This is against the CIS best practices, and when I asked Symantec why this was referenced as a necessary step, they said it was a Microsoft limitation. In my testing, this appears to not be true (maybe it once was), and I would not recommend enabling the built in administrator account. In that TECH article, Symantec also walks through the steps of removing various built in windows apps, which doesn't seem to be necessary in the 1607 edu version (and ent as well I'd imagine). These extra apps really cluttered the start menu in 1511, but are almost gone in 1607 edu version. The store can easily be blocked via GPO later and there are also options for creating custom start menu layouts via GPO. At least to start capturing your first version of a win10 image, I would not recommend running any of the Powershell commands in the linked TECH article.
Once you have a base win10 image created, you can always go back and attempt to remove anything you don't want on it via many powershell commands that are out there, but make sure to take advantage of using VMWare snapshots in case something goes wrong with the process that you can get back to a known good state (keep an eye on hard drive space available when leveraging snapshots). Be careful not to remove anything that's required for the start menu, and beware Microsoft might put back some items when you inevitably have to install feature updates to keep your win10 client updated. For this reason, I would try to use GPO's as much as possible versus modifying the base image for unwanted clutter. I'm still working through this on our base image (like the xbox tile being left behind even on 1607) & will try to remember to report back on my findings with that.