Servicedesk has the ability to process email messages and automatically generate incidents for technicians to work. This is very helpful in allowing end-users the ability to quickly send an email documenting a problem, and have a trouble ticket automatically created as a result.
In Servicedesk 7.5, the email monitoring application is a user-editable process. This provides some flexibility to modify the project to accommodate specific needs.
Problems
One of the difficult things that users, especially those in larger environments experience is the inability to support multiple email boxes. Some companies have taken a tactic of creating multiple monitors to handle the multiple email boxes. This works, but puts additional memory load on the Servicedesk server, in that multiple web services are running in the background. It also requires that, if changes need to be made, the correct mail account's related monitoring application must be selected and modified.
Also, the ability to classify an incoming incident, based on the target email address, and to assign the email to a specific service queue does not exist in the out of box product, without some substantive customization.
Solution
In a two part series of articles, we will describe how this is done. The first article will explain how the ability to support multiple email boxes, from differing email host servers can be generated and maintained. The second article will outline how to configure the data mappings to accommodate classifying the incident and assigning to a Service Queue, based on the email address the message was sent to.
Here is the link to that second article
Expanding Servicedesk 7.5 - Part 2 – Defining Classification & Service Queues from within Email Monitor
The attached projects will serve as an example of how this can be accomplished. If you are using ServiceDesk 7.5 SP1 please make sure to download the SP1 package files as there has been significant changes to E-mail Monitor in ServiceDesk 7.5 SP1.
The SD.Email.Monitor-Multiple project takes the default project and makes a couple of changes.
- It takes what was the default Primary Model and makes it a new linked model called GetEmails.
- A new primary model now contains a new SQL integration component that queries a new table in the database for email server and account information, and then, based on the account information, recurses the discovered mailboxes, and processes the emails.
- The second article will show that one other modification has an embedded model that handles the classification and service queue assignment. This is done with a small change to the ProcessMessage model.
This completes the small overview. Lets move to getting it installed.
Installation and Configuration
Changes to the Servicedesk Server
Installing the Projects
The two projects attached, SD.Email.Monitor-Multiple, and EmailServerAccountAdmin both have a change that must be made to accommodate the destination SQL server. The "Connection String" property must be changed to accommodate your SQL server.
If you know your Connection String:
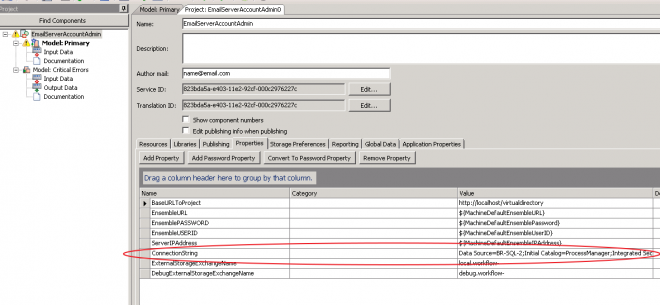
- When you open each project (EmailServerAccountAdmin and SD.Email.Monitor-Multiple), click on the top level of the tree on the left side. This will bring up the project information, properties and settings.
- Click the "Properties" tab, and find the "Connection String" property.
- Click in the Value field on the same row as the ConnectionString property, and replace the connection string with the correct one from your server. See the screenshot below.
If you do not know your Connection String:
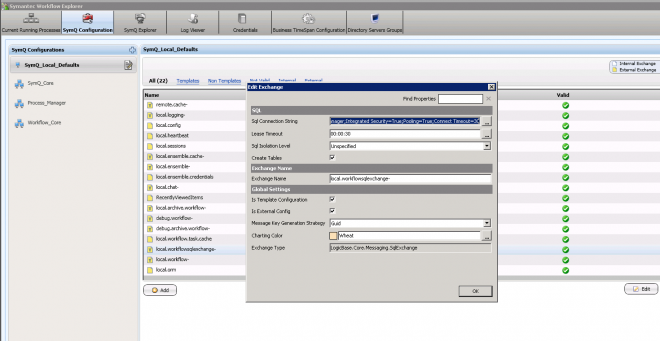
- Open the Log Viewer tool.
- Once open, click on the SymQ Configuration tab.
- On the left side, click on the SymQ_Local_Defaults configuration.
- In the list on the right side, scroll down until you find the "local.workflowsqlexchange-"
- Highlight this entry and click the "Edit" button.
- The SQL connection string will be the top most entry. Highlight and copy this value.
- Click OK .
- Open Notepad and paste the connection string into a Notepad window.
- Switch back to the EmailServerAccountAdmin or SD.Email.Monitor-Multiple project, whichever you were working on.
- Now follow steps 1-3 above, using the copied connection string.
- Save the Project, but leave open.
- Now open the other project and adjust its connection string as necessary.
- Save the second project.
SD.Email.Monitor-Multiple Project -Publishing as a Regular Web Service vs. Windows Service
Our first step will now be to decide which publishing option best meets the needs of your environment. Should you publishing the email monitoring tool as a web service, or as a Windows Service? Let's look at the options.
Publishing as a Web Service
The default configuration is to publish as a web service. IIS controls the timeout settings of this monitoring project. It also can be very difficult to support more than 100 emails an hour in this configuration. If the emails contain large attachments, again the IIS timeout issues will be a concern. If your overall email traffic is low, but you want to have a large source of email addresses that are monitored, then this might be the correct choice for you.
To Publish As a Web Service:
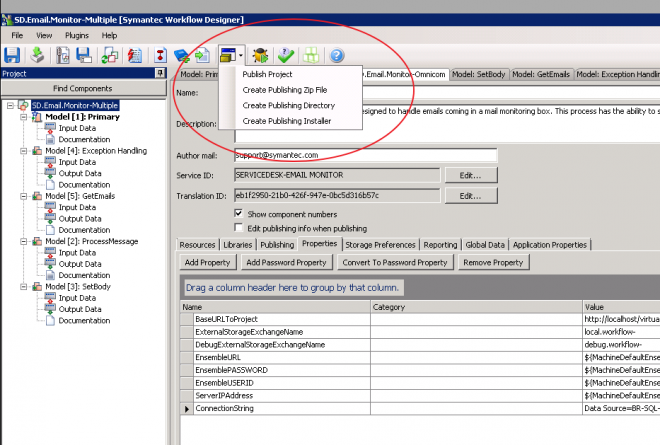
- Find the previously opened SD.Email.Monitor-Multiple project. Click on the "Publish Project" .icon in the toolbar and select "Publish Project". See the screenshot below.
- Click the checkbox next to the local server, or the server of your choice, and click Next.
- Click Next.
- Click Next.
- Your project will be published.
Publishing as a Windows Service
To publish as a Windows Service, you will need to perform a couple of items before you actually publish.
- Since SD.Email.Monitor is published by default as a Servicedesk web service, you should remove the IIS virtual directory for it. Open IIS, and find the SD.Email.Monitor service under the Default Web Site, and remove it.
- Reset IIS Services.
- Find the published location of SD.Email.Monitor and remove the properties.config file. This file is found at .../Symantec/Workflow\WorkflowDeploy\Release\SD.Email.Monitor. Delete the properties.config file.
- Now return to the open SD.Email.Monitor-Multiple project.
- Make sure that the top level of the tree is highlighted in the left column, as show below. You should see all project tabs as well.
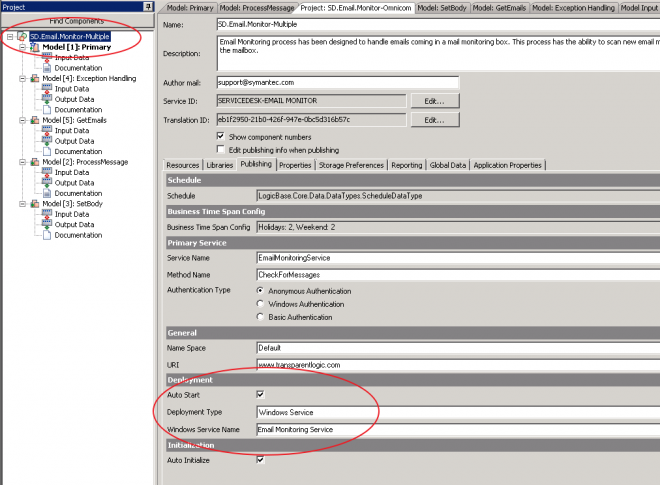
- Now click on the Publishing tab, and find the Deployment Section. It's shown in the screenshot above.
- Verify that the Deployment Type is set to Windows Service. If not , change it from Web Service, to Windows Service. Make a mental note of the Windows Service Name value, (In this case, Email Monitoring Service.
- Now you can find the publishing icon in the toolbar, and Click on the "Create Publishing Installer" item.
- You will see the screen below. All of the items should match. Change the path of the installer to go to the published project folder. In this case, it will be ...\Symantec\Workflow\WorkflowDeploy\Release\Sd.Email.Monitor\bin. This will place the SD.Email.Monitor.Setup.exe file in that folder.

- Click OK.
- You will get a screen similar to what is seen below. Rather than click the run installer button, click the Open Directory button.

- In the folder that opens, you will see the file SD.Email.Monitor.Setup.exe. Run that file, and accept the default responses. If you have published this previously, you may need to go and stop the email monitoring service first, then let the installer complete.
- The service is now installed, but not running yet. In the same folder, you should see a file called Install.bat.
- Run Install.bat. This will activate the Windows Service.
- Lastly, we need to set the newly installed service to run as the service account, (if your environment requires or is configured to use a service account). Open up the Windows Services from the System Administrators screen. Find the newly installed Email Monitoring Service. Right-Click, on it, and select "Properties", then click on the Log On tab. Now you can add the Service account, with its appropriate credentials. Save the settings and restart the service.
Notes on the SD.Email.Monitor-Multiple application.
You should note that the default frequency for the monitoring application to check for email messages is 15 minutes. You may, based on your load, or for testing purposes, desire to reduce that number. To do so, simply select on the publishing screen, under the Schedule section, the ellipsis next to the schedule. You can then edit the Every Day Pattern frequency as needed.
The EmailServerAccountAdmin Project
With the Email monitor ready to use, we now need to publish the Email Server Account Admin Package, and configure the accounts to monitor.
Installation and Publishing
This is a user -activated web application, and at the end we will include instructions on how to add this to your Administrative Tools service catalog.
To Publish the EmailServerAccountAdmin project:
- Find the previously opened EmailServerAccountAdmin project. Click on the "Publish Project" .icon in the toolbar and select "Publish Project".
- Click the checkbox next to the local server, or the server of your choice, and click Next.
- Click Next.
- Click Next.
- Your project will be published. Make a note of the URL highlighted in the screenshot below. Your URL may be different. Highlight and copy the URL.

Making the Tool Useable in the Service Catalog
We can now take the URL that we captured from the published project and build a quick new entry in the service catalog.
- Open the ProcessManager Portal.
- Click on Admin>Service Catalog Settings. You should see the Administrative settings.
- Click the lightning bolt on the upper right corner, and click add Web Form.

- You should make your form match the one shown above. Once complete, click Save.
- Now click on the Submit Request Tab, then select the Manage Monitored Email Boxes tool.
- You will see screen that looks similar to the one below
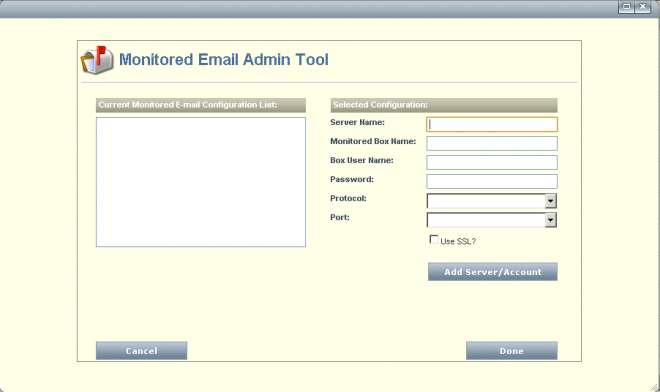
- Simple add the appropriate information for the email Servers, and mail boxes that are required to be monitored. Note that IMAP and POP are still the only options to monitor. If your authentication credentials require a domain reference, that is entered in the Box User Name: field as DOMAIN\UserName.
- Complete the rest of the information as required.
- Click Add Server/Account
- Now you can continue to add additional server and account information for the number of boxes you need to monitor.
- Click Done when complete.
Conclusion
The combination of these two project provide the tools necessary to add to your existing Servicedesk 7.5 system the ability to process emails from multiple boxes. Due to the components used, this is not backwards compatible to 7.1 versions of Servicedesk. This will ultimately extend your ability to monitor additional email boxes.
The 2nd article will focus on taking the email address, and use it to route messages to specific queues and classify the messages as well.