It is possible to add the latest version of SEP Client installer without having to upgrade the SEPM server to the latest version. While it’s always recommend that SEPM is updated at the same time, there may be a case where you need to plan this upgrade at a later time but needed to deploy the latest version of SEP Client, then this is how you can do this.
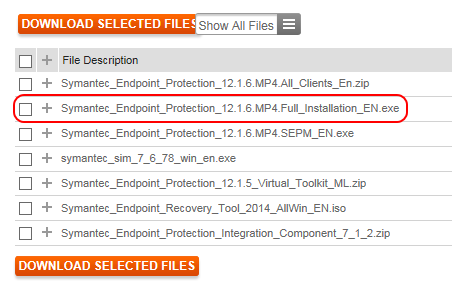
Firstly, you will need to grab your Symantec serial number and head over to https://fileconnect.symantec.com – enter your serial number and navigate your way into “Symantec Endpoint Protection” – from there, pick the language you want to use. For this article, I’ve picked ‘International English’ and you will be taken to the download page.
From there, pick the 2nd choice (Full Installation) It contains Windows, Macs & Linux clients at its current version (at the time of writing this, v12.1.6 MP4) – I preferred this version because the SEP clients comes with an .info file which will make copying to SEPM console very easily, which I will explain later on in this article. Also the SEPM installer is included with this, which you can use it for future planning & upgrading. So it’s like killing two birds with one stone by using a single download file! :)

Start the download & save it. For best practice, I would recommend that you run an MD5 signature checker against the MD5 number displayed on the download page to ensure the download is not corrupted. I use WinMD5 which is freeware to compare the signatures.

Once matched and you’re happy with it, copy the file over to the server and extract them in a suitable location. For this example, I used D:\Sources\SEPM v12.1.6 MP4 to extract the files into this but don’t start the installer. Cancel any prompts if any.
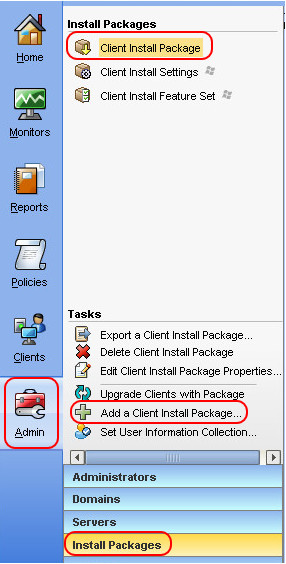
Now, launch the SEPM console and go to Admin -> Install Package and ensure that ‘Client Install Package’ is selected. Then from there, click on ‘Add a Client Install Package’

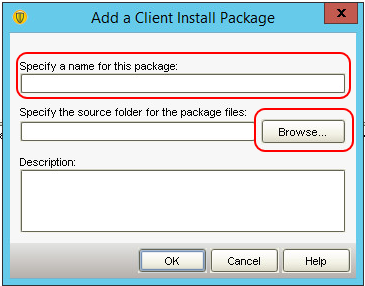
The ‘Add a Client Install package’ window will pop up. This is where you fill in the details. Click on the Browse button and go to the location where you saved the extracted files to. For this example, I’ve gone to D:\Sources\SEPM v12.1.6 MP4\SEPM\Packages
Here, you will find the .info files – click on one of them and then finally click on the OK button. It will begin importing into SEP & updating the database. It will take around 5 minutes or so. Repeat for other clients.

Once completed, you will have a list with the latest SEP clients. You can remove the old versions if you like, but hold off with that until you’re happy with the new versions on some machines for testing, for example.
For others who have more than one Domain, there are two ways to do this, depending on how you set up your Domains:
-
If you have Replication set up to sync clients, you do not need to do anything and the latest SEP clients will be synced across.
-
If you do not have Replication set up to sync clients, change Domain and follow the steps above to add them manually.
And this is how you add the latest SEP Client to SEPM, ready for deployments to your clients across the network.
Helpful links
WinMD5: http://www.winmd5.com
A guide to Endpoint Protection files on FileConnect: https://support.symantec.com/en_US/article.INFO2576.html
Download the latest version of Symantec Endpoint Protection: https://support.symantec.com/en_US/article.TECH103088.html