Deployment Server’s Linux automation is a light-weight and versatile imaging environment. Being less than a tenth of the size of the WinPE automation options, it is an attractive choice for those desiring to leverage PXE imaging across their enterprise. It is however a non-trivial proposition to implement imaging with Linux in organisations that lack Linux expertise; the efficiency savings gained in deploying with Linux can often be offset by the time required to troubleshoot it.
What Linux automation has long needed is a diagnostic Babel fish; something to recast Linux technical environment data into a language deployment teams can understand. If environment data is provided in a timely manner, desk-side technicians have all they need to resolve with confidence many common imaging black-spot scenarios.
iDiag has been created by Incit Technology and the department of IT Services at Oxford University to fulfil this purpose.
In this article today,
- The Dark Side of Imaging –Deployment ‘Blackspots’
- Introduction to iDiag
- Terminal Output
- Installing iDiag
- Specific iDiag Troubleshooting Scenarios
Unpowered/Disconnected Network Cable
Unsupported Network Card Scenario
Quarantined/Firewalled Network Scenario
- iDiag Switches
- iDiag text Customisation
- Uninstalling iDiag
- Acknowledgements
- Comments and Feedback
1.The Dark Side of Imaging –Deployment ‘Blackspots’
When computer deployments move outside an organisation’s test environment they are instantly and necessarily exposed to legacy systems, infrastructure irregularities and human error. These environmental factors add risk to your computer deployments resulting in a multitude of scenarios where they will fail. These failure scenarios create a ‘black spot’ in your imaging statistics which must be addressed to preserve confidence in your deployment infrastructure.
Some common black-spot scenarios which can emerge during enterprise computer rollouts are,
- New machines arriving incorrect mass-storage configurations in BIOS
- Machines possessing hardware components which were not captured in information gathering (i.e. not ratified for deployment)
- Machines unable to get IP address due to DHCP pools being full
- Machines unable to get IP address due to mistyped MAC address in static DHCP
- Machines accidentally assigned networks which cannot access the Deployment Server (Quarantined networks for example)
- Deployment desk network switches being turned off
- Ethernet cables disconnected from socket due to faulty clips
- Machines with disconnected SATA cables
Even in well planned to-desk rollouts, it is reasonable to expect that a small percentage of deployments will not proceed entirely as per the ‘gold’ plan. A good process is therefore needed to tackle that few percent of deployment failures in order to retain confidence that deployment schedules won’t over-run.
Core to any resolution process is the need for timely information. However, the ability to harvest information from Symantec’s Linux Automation has historically been difficult. Deep Linux expertise has generally been required to diagnose the various faults which result in ‘black spot’ imaging scenarios. Only with specialists interpreting the results of Linux diagnostic commands such as
fdisk,
dsmeg,
lspci &
ifconfig, could Altiris customers troubleshoot Linux imaging issues with clarity and confidence.
What has been lacking up to now is a friendly diagnostic tool which empowers deployment teams, enabling them to understand (and therefore resolve) the majority of the above black-spot scenarios themselves.
2.Introduction to iDiag
iDiag comes from the need to diagnose Linux automation issues without requiring the intervention of Altiris specialists. It provides desks-side IT staff a means of instantly diagnosing the common imaging issues that arise from unplugged and faulty network cables, mistyped DHCP table additions, firewall blocks and even unsupported hardware.
For desk-side technical teams to image systems efficiently, they require a simple means to establish the following with confidence within Linux automation,
- Local disk configuration
- Network connectivity
- Deployment server accessibility
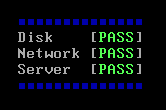
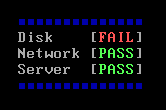
iDiag provides a simple traffic-light test summary of the above points each time Linux automation boots (see Figure 1 below).
|
(a)
|
(b)
|
Figure 1: Depiction of iDiag's three client tests which are displayed to desk-side IT staff when Linux automation boots. (a) shows all tests passing which means the environment is cleared for imaging (b) Shows the disk test failing
In the event that iDiag flags that a test has failed, the desk-side technical teams are presented with the most likely cause as shown in Figure 2. This allows them to understand that an issue exists and potentially resolve it before imaging even begins.
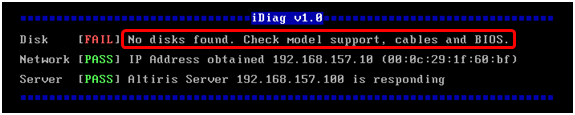
Figure 2: iDiag’s response when no disks are detected. As the output highlighted with red indicates, this could be due to the model not actually being supported in your deployment infrastructure, loose cables, or even an incorrect BIOS configuration.
The result of deploying iDiag is increased deployment confidence and faster imaging incident resolution times. iDiag’s simple display of environment tests diminishes the impact of your imaging blackspots helping to further reduce the total cost of ownership (TCO) of your managed infrastructure.
3.Terminal Output
iDiag outputs a summary display which details the results of three tests,
1. A Disk test
2. A Network test
3. A Server connectivity test (requires nping)
The summary display layout is depicted in Figure 3 below.

Figure 3: Illustration of iDiag's 'Traffic light' summary layout
Each of these tests will either pass or fail; there is no middle ground. If all tests pass, iDiag will exit and permit automation to proceed and load the agent.
Should any of the tests fail, iDiag will,
- Offer error-specific avenues to troubleshoot
- Begin a countdown before permitting automation to proceed (offering the option to pause indefinitely)

In most cases, the information provided by the summary screen will be sufficient to diagnose most issues. However, if more details are required to troubleshoot, then the desk-side IT staff can interrogate iDiag’s more detailed output on the secondary Linux terminal (ALT-F2) as depicted in Figure 4.

Figure 4: Illustration of iDiag's more detailed output to Linux's secondary terminal (tty2). The area numbered (1) is the traffic light summary, (2) provides enumeration of storage and network controllers and (3) provides IP connectivity data.
In order to return to the primary Linux terminal, the key combination is ALT-F1
The detailed information provided on the secondary terminal describes more thoroughly the driver and connectivity status of the machine. The form is quickly digestible should escalation to the Altiris Administrator be required.
All text is customisable in iDiag to permit local tailoring to local language and support needs.
4.Installing iDiag
iDiag can be installable on either an Altiris 6.9 or 7.1 Deployment Server. Installation takes just a few seconds as all that’s required is to copy over a few files in to your automation environment build folders.
- Download nping for Linux Automation from Symantec CONNECT
http://www.symantec.com/connect/downloads/statically-compiled-nping-linux-automation
- Download the iDiag Zip
http://www.incit-technology.com/downloads/idiag_v1.0B.zip
Extract the files within the zip archive, and place these too in a location visible to your Altiris 6.9 or 7.1 Deployment Server
- Locate your BootWiz Folder
Automation build folders sit in the Bootwiz folder hierarchy. The location of the Bootwiz folder structure will depend on the DS version you are running. The full path to the Bootwiz folder is referred to in the file copy instructions by the abbreviated form [Bootwiz].
On a DS6.9 server, the BootWiz folder sits in the eXpress share. The default path to the Bootwiz folder will vary slightly according to your OS architecture,
x64 Windows Server OS
[BootWiz] -> C:\Program Files (x86)\Altiris\eXpress\Deployment Server\BootWiz
x86 Windows Server OS
[BootWiz] -> C:\Program Files (x86)\Altiris\eXpress\Deployment Server\BootWiz
On a DS7.1 Server, the Bootwiz folder sits within the Deployment share. The default path to the Bootwiz folder in this instance is,
Windows 2008 R2
[BootWiz] -> C:\Program Files\Altiris\Altiris Agent\Agents\Deployment\Task Handler\Bootwiz
Naviagate now to your Bootwiz folder.
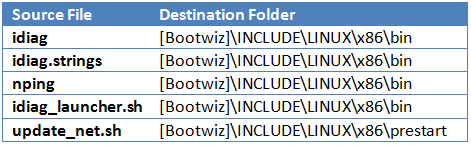
- Copy the iDiag files into the Bootwiz folder hierachy
Using the table below for reference, copy the files downloaded in steps 1 & 2 above to their Bootwiz folder destinations. If the full Bootwiz paths do not exist already on your server, you'll need to create them. The idiag.strings file is an optional addition; it holds string replacement text for localisation. Further details regarding the use of this strings file is detailed in section 8.
- Rebuild/Distribute your Linux Automation environment as usual
When you automation environment is rebuilt, iDiag will be seamlessly inserted.
When you next boot into Linux automation, you’ll find it enhanced as illustrated below,

Figure 5: iDiag with DS7.1 Linux Automation
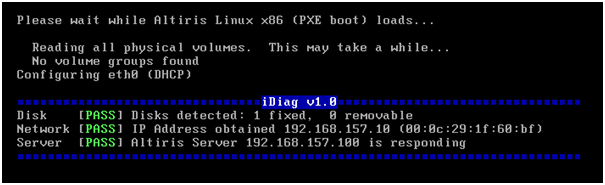
Figure 6: iDiag with DS6.9 Linux Automation
In both cases, the iDiag tests are executed very early in the Altiris automation execution sequence. Should all the tests be marked as passed as shown above, you can be confident you have both the network connectivity and storage availability required for deployment.
5.Specific iDiag Troubleshooting Scenarios
In order to illustrate the power of iDiag, let’s see how it works in practice. As most deployment issues are network related, let’s examine a few scenarios to see how iDiag’s display helps minimise blackspot impact.
In nearly all network related blackspot scenarios, a deployment technician will be presented with the rather obscure Linux automation error screens as illustrated in Figure 7 and Figure 8 below.

Figure 7: DS6.9 Linux console screen for a network 'blackspot' scenario
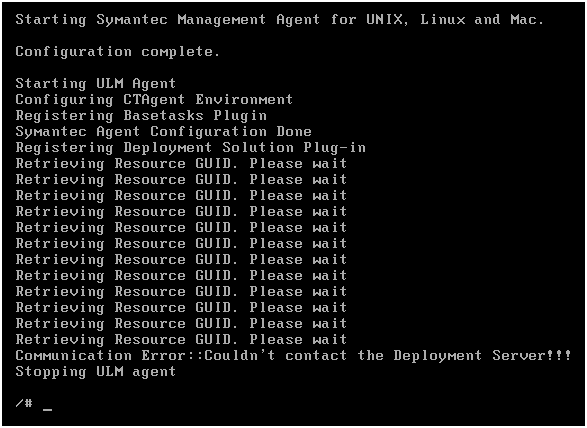
Figure 8: DS7.1 console screen for a network 'blackspot' scenario
Altiris Administrators know these screens well. All that can be gleaned at this point is that a network problem exists and this can frustratingly be at the client, the server or even anywhere between.
A Deployment technician’s typical response to such a scenario is detailed below,
- Technician tries booting into automation 2 or 3 times, just to see if it’s a random glitch
- Technician have a chat with other deployment technicians to see if it’s just him
- Technician calls the Altiris admin and details the screen text
- The Altiris Admin then runs through the setup checklist with deployment tech to confirm deployment is being done as prescribed
- The Altiris admin reads out various Linux commands for the technician to type
- Technician implements resolution offered by Altiris Admin
The above steps can consume over 2 hours and across multiple personnel as there are a multitude of scenarios which can result in the above automation failure screens.
To illustrate iDiag’s ability to resolve such blackspot scenarios rapidly, let’s now take a look at three specific scenarios with iDiag in place.
5.1. Unpowered/Disconnected Network Cable
In this scenario, a deployment is attempted with a disconnected or unpowered network cable. When automation boots, iDiag’s test results are presented within just a few seconds of the automation boot,
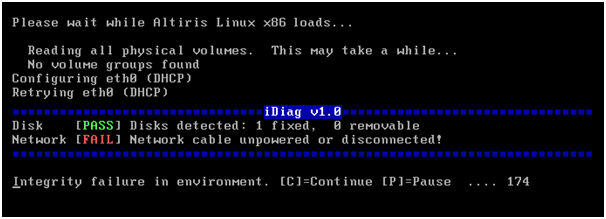
The deployment technician now knows instantly that he’s got a network problem. Even better, he now knows that this failure is likely due to an unpowered or disconnected cable.
The process to resolve is now very focused. The technician could now,
- Check the network cable is still connected (broken clip?)
- Check that network switch is still powered
- Try a new cable
The important point is that all of the above steps in their entirety will take no more than a few seconds and have been executed entirely without external assistance.
5.2. Unsupported Network Card Scenario
In this scenario, a deployment is attempted on a computer which has a network card that is unsupported in Linux automation.
This can occur on old machines that have suffered motherboard and/or network card replacements over their lifecycle. New machines can also suffer this if they’ve somehow circumvented your organisation’s Altiris hardware ratification processes.
As usual, the standard troubleshoot could potentially see 2 hours of organisational resource wasted. Let’s now see what happens when iDiag is installed,

This error here is quite specific; the target network hardware isn’t supported in Linux automation.
This is one example where there is nothing the deskside technician can do except escalate this case to the Altiris Administrator. The information which is useful to the Altiris Administrator in such scenarios can be found in the detailed output screen (ALT-F2),
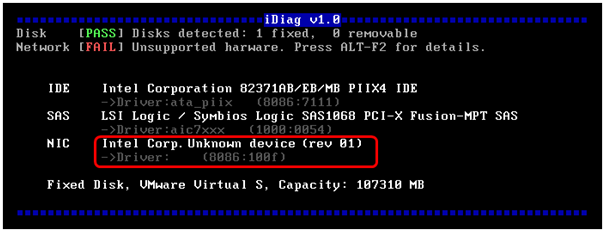
This information can be snapped up on a smartphone camera and emailed to the Altiris Administrator. This will reveal to the admin that the network card is unsupported and that in particular the offending NIC is an Intel card with a device ID 100F.
5.3.Quarantined/Firewalled Network Scenario
In this scenario the computer has been connected to a network which is unable to contact the Deployment server. The can occur in enterprises where unknown computers are pushed by default into a quarantined LAN.
Let’s now see what happens when iDiag is installed,
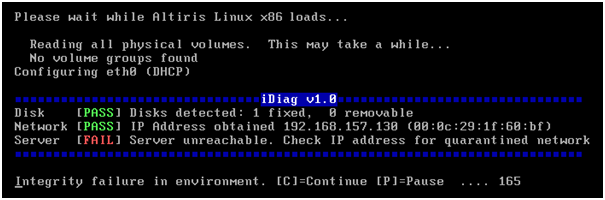
iDiag’s assistance here means that the deployment technician is confident he’s on a network and has a IP address. He also now understands the client is unable to connect to the server from this IP address. The advice in this instance is to check the client’s IP address to ensure the client hasn’t been pulled into a quarantined network in error.
The process is now,
- Technician checks that the IP address is valid for deployment
- If IP address for quarantined LAN, technician corrects
- If IP address is valid for deployment, then technician can escalate to Altiris Admin as a potential ‘server down’
Once again, the technician has been provided the information to resolve the error himself within a few minutes.
Should escalation be required, the technician is now armed with a great deal more information about the issue than he would have had without iDiag in place.
6.iDiag Switches
The iDiag launcher script (idiag_launcher.sh) is located in .\Bootwiz\Include\LINUX\X86\bin\. This script can be amended according to the following swiches,
-n
|
No Banner. Removes the banner to save on screen real estate on the primary display
|
-s[n]
|
Sleep interval in seconds after displaying summary when tests pass
|
-t[n]
|
Sleep interval in seconds after displaying a summary when a test fails
|
-v
|
Displays version information
|
When iDiag is installed, the launcher script is as follows,
#!/bin/sh

/bin/idiag -s 5 -t 180
This launches iDiag with a 3 minute sleep configured should an environment fault be encountered. In the event that all tests pass, a 3 second sleep is used.
7.iDiag text Customisation
When iDiag loads, it checks for the existence of an iDiag.strings file. This file permits customisation of the text strings used in iDiag.
The default file contents are follows,
# This iDiag Strings file. This is supplied to illustrate the default strings which are
# set in iDiag itself. You can amend these strings here to support your language

# Strings specific to the traffic-light checks.
  [1] PASS
  [2] FAIL
  [3] Disk
  [4] Network
  [5] Server

# Strings specific to the disk checks
  [10] Disk Check
  [11] Disks detected: %1% fixed,  %2% removable
  [12] No disks found. Check model support, cables and BIOS.

# Strings specific to controller enumeration
  [20] Enumerating Disk Controllers and Network Cards
  [21] Found
  [22] Driver

# Strings specific to the network checks
  [30] Network Configuration Verification
  # Note for [31] variables %1%=MAC %2%=KERNEL_DRIVER_NAME
  [31] Link down %1% %2%
  [33] Network cable unpowered or disconnected!
  # Note for [34] variables %1%=IP %2%=MAC %3%=KERNEL_DRIVER_NAME
  [34] IP Address %1% %2% %3%
  # Note for [35] variables %1%=MAC
  [35] No IP Address. Check DHCP. (%1%)
  # Note for [36] variables %1%=IP %2%=MAC
  [36] IP Address obtained %1% (%2%)
  [37] Network Check FAIL. No NIC drivers loaded.
  [38] Unsupported harware. Press ALT-F2 for details.
  [39] Network Check PASS. NIC drivers loaded and IP obtained.

# Strings specific to the nPing firewall checks
  # Note for [50] variables %1%=Altiris Server %2%=Altiris TCP Port
  [50] Altiris Server %1% responded to SYN on %2%
  # Note for [51] variables %1%=Altiris Server
  [51] Altiris Server %1% is responding
  # Note for [52] variables %1%=Altiris Server %2%=Altiris TCP Port
  [52] Altiris Server %1% did not respond to SYN on %2%
  [53] Server unreachable. Check IP address for quarantined network

# Strings specific to prompts
  [60] Integrity failure in environment. [C]=Continue [P]=Pause  ....
  [61] iDiag paused. ALT-F2 for more details, CTRL-C to Continue
To customise, simply edit this file with your own text and recreate your automation images as normal.
8.Uninstalling iDiag
To uninstall iDiag simply,
- Delete the idiag, idiag.strings, nping, idiag_launcher from the bin folder
- Delete update_net.sh from the prestart folder
- Recreate your Linux PXE images and/or bootdisks
9.Acknowledgements
Incit Technology would like to thank IT Services at The University of Oxford for the valuable feedback they’ve provided throughout iDiag’s development.
10.Comments and Feedback
Please post feedback here to Symantec CONNECT, or send to support@incit-technology.com
EDIT: 31/05/2013 Updated download to reclaim 1MB disk space on the root filesystem. This is to resolve the scenario where 32MB Linux environments are used there is insufficient space to unpack the ADLAGENT when iDiag is installed.