Importing Symantec Endpoint Protection Compliance Data into Altiris.
We saw an opportunity to gain better insight into what was going on with computers in SEP by bringing the SEP compliance data into Altiris where it could be reported on and actioned. More people have access to Altiris reports than SEP reports, and Altiris can take actions on SEP data in an automated fashion according to rules that you define. The first step is to get the SEP data into Altiris where you can work with it.
Here is what the end result looks like:
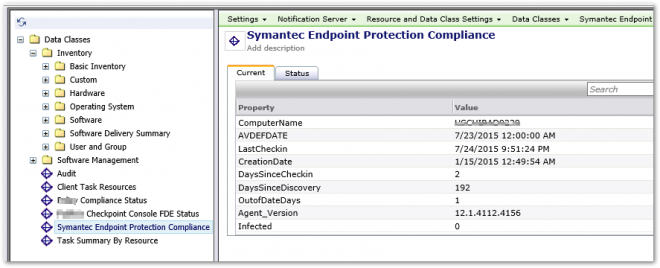
These fields can all be brought into any number of reports or used to target the machines with policies etc.
There are several steps to implementing this described below.
Create the SEPM query.
NOTE: to run a query against the SEPM database you will need valid credentials that will also have to be entered into Altiris.
You need to pull the relevant details from each computer so that you can see where it stands from a SEP perspective at a glance. To do that I constructed a SQL query to pull this data from SEP. I wanted to get the following details:
- ComputerName - Computer name for matching
- AVDEFDATE - The date stamp of the virus definitions
- LastCheckin - The last time the computer checked into SEP
- CreationDate - When the computer first joined SEP
- DaysSinceCheckin - How long since the computer checked into SEP
- DaysSinceDiscovery – How long the computer has been in SEP
- OutofDateDays - How out of date the Virus definitions are
- Agent_Version - The version of the SEP agent
- Infected - If the workstation is infected or not
Here is the query that I came up with:
SELECT DISTINCT SEM_COMPUTER.COMPUTER_NAME AS 'Computer name',
PATTERN.PATTERNDATE as 'AV DAte',
dateadd(second, SEM_AGENT.LAST_UPDATE_TIME/1000, '1970-01-01') AS 'LastCheckin',
dateadd(second, SEM_Client.CREATION_TIME/1000, '1970-01-01') AS 'CreationTime',
DATEDIFF(d,(dateadd(second, SEM_AGENT.LAST_UPDATE_TIME/1000, '1970-01-01')),GETDATE())as 'Days Since Last Checkin',
DATEDIFF(d,(dateadd(second, SEM_Client.CREATION_TIME/1000, '1970-01-01')),GETDATE())as 'Days Since Discovery',
DATEDIFF(d,PATTERN.PATTERNDATE,(dateadd(second, SEM_AGENT.LAST_UPDATE_TIME/1000, '1970-01-01'))) AS 'OutofDateDays',
SEM_AGENT.AGENT_VERSION,
SEM_AGENT.INFECTED
FROM SEM_COMPUTER
INNER JOIN SEM_AGENT ON SEM_AGENT.COMPUTER_ID=SEM_COMPUTER.COMPUTER_ID
INNER JOIN SEM_CLIENT ON SEM_CLIENT.COMPUTER_ID=SEM_COMPUTER.COMPUTER_ID
INNER JOIN SEM_CONTENT ON SEM_CONTENT.AGENT_ID=SEM_AGENT.AGENT_ID
INNER JOIN PATTERN ON PATTERN.PATTERN_IDX=SEM_AGENT.PATTERN_IDX
INNER JOIN (
SELECT SEM_COMPUTER.COMPUTER_NAME AS 'TempHostName',
MAX(SEM_AGENT.LAST_UPDATE_TIME) AS 'TempMax'
FROM SEM_COMPUTER
INNER JOIN SEM_AGENT ON SEM_AGENT.COMPUTER_ID=SEM_COMPUTER.COMPUTER_ID
GROUP BY COMPUTER_NAME)
TestTable ON TestTable.TempHostName=SEM_COMPUTER.COMPUTER_NAME
AND TestTable.TempMax=SEM_AGENT.LAST_UPDATE_TIME
WHERE PATTERN.PATTERN_TYPE='VIRUS_DEFS'
AND PATTERN.DELETED='0'
AND SEM_CONTENT.DELETED='0'
AND SEM_AGENT.DELETED='0'
AND SEM_COMPUTER.DELETED='0'
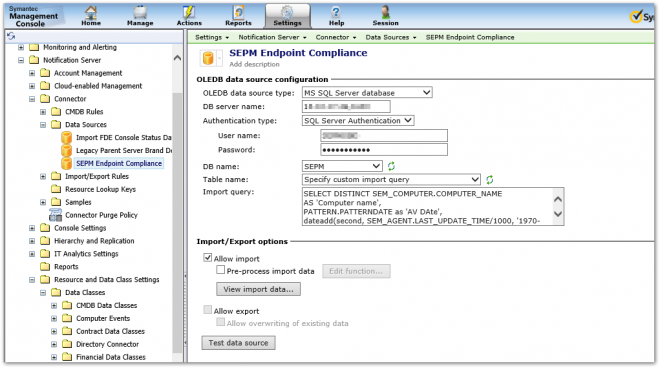
Add the SEPM Data Source
- In Altiris got to Settings > All Settings > Notification Server > Connector > Data Sources
- Create a new OLEDB data source
- Fill out the details of your SEPM instance.
- Add the SEPM query and test your datasource
Create the new SEPM dataclass to house these data
- In Altiris go to Settings > All Settings > Notification Server > Data Classes
- Create a new Dataclass called something like Symantec Endpoint Protection Compliance
- Add Attributes that match the SEPM Query you create

Add the new Symantec Dataclass to the Computer Resource
This is the tricky part that took a while to find. In order for the custom data to be written to each computer object, that dataclass must be associated to the computer resource type.
- In Altiris got to Settings > All Settings > Notification Server > Resource and data Class settings > Resources Types > Asset Types > IT
- Open Computer
- Scroll to the Bottom and choose “Add Data Classes”
- Navigate to your new Data Class and check the box next to it to add it to the Computer record

Create your import Export Rule
This Rule maps the data to the data class “writing” it to each matching computer record
- In Altiris got to Settings > All Settings > Notification Server > Connector > Import/Export Rules
- Right Click on Import/Export Rules and choose New > Resource Import/Export Rule
Filling out this Rule is easier than it looks. You are just matching the data from your query to the data in your custom Data Class
- Data source = your newly created SEPM data source
- Replication Direction = Import
- Resource Lookup key: This is the part that matches the computer name gathered from SEP with the Altiris gather computer name. In our case it’s just: Resource Name on the left and Computer Name on the right.
- Data Class mappings: Click this and browse to an select your Symantec Endpoint protection Compliance data class
- I found it important to uncheck “create resources if doesn’t exist”. You don’t want a bunch of SEP only computers getting created in your Altiris
- Map the query data to the Data class in the table that appears below it

- When its complete test your rule by choosing the "Test Rule" button.
- This can take a few minutes for my 28,000 endpoints it take between 4 and 8 minutes to run
- If all looks good schedule your rule to run on whatever regular schedule suits your needs. You will be able to find the SEP data for all matching compouter names inside the inventory on each computer resource manager as depicted in the first screenshot of this article.