Software Portal platform detection introduced in ITMS 8.1 RU5
The Software Portal provides users access to software that administrators grant rights to. This software can be selected and installed through the portal. When a user opens the portal, and software granted by the administrator is available. In previous versions this did not take into account what platform the portal was launched from. For example if a Mac system loaded the portal, it would still show all available software including Windows-based applications. In the 8.1 RU5 release it is now possible to configure software so it only appears in the Portal for computer platforms that supports it.
The following sections provide detail on how to configure and use this new feature:
Component Configuration
The first step is configuring Software Releases so they apply to specific platforms. By default not all these associations are automatically added, but may need to be added manually. This can be done as part of the original creation and configuration of the software, or be added later.
The following steps provide a walkthrough of how to edit a component and add the association.
- In the Symantec Management Console, browse under Manage > Software.
- Using the views in the upper left-hand pane (common view is Deliverable Software > Software Releases) using the middle pane to find the software you wish to configure.
- Double-click on the software or right-click and choose Actions > Edit Software Resource.
- If you are creating a new software resource, this is the point you’d add this configuration item to the initial creation.
- Click on the Association tab.
- From the Association Type drop down list, select Applies to Software Platform.
- Click the Add button.
- The list in the left pane allows you to choose one of the following supported operating system types:
- Linux
- Mac
- Unix
- Windows
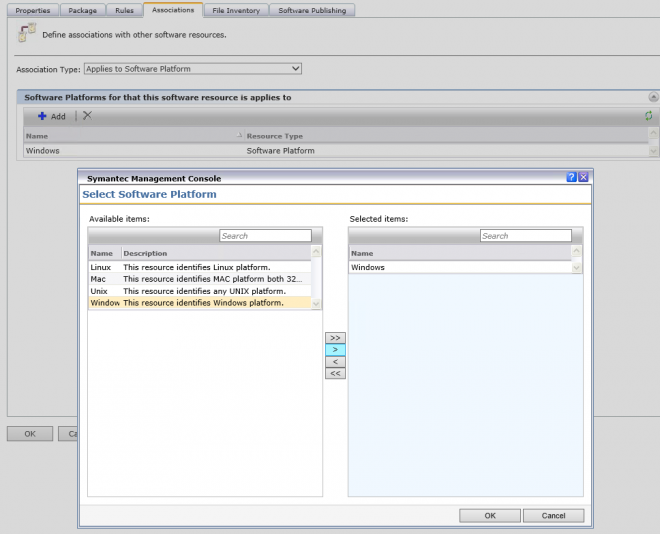
Click OK to save the added platform settings.
Target Configuration
Another common use-case revolves around distinguishing between 32-bit and 64-bit platforms. The associations do allow Operating Systems to be added, however the Software Portal does not use those associations. Instead, targeting provides the ability to target specific filters of computers. By adding a specific type of computers to the target, you can restrict things like 32-bit or workstations only.
The following process walks through how to set these types of targets:
- In the Symantec Management Console, browse under Manage > Software.
- Using the views in the upper left-hand pane (common view is Deliverable Software > Software Releases) using the middle pane to find the software you wish to configure.
- Double-click on the software or right-click and choose Actions > Edit Software Resource.
- If you are creating a new software resource, this is the point you’d add this configuration item to the initial creation.
- Click on the Software Publishing tab.
- Select the command-line that is published that you wish to change settings on.
- Click on the option “Change Target”.
- Select the appropriate target from the left-hand pane and use the arrow key to move it to the right-hand pane.
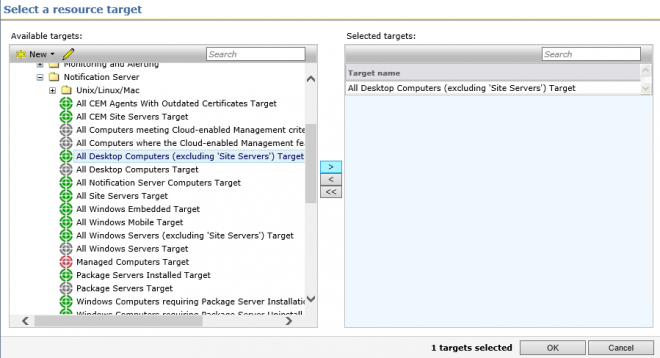
- Click OK to save the target selection.
- Click OK to save the Software Resource changes.
Automatic Association
Some associations will be made automatically. Certain file types, when imported, will trigger this to happen. Note that this only happens for the file that is chosen as the Installation File during Import of the Software, as shown in the below screenshot:
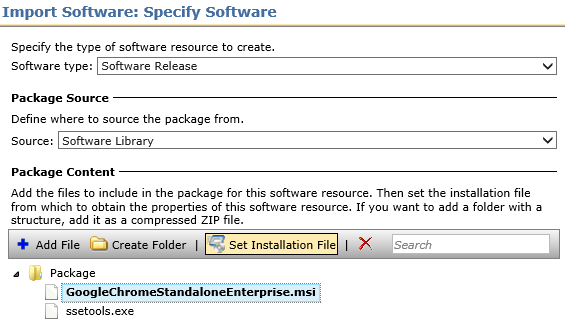
For example, if you import an MSI, the Platform Assocation of Windows will already be present for the Software Release. The following file formats are used in this manner:
Illustrating Functionality
The following walkthrough demonstrates this functionality in use. For this scenario, I’m taking Google Chrome to post to the Portal. The steps are not full, meaning this isn’t a full walkthrough of all steps, but only those applicable to the example of the functionality.
Criteria:
- Make Google Chrome available to all Users.
- Limit Chrome to only workstations and notebooks. No Server-class machines should have Chrome installed.
- Users with server access still need access to Chrome for workstation-notebook Chrome installs. For example on their personal notebooks.
Walkthrough:
- Import Google Chrome to the Software Catalog.
- During the import, choose the MSI as the Installation File.
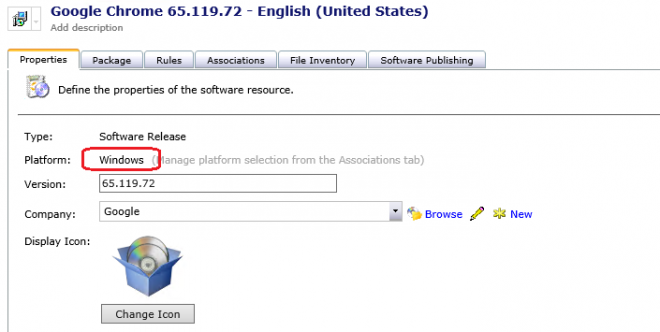
- When asked, choose to Open the new Software Release for editing when finished with the Import.
- Note that the Properties show the Windows platform association automaticalliy.
- Under the Software Publishing tab, Check the box next to the appropriate command line (i.e. Install for all users with no UI) add All Domain Users as the group and set the radial to Approved.

- Click OK to save the changes.
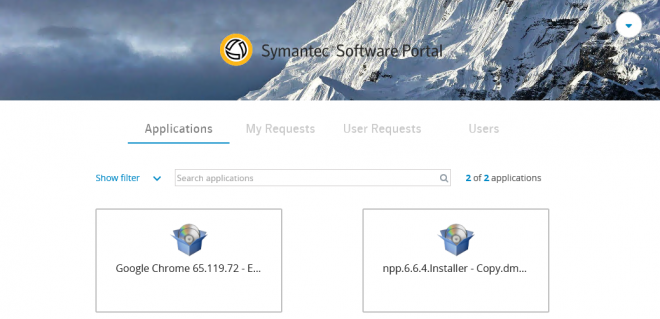
- Launch the portal from a Windows workstation and Windows Server. Note that it shows on both, including the Server. Since Any Windows platform is applicable as configured automatically, it will show on server operating systems. The following screenshot is from a Windows Server 2012 system:
- In the Symantec Management Console, browse under Manage > Software.
- Using the views in the upper left-hand pane select the view Deliverable Software > Software Releases and use the middle pane to find Chrome.
- Double-click on the software or right-click and choose Actions > Edit Software Resource.
- Click on the Software Publishing tab.
- Select the command-line that is published in order to edit the settings on it.
- Click the Change Target button.
- Click New > Target.
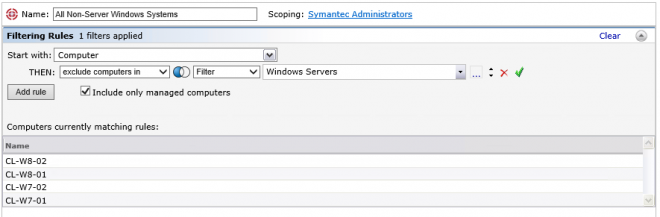
- Provide a name for the target, such as: All Non-Server Windows Systems.
- Click Add rule.
- Choose next to THEN: Exclude computers in > filter > and click the … button.
- In the search type windows servers and select Windows Servers from the resulting list, and click OK.
- If you click Update Results you will see a list of computers that does not include server-class operating systems.
- Click OK to save the new Target. You will see the target now selected in the Select a resource target screen.

- Click OK to save the target selection.
- Click OK to save the changes made to the Software Release / Resource.
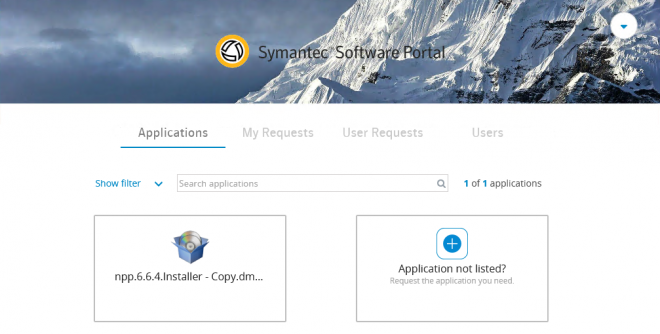
- Now open the Portal on both a client and server operating system. Note that it will still show on the client Windows versions, but not the Servers. For the following screenshot I used the same Windows Server 2012 system:
- Done!
32-bit and 64-bit Systems
As one last example, this is how you create a filter for only 64-bit systems:
- In the Symantec Management Console, browse under Manage > Software.
- Using the views in the upper left-hand pane select the view Deliverable Software > Software Releases and use the middle pane to find Chrome.
- Double-click on the software or right-click and choose Actions > Edit Software Resource.
- Click on the Software Publishing tab.
- Select the command-line that is published in order to edit the settings on it.
- Click the Change Target button.
- Click New > Target.
- Provide a name for the target, such as: All x64 Windows Systems.
- Click Add rule.
- Choose next to THEN: Exclude computers not in > filter > and click the … button.
- In the search type windows x64 and select Windows x64 from the resulting list, and click OK.
- Click OK to save the new Target. You will see the target now selected in the Select a resource target screen.
- Click OK to save the target selection.
- Click OK to save the changes made to the Software Release / Resource.
The same thing can be done for x86 (32-bit) systems thus allowing you to target those specific platform types.
Conclusion
Using these methods, the Portal can now be configured to only show software that is applicable to the user and machine the user is logged onto. This avoids users trying to install software that is not meant for the target system.