This white paper provides valuable information for anyone leveraging Software Management in the Symantec Management Platform (Notification Server) environment. Learn the tips and tricks for using Software Management successfully. Warnings, recommendations, explanations, and best practices are covered.
A downloadable version of the entire article is attached below.
Introduction
General Configuration
Software Library
Software Management Plug-Ins
Licensing
Software Catalog
Process Flows
Legend
 - Warning - These tips provide you warnings for known configuration issues and other items that may be important to know.
 - Best Practices - From experience the Best Practices tips provides you methodology or considerations when using the applicable features.
Introduction
Software Management in Notification Server 7.0 underwent the largest transformation of any of the products available from the 6.0 architecture. New functionality gave expanded abilities and provided some real ROI for the whole of Software Management. From new Detection capabilities to intelligent monitoring of Software, Software Management offers a large toolbox for not just deploying software, but for managing software.
In 7.1 the ease and ability of using Software Management was greatly enhanced by the introduction of the Silverlight interface (known as the Activity Center, a.k.a Enhanced Console Views). Feedback taken from users of 7.0 guided much of the changes found in version 7.1.
Back in 7.0, due to this influx of new functionality, the first release required a steep learning curve, and as users starting implementing Software Management the idiosyncrasies and problems began to surface. In 7.1 most of these early problems have been addressed, yet many these same configuration lessons learned in 7.0 apply to 7.1 as well. The potential still exists for problematic configurations. This document attempts to address these points, provide guidance for the new features and interfaces, and provides warnings to avoid the potential pitfalls, and provide configuration details to enable successful Software Management.
Best Practices are offered based off understanding of typical goals. In other words these are offered as they fit the majority of use cases. It is possible an environment will not cater to these Best Practices. As such the functionality behind the configuration options are explained, where possible, to help you make your own informed decision on how it should be configured for your environment. This document is provided "As Is" and implies no warranties, guarantees, or supportability.
General Configuration
For effective use of Software Management, it's important to set all the general settings as needed for your environment. Though some of these settings won't be known until later, I'll cover all general settings for reference.
Software Library
The Software Library is a location where all Packages are stored (when Software Library is selected as the Package Source). The Software Library has two requirements before it can be used successfully. One is a one-time only setting, and the other is required on any system that needs to run the Console in conjunction with the Software Library.
- Software Library Location - This should be a location that has a lot of storage, or at least sufficient storage for all packages to be managed within the infrastructure. To set the location, follow these steps:
- At the desired location where you wish to store the packages within the Software Library create a base folder. When packages are added they will be added to this folder as subfolders.
- The folder requires a share that the Application Identity can access (preferably all administrators on the system should have access). It is recommended to keep the share name short for ease of configuration.
- In the Symantec Management Console, browse under Settings > All Settings > Software > Software Catalog and Software Library Settings > Software Library Configuration, as shown below:
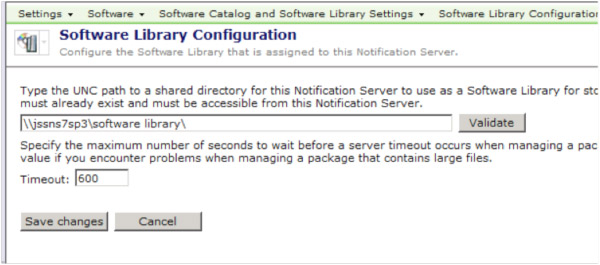
- Set the location as a UNC path to the desired location.
- Click Validate to ensure the path is set correctly. Reasons it may fail are:
- The Altiris Application ID, or the Account associated with NS, may not have rights to the UNC specified
- The UNC is not a valid share
- The UNC cannot be reached (DNS or other related network issues)
- Click Save changes to commit the settings once validated.
Note the timeout value set here. For very large packages we have seen instances where this value should be increased beyond the default 600. Also note that very large files can also reach the timeout value when importing into the library.
If your Software Library resides on the same disk as a Package Source, the files will be duplicated into the Software Library share, taking twice the necessary disk space. If the package is local to the Software Library, you can use a UNC Package Source as the source instead of the Software Library, or mount the package in another location to use as a source. The benefit for having a separate source outside of the library is for package integrity.
- Java Runtime Environment - To use the Software Library option when configuring a Package, Java Runtime Environment (JRE) is required. You can go to www.java.com to obtain the free download of JRE.
NOTE: the JRE needs to be installed and available on any system that runs the Symantec Management Console where Package creation is to be used.
Software Management Plug-ins
There are four Plug-ins for Software Management. The first and second ones are automatically installed as part of the Altiris Agent. The first is called the Software Management Framework Plug-in (SMFAgent.dll). This one is used closely with the second plug-in, which is the base Software Management Agent. This allows all Solutions and the NS itself to make use of the Software deployment and management capabilities for the distribution of packages, policies, and certain task types.
To extend the functionality for use within the Software Management Solution, the Software Management Solution Plug-in needs to be installed. The last "Plug-in" is the configuration of the Software Portal interface.
The following procedure walks through configuring and pushing out the Software Management Solution Plug-in and the Software Portal Plug-in Policy:
- In the Symantec Management Console, go to Settings > All Settings > Software > Software Portal Settings > and select Software Portal Settings.
- Set the maximum number of Open requests in the right-pane to a reasonable number of your environment.
- If desired, change the Company Name and Logo to brand the Software Portal to your Company.
- Click Save changes when set correctly.
- In the Symantec Management Console, go to Settings > Agents and Plug-ins > All Agents and Plug-ins > Software > Software Management > Windows > and select Software Management Solution Agent for Windows - Install.
- Normally the default filter suffices, but this can be changed at this time if required, as well as the schedule.
- This Policy controls the rollout to ALL platforms, including Windows, Mac, Linux, and Unix. If you wish to control the Plug-in rollout separately, the Filter needs to be changed to reflect which platform to target. You can clone the Policy and configure for another platform, etc.
- NOTE: It is not recommended to try and edit the existing filter, since that filter is used in other places. If you wish something different, create your own filter and add that as the target.
- Enable the Policy and Save changes.
- In the same folder, now select the Software Portal Plug-in Policy. This screenshot shows the policy:
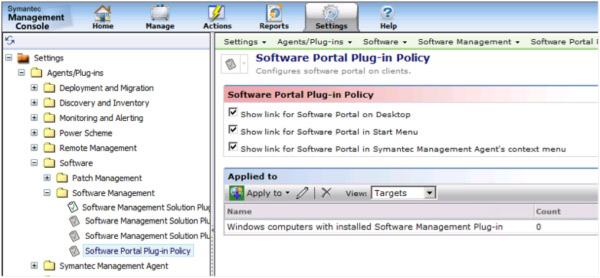
- Select the options for where you want the link for the Software Portal to appear. Options to consider are:
- If your Symantec Management Agent tray icon is hidden, uncheck the option for "Show link for Software Portal in Symantec Management Agent's context menu".
- The Start Menu is a popular choice as it's out of the way but easily understood by typical end-users.
- It is recommended to keep the current target as that enables the Software Portal on all Managed Systems.
- Done! The Agent will now be deployed as the target computers check in for a new Configuration. As this is policy based it may take a number of hours for all machines to run the policy and install the Plug-in.
Licensing
Protection against unauthorized use is required for any Software Company. Licensing ensures that only authorized organizations (AKA those who have purchased) can use the software, and that they only use it within the scope of their license. While required in some form or another, it is not desired that licensing get in the way of successfully using the software if properly licensed. For the Software Management Framework, no license is required. For the Software Management Solution, a valid license must be installed in order to use it.
Software Management Solution counts licenses by the number of computers that have the Software Management Solution Plug-in installed. The count is figured off of the table Inv_AeX_AC_Client_Agent which Basic Inventory populates. The count is based off of the Agent Name: Software Management Solution Agent and the corresponding Agent Count column.
Keep a tab on how many computers have the Software Management Solution Agent installed. Visit SIM in the Licensing section, and ensure you don't roll the agent out to too many systems. If you need more licenses ensure you receive them and install them before you roll additional Plug-ins out.
If your Software Management Solution license has been exceeded, the following action can be taken to free up licenses.
- In the Symantec Management Console, go to Manage > Filters > Software Filters > Agent and Plug-in Filters > and select All Windows Computers with Software Management Solution Agent Installed.
- Click Update membership to ensure the Filter is up to date.
- In the list of computers, find those computers you wish to remove a Software Management License from. Make a list of these computers
NOTE: If you wish to make a dynamic filter, then it is unnecessary to create a list.
- In the Symantec Management Console, go to Settings > All Settings > Agents/Plug-ins > All Agents/Plug-ins > Software > Software Management > Windows > Software Management Solution Agent for Windows - Uninstall.
- Under the Applied to section remove the default Filter by selecting it and clicking the red X delete button.
- Now add the filter of the systems you wish to remove the Plug-in from. If it is a dynamic filter you've created, even better.
- If you wish to use the list you acquired in step 3, follow these steps:
- Click Apply to > Computers.
- Click Add Rule.
- Change Then to Exclude computers not in, and the next field to Computer List.
- Click the ellipses <...> at the end of the row to open the computer selection dialog.
- From the left-hand pane select the computers to remove the Plug-in from. Note that you can use the filter to find systems if you have a large list.
- Add your selects by clicking the > button (or if you have filtered down to the list you wish, use the >> button). See this screenshot for a sample:
- Click OK to apply the new filter.
- Enable the policy, aka turn the policy to the ON status.
- Click Save changes to save the application of the new filter.
- Done!
As the targeted computers update their configuration, they will receive the new uninstall policy and remove the Plug-in. It then requires those targets to send an updated Basic Inventory. To finalize the process, the License Refresh must occur. The entire process can take time to propagate to all targeted systems.
Software Catalog
There are a number of other settings/configurations that can be utilized by the Software Catalog. The following items are available and can be used as desired. For most general use they do not necessarily require configuration beyond the defaults. To locate these items, in the Symantec Management Console go to Settings > All Settings > Software > Software Catalog and Software Library Settings.
- Clean up File Resources - This is an automatic process that reconciles data captured from multiple computers to synchronize file resources, if needed.
 Best Practices!: The results of Software Discovery, called Add Remove Programs data or Installed Software, may show incomplete data after machines have reported Inventory. If this occurs, manually run the Clean File Resources task to correct the problem.
- Installation Error Code Descriptions - There is a large default list (600+ entries). Only if you wish to clarify specific errors or add your own should you use this feature. It can be nice is large environments where the IT professionals working on issues may benefit from more verbose error messages.
- Known As - This allows catalog information to be correlated from Company Name to a corresponding resource. This also allows multiple versions of a company's name to map to the same resource. For example:
- Microsoft > Microsoft
- Microsoft Inc. > Microsoft
- Microsoft Corp > Microsoft
- Microsoft Corporation > Microsoft
- Also note that there is a Wildcard section to catch potential exceptions. Use "Microsoft" in the search field to see a list of those items already mapped.
- Software Discovery - Software Discovery is executed by the Software Management Framework Agent (SMFAgent.dll), but is executed by Inventory Solution. Please see the Inventory Solution section of this document for more information. As a general rule, this built-in policy should be left disabled.
Process Flows
The following Process Flows show how different mechanisms work with Software Management. These will be referenced in the subsequent sections as needed.
Read Part 2