Software Resource Import Method
Manual Creation
Software Component Details
Package
Command-Line
Rules
Static File Expression
Associations
File Inventory
Software Publishing
Software Resource
A Software Resource houses Package and command-line information, and contains a myriad of metadata for a specific piece of Software. This includes Package information, or the physical files, the command-lines that can be executed against the package, detection and applicability rules, file information, associations with other Software Resources, and Software Publishing information. The culmination of this data makes up a single Software Resource, also known as a Software Component, in the Notification Server infrastructure.
Software Resources are organized in the Symantec Management Console under Manage > Software > Software Catalog. The Catalog view within the Enhanced Console View (ECV) contains a list of Newly discovered/undefined software, of Managed software products (installed, licensed, metered, deliverable), and Unmanaged software. See this screenshot for an example:
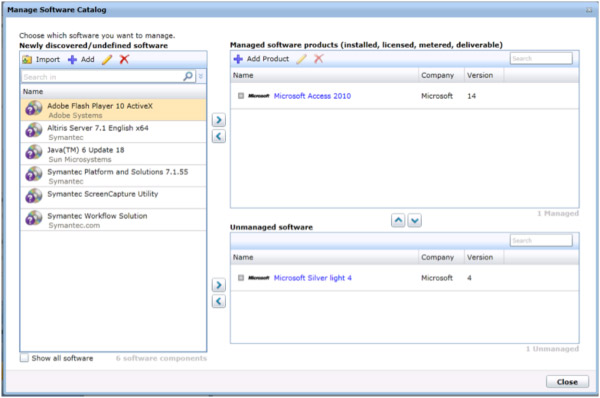
This is only a condensed view of the Catalog, typically software that is active in your environment. Actions you can do from this view are:
- Import - Import new Software via the installation files.
- Add - Manually create a Software Resource.
- Edit - Edit an existing Software Resource
- Add Product - Create a new Product
NOTE: Products are how licensing and usage are tracked, so proper Product configuration is essential
To view the entire Catalog in a single view, browse under Settings > Console > and select Views > browse under Views > Software > and select the Software Catalog. This gives you a full view of all Software Resources in your environment. To view software that can be delivered, browse in the Symantec Management Console under Manage > Software. This will load the Enhanced Console View (ECV). In the left-hand pane labeled "Deliverable Software", choose either Software Releases or Software Updates. The items that populate the center pane have associated Packages and/or command-lines.
There are several ways Software Resources are created. They can be imported manually (this process is covered in the next segment), manually created, created by Inventory Solution running Add Remove Programs Inventory or alternatively via the Software Discovery Task, or imported through a data provider.
Import Method
The best way to add deliverable software to your Software Catalog is to use the Import function. The import will auto-generate much of the fields needed for a Software Release, including a command-line (or multiple command-lines if using an MSI), version information, Package details, and if you are using an MSI a Detection Rule of MSI Product Code type is automatically generated.
Follow these basic steps to import Software into the Software Catalog. Please also review the manual steps as it will illustrate what is being done during the automatic import process.
- In the Symantec Management Console browse under Manage > Software. This will load the Enhanced Console View (ECV).
- Within the Installed Software pane in the upper left, right-click in the white space and choose Import Software.
- Select the appropriate Software type (most will be Software Release).
- Choose an appropriate Source, such as the Software Library.
- Click the Add button to browse to the source installation files of the software.
- When you select a directory, this directory should only contain the files for this specific software. This is because the selected folder becomes the package root, and all files, folders, subfolders and files will be included in the Package.
- The Package contents will be populated. Note that the Console will attempt to auto choose what file is to be the default Installation File. Use the "Set Installation File" button if you need to choose a file other than what was automatically chosen.
- Click Next to create the Package.
NOTE: this process may take some time if your files are overly large (GBs in size) or there are many files within the package. This is due to the hash created for each program file found within the package.
- The following screen allows you to either create a new Software Resource, or update an existing one, as shown in the following screenshot. If the import detects that an existing Software Resource appears to match what is being imported, that will be the default option.

- Check the option to Open software resource for editing when finished if you wish to review what was imported, make any changes, or add additional information.
From this point on any modifications will be covered in the manual process for created a Software Resource in the subsequent sections.
Manual Creation
The following process runs through each configuration section of a Software Resource, and how it is configured. The process will help illustrate how each set of functions operate, and how they can be configured to meet your specific use-case.
Software Component Details
- To create a Software Resource, log into the Symantec Management Console and browse under Manage > Software. If you are already in the Enhanced Console Views (Silverlight) you can click the Software option in the lower left-hand pane.
- Right-click in the white space found under the Installed Software pane in the upper left and choose Managed Software Catalog. This will bring you to the Catalog management screen, as shown:
- Click the Add button on the icon bar for the left-side pane and choose the appropriate Software Resource type from the list:
- Software Release (most common)
- Service Pack
- Update
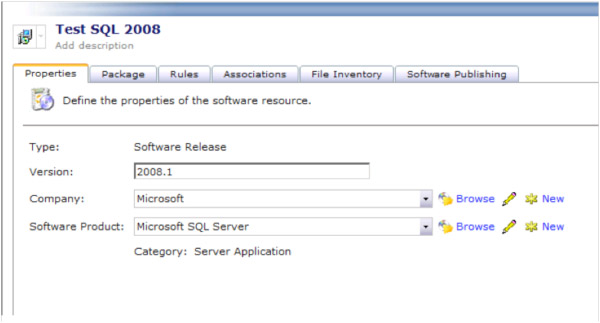
- Fill in the resulting fields using the guidance below:
- Name - This is the label or name that this Software Resource will show up as in lists or pickers.
- Type: This will list what type of Software Resource it is from the above list.
- Version: This field affects how the versions are calculated for a Product. It is recommend to use an approximation of the version of the application you are creating the Software Resource for.
 One function of this version field is to check against changes made to the Resource. For example if the Version number changes, the components within the Resource are invalidated and must be refreshed. This means any changes you've made to the components of the Software Resource will go through the update process on the Notification Server and can expedite updates to the targeted clients.
- Company: Used to put the manufacturer of the Software contained within the Resource. This affects reporting by Manufacturer so it is highly recommended to use a consistent naming scheme, and avoid differences such as:
- Microsoft
- Microsoft Inc.
- MSoft
- MS
- Software Product: This ties the Software Component to a Product, as managed in the Symantec Management Platform.
 In Software Management 7.1 most software actionable functionality is pointed to the Product level. It is highly recommended to use a consistent assignment to existing Products within the system. Application Metering, Asset Management, Licensing, and more are calculated against the Product level.
- See the below screenshot for an example of the Properties.
Package
The Package within a Software Resource is a collection of physical files and folders (if you can really call a digital file "physical"). The most basic explanation is a Package is a folder and all files and subfolders/files therein. For all Package Source types except for the Software Library, this is all a Package is. The Software Library option adds another layer to include the default execution file no matter where it is contained within the folder structure of the package.
The Software Library is the default selection for a Package Source. A Package can be configured to use one of the other options, such as UNC, URL, or a local directory on the NS. See the previous section on Importing Software for details on how to do this.
To aid in understanding what source is best for you to use, the following details can help you make a decision. Please note that the Package Source does not necessarily indicate where a targeted client will obtain the Package from. It's where the Notification Server will provide the Package from.
- Access package from an existing UNC - The Notification Server will provide the UNC to any Package Server or Client that requests the Package. An HTTP link is also created off the UNC to be used to distribute the Package.
- Access package from a URL - This reacts the same way as UNC only flip-flopped.
- Access package from a directory on the Notification Server - The Notification Server will turn the designated folder into a UNC and URL share to provide to all Package Servers or Clients that request it.
- Software Library - The Notification Server will import the package when configured. This process does the following:
- The contents of the folder (files and subfolders/files) to the location specified in the Configuration of the Software Library covered earlier in General Configuration section.
- Each file will be scanned. All EXE, DLL, or other programmatic files will be cataloged as part of the Software Resource.
- A hash will be generated for each of these files.
- A default Installation File will be set. The below screenshot shows a sample of this. Note that the Installation File will be bolded. By default the import process will try to analyze the most likely file and automatically set it. It is advised to check and ensure the right file is selected. To manually set it, select the file and click the Set Installation File button.

The Package Import process can take a long time depending on the size of the package. While there are a lot of factors that contribute to this, including network speed between the NS and the Package Source and Resource availability on the Notification Server, I've seen large packages take up to 45 minutes to import. The specific IE session will be locked during this process, so open a new console if you need to continue working in the meantime. In 7.0 we saw issues where the Import would time out, but in later version and in 7.1 these have not been reported due to improvement and efficiencies introduced into the product.
Click on the Package Server tab. The default configuration is set to All Package Servers with Manual Prestaging. Despite the name, this feature basically means the package will not be delivered to Package Servers until a client has a policy that needs it.
This recommendation comes with a caveat. If you have a large distributed environment, you may not want all your Package Servers to host every package until they are needed. If this is the case the default should be OK. Otherwise, follow these steps:
- Click on the Package Server tab after you have configured the Details tab of the Package.
- Under the dropdown labeled Assign package to, change the option to All Package Servers.
If you leave the selection on Package Servers with Manual Prestaging, be aware of the implications of this. Package Servers will not download the package until another Package Server or Client is services requests the Package. This can cause a Package or Quick Delivery task to timeout due to the time it takes to stage the package and then download it. Quick Delivery task timeout's include the download time.
Note you also have the option of specifying an alternate location for the Package Server to download the Package locally using the check box labeled: Package Destination on package servers (leave blank for default).
Command-line
Consider the Command Line as the action against a package. After a Task or Policy has been delivered to a target, after applicability and detection rules have been executed, after the package has been downloaded, the execution occurs, as configured in the selected command-line. Obviously the command line is a string that executes against a particular file, but there are other aspects to the Command-line Object within Software Management to be mindful of.
The following walkthrough takes you through configuring the Command Line:
- Under the Package tab of the Software Resource click the Add command button.
- Provide a Name for the Command-line. If desired, provide a Description.
It starts to feel like there are a bazillion names within a Software Resource. This includes names for the Software Resource itself, Package(s), Command Line(s), Association Rule(s), Detection Rule(s), The Task(s) or Job(s) applied to it... after a while you may be tempted to put in generic names. This will make it difficult when managing the individual objects. Use a naming system you can easily use to recognize what an object is intended for.
- The option Command-line requires a package can be unchecked if you wish to run a command-line against an installer that already exists on the target computers. For this example we are leaving it checked.
- Set the Installation file type to the correct type. This will enable the Command-line builder for that type of Installer file.
- Depending on what the command-line is for set the Command type appropriately. See below for an explanation of the settings:
- Custom - This can be used for anything as a catch all for any execution that doesn't fit the other three options.
With a Custom type selected you cannot make it a default command line for the Software Resource. This also affects how a Detection Rule interacts with the command-line. For example the logic for detection of an install versus uninstall is not used with a custom command line. When an Install command line type is set, the detection status "Not Detected" initiates the remediation, whereas with an uninstall command type the detection status "Detected" will initiate the remediation.
- Install - Typically used when the command-line will install an application. This will also be the default for a Software Portal request.
- Repair - If the command-line initiates a repair of an application, such as a corrupted MSI installation, use this option.
- Uninstall - Used for uninstalling the Software Resource.
- Check the option 'Set as the default for this command type' if required. This will affect how "drag and drop" default settings are selected in the Silverlight interface.
- Enter the command-line including all applicable switches.
Often when time is pressing an administrator will not test the command-line before rolling out Software into Production. It is recommended to always test the command line before adding it to the Software Resource. The following items should be considered when generating a command line:
- Can you successfully launch the installer using a command-prompt at a similar system to the ones being targeted?
- When is executes, does it prompt the user for anything? This is important if the installation will be hidden from the user. If it is hidden, and there is a prompt, the prompt will sit in limbo until the Task or Policy is killed.
- What rights are required to run this specific command-line? Make sure the job or task you use to roll this out is set with an account that can execute the command line successfully.
By testing, you can avoid rolling out badly configured Command-lines.
- The success codes should be configured to contain those installer return codes that you wish to equal success. A common return code considered successful is 3010, which means the installation was successful but a reboot is required.
If the field is left blank, the default success code is 0 only. As soon as you enter a return code into the field, 0 is no longer considered a success unless it is explicitly added to the field, as shown in the following Screenshot.
Please add 0 if you are adding other return codes to this field.
- Inherently all codes that are not success are considered failures. However if you add specific failure codes here, they can be used in Task Server Jobs as part of the conditions. For example you may want one failure code to result in one action, and a different failure code in a different action.
- Click OK to add the new command line.
- Click Save changes to save the new command-line to the Software Resources.
Please note that I have asked the Resource to be saved after each major item is created. This will help save your progress so if a problem occurs in IE or on the server you will have much of your work saved.
You can add any number of command lines you need to the Software Resource. Typically you can create both an Install and Uninstall command line, and, if available, a command line that repairs the application.
Rules
To add intelligence to the Software Management Process, a myriad of Rules have been provided. Rules are used for two primary purposes:
- Detect whether or not a specific Software Resource is present on the target system.
- Check to see if the specific Software Resource is applicable or not for the target system.
The two rules combined results in dynamic management of configured software applications. For example if I have an Application that has one for a specific version of windows and one for another, I can create one Managed Software Delivery Job that contains both the versions of the application. The detection rules would check to see if the Application is there, and the applicability rules would ensure the right operating system is in place. The result would be that the right version of the Application would be installed on the right version of Windows.
Both Detection and Applicability Rules use the same Rule types. The difference is that when a Detection Rule is marked True, the Software Resource is NOT applied unless it is an uninstall command line. When an Applicability Rule is marked as True, the Software Resource IS applied. If you think of it in the paradigm I provided above you can see how you would use the two rule types together. It is not necessary to use both or even one of these rules, but it does add intelligence to the rollout. While all Rules can be either type, some cater better for one type. See below for explanations.
The following table helps illustrate what occurs when a Rule is evaluated in different configurations:
| Command line Type (for Detection) |
Rule True |
Rule False |
| Detection True - Install |
|
Remediation |
| Detection True - Custom or Repair |
|
Remediation |
| Detection True - Uninstall |
Remediation |
|
| Applicability Rule |
Remediation |
|
Here is a list of Rules and their known practical use:
- 64-bit Windows Installed - This Rule tells the Inventory Rule Agent to check the 64-bit sections of the Registry and File System, respectively, included in the base rule.
- File Version - This can ensure that an update only applies to systems with the right version of an application installed. Conversely it can be used to see if the specific Software is already installed or not.
- MSI Product Code - For MSIs this option can be used to detect the presence of the application associated with the MSI. Since the MSI Product Code will be different for different releases, you could use this to detect and apply upgrades. Note that when you Import an MSI via the Import method to create a Software Resource, the MSI Product Code Detection Rule is automatically created for you.
- Multilinqual User Interface Installed - I have not used this one, but it can assist in targeting those systems that have language packs installed that may require different versions of a patch or software.
- Processor Type - There are three options available. These point to actual hardware concerning the platform type. The three options are:
- x86
- Intel Itanium Processor Family (IPF)
- x64 (AMD and Intel)
- Registry Key Exists - I consider this a more general Rule to the Registry Key Value. This simply looks for the existence of a key, but not the value of that key. For example if you have the Office 2007 Compatibility Pack to deploy you may simply want to check for the existence of a major version of office and not be concerned on the minor updates or service packs.
- Registry Key to File Version - As the name implies this allows a check against a version of a file if it is stored in the registry. The operators allow you to specify how the rule works with found values.
- Registry Key Value - This is a common rule that is generally used. In the below example of creating and configuring a Rule, this Rule will be implemented.
- Registry Key Version - I recommend using the Registry Key Value as it is more straight-forward. If the version is not a String, however, this Rule should be used.
- Registry Key/File Path to File Version - This is a more complex rule that allows you to compare a registry entry with a file version.
- Registry Key/File Path to Product Version - This rule allows you to check a Product Version as found in the Registry.
- Windows Language - This rule allows you to target only the language you need to, whether for an application installation or an update that is language specific.
- Windows Version - This allows you to ensure that either you are running against the right version of windows, or that you are not running against the wrong version of windows. This is especially useful for Windows Updates.
- Software File Expression - This relies on the Installed Software inventory data stored in an XML cache locally on the client. If the specified entry is found in the XML, the rule applies.
- Static File Expression - This allows the check for a physical file on the file system. The path should include the filename. Also take special note of the Version field. Leave blank if the version is not applicable.
- Static Shortcut Target - I have not used this rule.
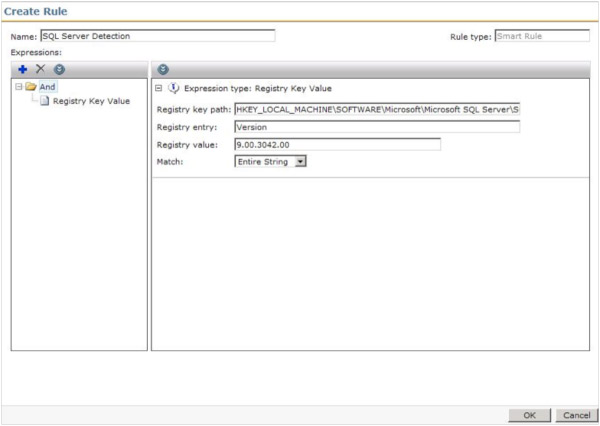
For the Detection Rule example, we'll use the Registry Key Value option since it is very dynamic in its uses.
- Launch the Editor for the Software Resource you wish to add the Rule to.
- Under the Rules tab, click the New button (yellow asterisk) next to the Detection Rule dropdown.
- Name the rule so it is easily recognizable. For example SQL Server 2008 Detection.
- Click the Add a new rule expression button (the blue plus +), move under the Standard Rule section, and click on Registry Key Value.
- Provide the Registry path. One way to ensure path reliability is to browse in the registry on a system that has the software installed, using the following steps:
- Go to Start > Run > Type regedit > Click OK.
- Browse in the Registry hives in the left pane to the Key you will be evaluating for the rule.
- Right-click on the key and choose Copy Key Name.
- Go back to the Rule setup and Paste in the copied key name. This will give you the proper path.
- Provide the Registry entry. This is the name of the value within the Key specified in the previous step.
- Provide the Value of the key.
- The Match criterion is defaulted to Entire String. To make this rule more dynamic, you can choose Substring to allow partial matches. For example if you want all versions of SQL matching 9.00, you can put 9.00 as the value and any version, such as 9.00.3042.00, will be considered a match.
- Click OK to add the criterion. This screenshot shows an example:
- Click OK to save the Rule. Note that you can have multiple detection points for a rule. This allows more granularity to ensure the target system correctly evaluates if the Software in question is installed or not.
The Registry rules are provided only for String values. DWORD or other value types are not supported and will not correctly fire.
For the Applicability Rule example, we'll use the Windows Version option as this is a common Applicability Rule I've seen used.
- Launch the Editor for the Software Resource you wish to add the Rule to.
- Under the Rules tab, click the New button (yellow asterisk) next to the Detection Rule dropdown.
- Name the rule so it is easily recognizable. For example SQL Server 2008 Detection.
- Click the Add a new rule expression button (the blue plus +), move under the Standard Rule section, and click on Windows Version.
- You can select a specific Windows server suite type using the checkbox and options under Check for Windows server suite types.
- Check the box Check Windows version and/or machine role.
- In the Major field place the major version number for the version of Windows you are targeting. In this example we're using Windows 2008, the value of which is 6.
- In the Minor field put the minor version number. In this example 2008's value is 0.
- Click OK to save the criteria. The following screenshot shows the configured Rule:

- Click OK to save the Rule. As with a Detection Rule you can specify multiple criteria.
Rules add great intelligence to Software Management. It is highly advised to test a Rule before rolling it out to ensure the rule accurately detects, or NOT detects, the given Software it is associated to. Testing both True and False for the rule will ensure it doesn't detect software as being there when it isn't, or detects it as not being there when it is.
Another note concerning Rules, how you use the Operators (And, Or) is important. When using the tree, you must put rules underneath the operator you wish to use. For example, this setup will not work:
AND (Folder)
- Detect Key
- Or
- Detect Key
All 3 options are directly under the AND operator so the system believes that all detections must be detected to be compliant. That is the reason for the 'Not Detected'.
In order to build the detection rule correctly the detection rule must be define as:
AND (Folder)
-OR (Folder)
-Detect Key
-Detect Key
Now both Key detections are part of the OR statement and the detection works successfully. Here is a screen shot of my successful detection rule. In order to add the Detection Keys under the OR statement you must high light the OR statement before clicking the + button. Or you can right click the OR statement and choose 'Add'.

This detection rule worked successfully when either of the keys existed.
Static File Expression
This Rule has a few tricks to it in order to get it to work properly. Please note the following when using this rule type:
- The Base folder does need to be selected, and the File path will need to originate in the Base folder, meaning it is a relative path to where the base folder is located. For example:
- Base folder: Program Files, path: Altiris\Altiris Agent\AeXNSAgent.exe
- The File Path should include the name of the File to be used in the Rule, as also shown above.
- The Version can remain blank. This has the most success rate as the qualifiers can easily be misused. A Blank version will look for any version of the indicated file.
- It is recommended to stick to = if possible if version is needed. This takes out the guess work on how to configure the version number (ie 7.0 versus 7.0.1154.5).
- For the Software Resource this detection rule is a part of, you need to add the file in question under the File Inventory tab. This was required until 7.1, where we have had success without having to add the file to the File Inventory tab, however if you run into problems it is a good troubleshooting step.
Associations
Associations allow the linking of different Software Resources. For example if you have a Software Resource for SQL 2008, you can create a second Software Resource for SQL 2008 SP1 and select it as an Update to the SQL 2008 Resource. The following Association Types are available:
- Conflicts with - Using this Rule you can avoid installing Software that has known compatibility issues with existing Software. This will help Administrators know what Software should not be installed together on a target computer.
Conflicts with is a messaging feature only, and will not stop an execution if the resource referenced in the Conflicts with is installed on the target systems.
- Contains - To help manage what updates or resources contain multiple items that may already exist as stand-alone, use the Contains Association to track these.
- Depends on - This Rule can automate the running of Prerequisites for the Software Resource. For example if a particular application requires the JRE (Java Runtime Environment) you can create a Software Resource that deploys JRE. That JRE resource will be referenced as a Depends on association to the primary Software Resource.
Depends on will install the dependent software if this option is selected within the associated Managed Software Delivery Policy when pushing out this software. This can remove any guesswork for ensuring systems have prerequisites.
- Software Channel Targets Software Release - I could not find a use-case or documentation on this Association.
- Supersedes - This is particularly applicable for roll-up hotfixes or updates. You can select all updates that are contained in the rollup by using this Association Type. This, like Conflicts with, is informational only and does not result in different results when rolling the software out.
- Updates (Service Packs) - You can add Resources that add a Service Pack to the editing Software Resource. With these associations you can automatically update your install base. The Managed Software Delivery Policies referencing the Resource can have the Service Packs added. Both Updates and Service packs can be selected when scheduling the associated Software Resource for execution, ensuring that with each install the needed updates are applied automatically.
- Updates (Software Updates) - This is the same type of Rule as Service Packs for individual Updates to the Software Resource.
For this article I'll detail adding an Update to a Software Resource. The following example adds an update to Microsoft SQL Server 2008.
- Launch the Editor for the Software Resource you wish to add the Association to.
- Click on the Associations tab.
- From the Associations Type dropdown select Updates (Software Updates).
- Click the Add button under the heading Software resources that update this software resource.
- In the resulting window use the search function to find the Update to apply.
- Once found, highlight the update in the left-hand pane and click the greater-than symbol > to add that update. See the following screenshot for an example. You can use multi-select with Ctrl to add more than one update at a time.

- Click OK to make the Association.
- Done!
File Inventory
File Inventory has two primary purposes:
- Provide data to be used by Detection or Applicability Rules
- Provide executable information for Application Metering for both monitoring and blacklisting (denying execution) applications.
How files are added depends on which processes are in use in the environment. The following methods populate this information:
- You can add files manually through a local browse on the server (with the ability to network browse).
- Use data captured through Inventory Solution's Audit Scan. This must be added manually in the same manner as the Browse functionality works.
- Use Software captured by the Software Discovery process Inventory Solution executes. The option is found on any main Inventory Task or Policy page, labeled: Software - Windows Add/Remove Programs...
- For MSIs the data is automatically populated when the Software Resource is deployed through a Managed Software Delivery Policy
The Browse function requires the JRE (Java Runtime Environment) as discussed concerning using the Software Library as the Package Source. As a reminder the JRE needs to be available on the system running the console, whether remote or local.
To add a Database File, follow this process:
- Launch the Editor for the Software Resource you wish to add the File Inventory item to.
- Select the File Inventory tab.
- Click the Add button.
- In the resulting Window click Add > Server file.
- A new window will pop up providing a search/selection window for what Application files are known by the Notification Server. See this screenshot for an example:

- Use the Search field to narrow your search to find the file needed. If you cannot find the file you need, use the Local browse method to add the file details to the Software Resource.
- Click OK to add the File. Repeat the steps as needed, and/or if you also want to include Local Files see the next section detailing the process.
- Done!
To add a File you've browsed to, follow this process:
- Launch the Editor for the Software Resource you wish to add the File Inventory item to.
- Select the File Inventory tab.
- Click the Add button.
- In the resulting Window click Add > Local file.
- The resulting browse window uses the JRE. You can browse the local Server, or put in another path (UNC or through the Network object). See this screenshot for an example:
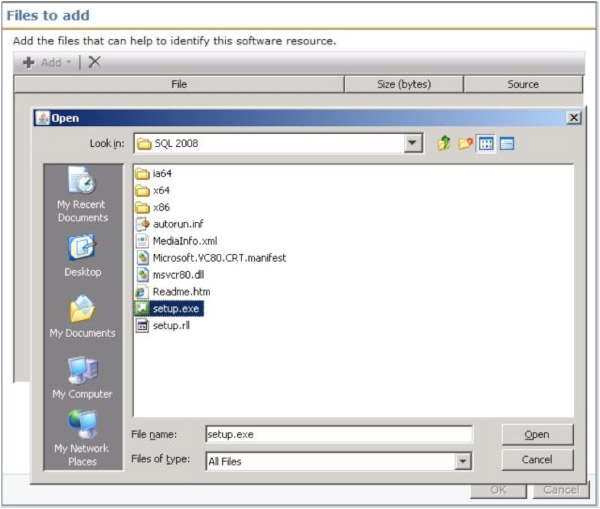
- Once you've located the applicable file, select it and click Open.
- The file will be added to the list. Click OK to add the selected files to the Software Resource.
- Done! Don't forget to click Save changes on the Software Resource.
Software Publishing
This tab controls Software Portal access for this Software Resource. Please see the section on the Software Portal for information on how to use this feature.
Return to Part 1
Read Part 3