Introduction
Inventory Solution provides hardware and software details on devices in your environment. Understanding how Inventory works, and how to troubleshoot problems, will give you the confidence needed to report accurate, relevant data. This is essential when managing assets and software licenses in the environment. Know what you have and where you have it. This document strives to provide both an understanding of how Inventory works, and how to troubleshoot problems that may arise, enabling you to succeed.
Table of Contents
Logging
Server and Client logging
Inventory Verbose Logging
Inventory Prerequisites
Inventory Solution Plug-in
32-bit Plugin Failing on 64-bit
Preparation
64-bit Component
Managed Delivery Policy
Verify Plugin installed
Directory Structure and Files
Component or Association missing
First Method
Second Method
Third Method
Application Metering Plugin
Logging
Logs are wonderful! Both on the server and on the clients, logs will provide data when problems occur. They also give you informational messages about routine procedures. When a problem is occurring getting trace logs will enable you or a Support Rep to much more easily diagnose where the problem is occurring. While standard logging will capture errors, trace logging will provide additional details for both the Server and Client.
Server and Client logging
The following details can be used to enable logging. Because trace logging takes a lot more space, you can also use these details to increase the size of each log, and how many log files are generated before it rolls over and begins overwriting previous logs. In the data below I've only included pertinent data to the troubleshooting process.
In Altiris 7, the Altiris Agent logging is controlled registry values in the registry key:
- HKLM\Software\Altiris\Altiris Agent\Event Logging\LogFile
In Altiris 7, the Notification Server is controlled registry values in the registry key:
- HKLM \Software\Altiris\eXpress\Event Logging\LogFile
The same registry values apply to both Altiris Agent and NS logging.
FilePath: Folder path where the log files will be stored; (String Value)
- Agent defaults:
Windows XP: C:\Program Files\Altiris\Altiris Agent\Logs\
Windows 7: C:\Users\Public\Public Documents\Altiris\Altiris Agent\Logs\
- NS defaults:
Versions 7.0.x: C:\Program Files\Altiris\Notification Server\Logs\
Versions 7.1.x: C:\ProgramData\Symantec\SMP\Logs\
MaxFiles: Maximum number of log files to create; (DWORD Value)
- Agent default: 10 (files)
MaxSize: Maximum size of each log file (in KB); (DWORD Value)
Severity: The level of logging to be recorded; (DWORD Value)
- Agent default: value not set, will Error, Warning & Informational messages
- NS default: same as Agent
Additional information:
- These values can be modified on the client as well as on the server.
- The NS logging severity level can be set in the Altiris Console In Altiris 7: Settings > All Settings; Notification Server > Notification Server Settings; Logging (tab); The Console will only set the registry value if trace logging level is enabled.
- When the logs are generated, a.log is always the current log and when the max size is reached, it becomes a1.log. The next one would be a2.log and so on until the max files is reached.
- Very large log files sizes on the Notification Server can result in poor performance when viewing from the Web console, so you may be better off increasing the MaxFiles rather than the MaxSize.
- The Agent will not create more than one day of logs regardless of the MaxFiles and PurgeDays settings if the FilePath value is not also specified. This will only be an issue for a 6.0 Agent which was upgraded from NS Client 5.x. NS Client created only the FileName value where the Agent install creates both FileName and FilePath.
There are four main levels of severity logging, and they are:
- Errors
- Warnings
- Information
- Trace
The registry Severity key can be manually adjusted to the desired logging level (these are Decimal values):
1 = Errors
2 = Warnings
3 = Errors and Warnings
4 = Information
5 = Errors & Information
6 = Warnings & Information
7 = Errors, Warning & Information
8 = Trace
9 = Errors and Trace
10 = Warnings and Trace
11 = Errors, Warnings, and Trace
12 = Information and Trace
13 = Errors, Information, and Trace
14 = Warnings, Information, and Trace
15 = Errors, Warnings, Information, and Trace
255 = Verbose logging
Here is an example of a registry increased to trace logging with more files with larger sizes:

Inventory Verbose Logging
This logging is essential when troubleshooting client-side issues with gathering inventory. When used in conjunction with Agent trace logging, a lot of data can be gathered. Verbose logging is enabled per Inventory Policy.
- In the Symantec Management Console, browse under Manage > Policies.
- In the left-hand pane, browse under Discovery and Inventory > Inventory > and select the desired policy.
- Click the Advanced button.
- Click the Run Options tab.
- Check the option labeled Enabled verbose client logging.

- Click OK, and then Save changes to apply verbose logging. Done!
- NOTE: Only use this for troubleshooting purposes. Turn it off after the desired data has been gathered at the client.
NOTE: If you are gathering verbose logging for the File Scan, the amount of logs required on the client may be great. Each file scanned is logged, so the amount of logging will be vast.
NOTE #2: Remove any inventory not involved in your troubleshooting. For example if the issue is only with the Hardware based inventory, uncheck the options for Software - Windows Add/Remove Programs, File properties, and Server applications. Furthermore, if you know it is only the hardware and not OS-based data classes, go into Advanced, under the data classes tab and uncheck all but the Hardware section. Lastly, if you know the specific data class you are troubleshooting select only that one in the Advanced. This makes it much easier to search through the logs for the desired data.
Inventory Prerequisites
The following items must be met in order for Inventory to function properly. Sometimes it is the lack or inaccuracy of inventory that may alert you to problems with some of these required items. I've included a list of typical symptoms when an item is not functioning properly or is not in good health.
- Symantec Management Agent installed and working - Obviously, however sometimes it is not known if an agent is unhealthy or not.
- Symptoms: are inventory not being received or updated from a client.
- Problems: include bad install of the SMA, the Client Task Agent is not functional.
- Tests: include sending basic inventory, making a config request, and try running another solution policy or task to see if the Client Task Agent is running
- Inventory Plug-in Installed - Another obvious one, but it does need to be validated.
- Symptoms: Inventory Policy enabled, SMA working properly, Client not running Inventory
- Problems: Filter not updated to install the Agent, Plug-in uninstalled and has not run the install again, Install or Upgrade policies disabled after an upgrade.
- Tests: Check to ensure the policy is enabled, check the filter targeted computers to see if the problem system needs the plug-in
- Inventory License valid - Systems that send in inventory when licenses are exceeded and they do not claim a node will have their inventory thrown out. Expired licenses will have all inventory thrown out and not populated on the server.
- Symptoms: Inventory gets sent but is not processed at the server, error messages in the logs concerning failed to obtain an Inventory Solution License
- Problems: License counts exceed the licensed nodes, also includes if Agentless Inventory is run as those devices also take up Inventory Licenses
- Tests: Check the license count. If at the limit or exceeded, delete old computers and devices or obtain a larger license count
- Good Database Health - Since all inventory is sent and stored in the database, it is essential to have good database health.
- Symptoms: Inventory is out of date, and not all Inventory being sent up reaches the database.
- Problems: Inventory is missing or out of date.
- Tests: Check for deadlock messages in the logs. How long are SQL queries taking? If slow, and if deadlock messages, database health may be poor.
- Good Queue Health - Another one that often goes hand-in-hand with good database health is monitoring the queue to ensure inventory is not overloading it.
- Symptoms: Symantec Management Console is slow, Inventory is missing or delayed, SQL is overtaxed
- Problems: Queue is filled up with Inventory NSEs. Inventory is delayed in processing.
- Tests: Check the queue to see if it is filled with NSEs, sample the NSEs to see if they contain inventory data (denoted by data class guid).
Inventory Solution Plug-in
As with most solutions, Inventory Solution requires a plug-in in order to operate. Unlike most other solutions, the Inventory Solution Plug-in does not have a native 64-bit version. At the time this article was written plans are underway to release a 64-bit version. Until that time, it is common to run into an issue where the DLLs used by Inventory are not recognized as valid Win32 applications, thus no data from certain DLLs are captured. The resulting NSE will have a blank DATA section, blanking out any inventory data that might have been captured previously. There is a way around this issue using Software Management.
This section also details how the plug-in is installed on Windows systems. This includes the file structure and what files can be used for troubleshooting.
32-bit Plugin Failing on 64-bit
Using InvSoln.exe allows the data missing from the default policies to be properly captured. The following process creates Managed Delivery Policies to capture inventory, utilizing this client-side Inventory utility. Please note that the full process should be followed to ensure the default policies do not interfere and remove the data again.
Preparation
The following steps create a "dummy" package to be used as an anchor for the delivery policy.
- Create a directory on the NS with only a simple txt file therein (this will be a dummy package used to utilize the Managed Delivery Policies).
- In the Symantec Management Console, browse under Manage > Software.
- Right-click in the Installed Software box in the upper left and select Manage Software Catalog.
IMPORTANT! Please note that it may seem relevant to deviate from these provided steps, however these were create understanding how the different pieces interact. The steps should be followed as listed, and the settings provide should be used as indicated.
64-bit Component
The following resource is created for Inventory Agents installed on 64-bit Windows operating systems.
- Click Add under Newly discovered / undefined software and choose Software Release.
- Provide a Name, such as InvSoln.exe Full Inventory.
- Under version, provide 1.0 (this can be incremented as changes are made, if so desired).
- In the Company field, type Symantec and choose Symantec from the dropdown.

- Click on the Package tab.
- Click Add Package.
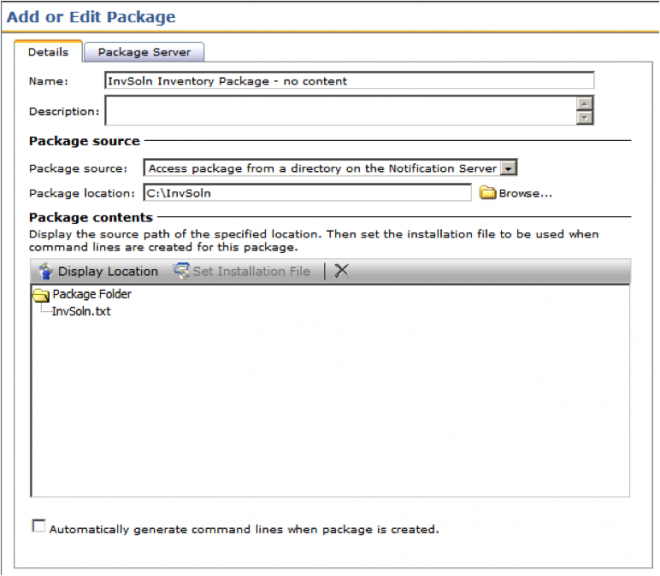
- Provide a name, such as InvSoln Inventory Package, no content.
- Change the Package Source to Access package from a directory on the Notification Server.
- Type in the path to the folder previously created, or use the Browse feature to browse to it.
- Click Display Location, and you should see the name of the text file found within the folder.
- Click on the Package Server tab.
- Under the Assign package to: dropdown, select All Package Servers.
- Click OK to save the Package.
- Click Add Command.
- Provide a name, such as InvSoln Full Inventory Execution.
- Uncheck the requirement "Command line requires a package".
- Set Installation file type to <other>.
- Provide the following command line:
"C:\Program Files (x86)\Altiris\Altiris Agent\Agents\Inventory Agent\InvSoln.exe" /fi
- Repeat the steps for each default Inventory Policy to run, such as:
"C:\Program Files (x86)\Altiris\Altiris Agent\Agents\Inventory Agent\InvSoln.exe" /dhi
"C:\Program Files (x86)\Altiris\Altiris Agent\Agents\Inventory Agent\InvSoln.exe" /dswi
These cover Full Inventory, Delta Hardware Inventory, and Delta Software Inventory.
- If you wish to use a custom policy, the command-line must be customized. The following is an example of what it would look like:
"C:\Program Files (x86)\Altiris\Altiris Agent\Agents\Inventory Agent\InvSoln.exe" /i "C:\Program Files (x86)\Altiris\Altiris Agent\Agents\Inventory Agent\InvTaskConfig\Name of Custom Policy.xml"
- Click on the Rules tab.
- Click *New next to the Applicability Rule dropdown.
- Provide a name, such as InvSoln 64-bit Applicability.
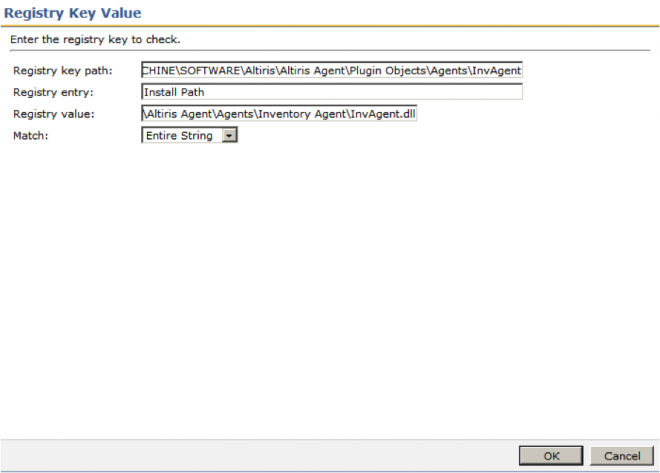
- Click the blue + button and choose Registry Key Value.
- Set the Registry key path: HKEY_LOCAL_MACHINE\SOFTWARE\Altiris\Altiris Agent\Plugin Objects\Agents\InvAgent
- Set the Registry entry: Install Path
- Set the Registry value: C:\Program Files (x86)\Altiris\Altiris Agent\Agents\Inventory Agent\InvAgent.dll
NOTE: If a custom install path was chosen, this value may be different.
- Click OK and OK again to save the Applicability Rule.
- Click OK to save all changes to the new Software Component.
Managed Delivery Policy
The following steps create a Managed Policy that will properly detect which execution needs to be run so that the proper paths are used based on the platform type.
- In the Symantec Management Console browse under Manage > Policies.
- Browse under Software > right-click on Managed Software Delivery > and choose New > Managed Software Delivery.
- Provide a name, such as: InvSoln Full Inventory Work-around Policy.
- Under the Policy Rules/Actions, click +Add > Software.
- Use the upper-right search and look for InvSoln.
- Locate the 64-bit package created, such as: InvSoln.exe Full Inventory and click OK.
- Click to highlight the Software Component in the list.
- Under the Remediation settings section, click the dropdown and choose the command line, such as: InvSoln.exe Full inventory Execution.
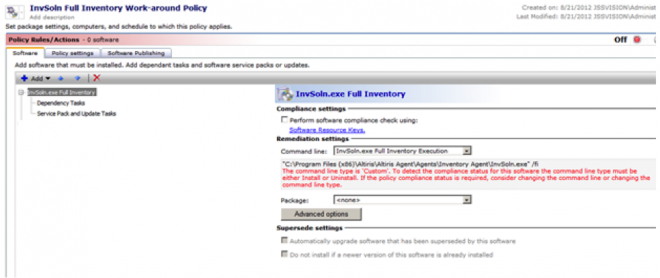
NOTE: Ignore the warning displayed.
- Click the Advanced button.
- Click the Run tab, and change the Display window: to Hidden.
- Click OK to save the changes to the Advanced Settings.
- To Save current progress, click the Save changes button.
- Expand the Applied to section using the right arrow button.
- Click Apply to > and choose Computers.
- Click Add rule under the Filtering Rules section.
- Use the following settings: THEN: exclude computers not in - Filter - Search for "Windows Computers with Inventory Plug-in.
- Click Update results to ensure the target is returning the expected number of systems.
- Click OK to save the target parameters.
- Expand the Schedule section using the right arrow button.
- Though no Compliance check will occur, a schedule must be set in the Compliance section. In this case you should set a schedule that fits your infrastructure's needs, such as: Start 18:00 Repeat weekly on Mon.
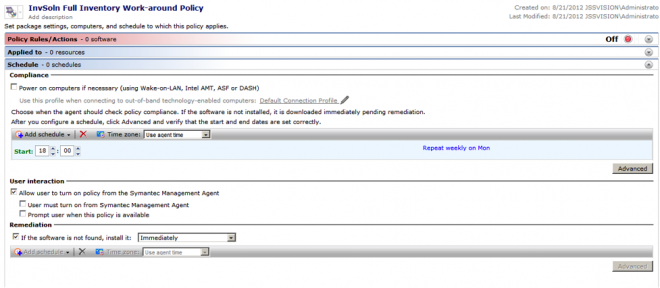
- If you wish to have Inventory run immediately the first time, also create a Schedule Time and set it to some time in the past, such as: 01:00, no Repeat (Start date under Advanced is either the same day or a previous date).
- Leave Remediation to occur immediately.
- Turn the Policy on, and then click Save changes to put the policy into effect.
Repeat the Policy process to include other Inventory types, such as Delta, Hardware only, custom, etc. The only difference in configuration is what command-line you choose within the Policy, and the name of the policy should be unique and easily recognizable.
Verify Plugin installed
There are several places you can ensure the plugin has been properly installed. Please look through these steps if you need this verified.
- Check the filter for the Inventory Plugin install
- In the Symantec Management Console browse under Settings > Agent / Plugins > All Agent Plugins.
- Browse under Discovery and Inventory > Windows / UNIX / Linux / Mac > and select Inventory Plug-in Install.
- Is this policy enabled? If not, enabled it. If so, expand the Applied to section.
- Change the View: to Computers. Review the list of computers in this section. Typically you should have little or no systems in this policy if it is enabled.
- If computers are not installing the agent, try adding an extra schedule. Click Add schedule > Scheduled Time and set it for an appropriate time. This will ensure it runs again on any system that might have failed to run the first time.
- Check on the Server and locally on the Client
- For the Server, open Resource Manager for the system. On the summary page there is a list of all plugins and agents installed on the system. Ensure it lists the Inventory Plugin.
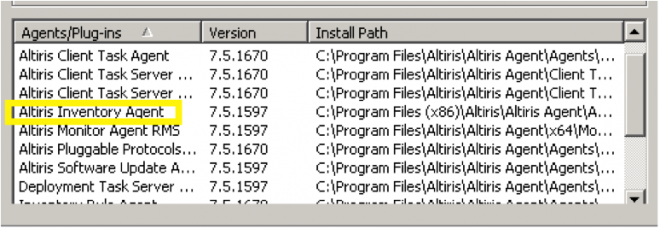
- On the client bring up the Agent UI (double-click on the system tray icon, or launch AeXAgentActivate.exe). Click on the Settings button. In the Agents/Plugins list ensure the Altiris Inventory Agent is listed.
- Upgrade if necessary
- Though Inventory will typically work for out-of-date plugin versions, some issues may occur if the plugin version falls behind the version installed at the server.
- In the Symantec Management Console browse under Settings > Agent / Plugins > All Agent Plugins.
- Browse under Discovery and Inventory > Windows / UNIX / Linux / Mac > and select Inventory Plug-in Upgrade.
- Enable this policy if it is not enabled. If needed remove the Run ASAP checkbox and put on a schedule that works with your environment for upgrading agents.
Directory Structure and Files
How the Inventory plugin is installed can be very useful when troubleshooting issues. Many of the files contain inventory data, and others contain methods for how inventory is gathered. By accessing the files on problem systems often the source of the issue can be determined. The two typical install locations are:
- C:\Program Files\Altiris\Altiris Agent\Agents\Inventory Agent
- C:\Program Files (x86)\Altiris\Altiris Agent\Agents\Inventory Agent
If the Symantec Management Agent is installed to a different location, the Inventory Plug-in will also install to that drive/location.
By location, here are files that are useful, and a description of what they contain:
- C:\Program Files (x86)\Altiris\Altiris Agent\Agents\Inventory Agent - This location contains most of the plugin files that are run when Inventory executes. It is considered the install location of the plugin.
- InvConfigSln.xml - This file contains WMI, Script, and Registry calls used by various data classes. You can use a data class name to see how that data class is collected.
- InvSoftwareScan.xml - This contains data of what will be collected during the file scan.
- InvData.mdb - This is an Access database that contains data on the files we have captured via the file scan.
- C:\Program Files (x86)\Altiris\Altiris Agent\Agents\Inventory Agent\InvTaskConfig - This contains specific configurations per Policy of what to capture. It can be used to review what a policy is gathering to ensure updates are making it to the client.
- Each XML file inside will be specific to the policies, enabled or disabled, defined on the Notification Server.
- C:\Program Files\Altiris\Inventory\NSI - This contains the NSE fragments for each data class defined in Hardware and Operating System, and Server Inventory. The file names will correspond to the data class. This allows you to review what has been captured for a specific data class. This contains the most recent data. Note that if data does not change with newer scans, these files are not overwritten so the date may be older.
- C:\Program Files\Altiris\Inventory\Outbox - Files relating to the File Scan are located in this location, namely:
- AuditPls_diskusage.bak - This contains data summary for number of files and total space taken for selected file types.
- AuditPls_filescan.bak - This is the main file containing the data for captured files.
- AuditPls_softwarekeyexecutables.bak
- AuditPls_summary.bak
- AuditPls_deletedfiles.bak - These are files that have been removed from the system, that will thus be removed from the database.
- Software Discovery file, typically "CLNINV----.bak" contains data from the Software Discovery run through Inventory Solution.
Component or Association missing
A common issue after an install or upgrade appears when agents are not installing or upgrading their Inventory Plugins. This happens due to a condition where a configuration item gets dropped during the install / upgrade process. This might be the entire package configuration, or an association to it. In the logs the following error or one similar will appear when clients request their configuration:
"2/25/2011 11:01:16 AM","Unable to generate policy XML for item: 8592325b-1b4a-4cf4-8c46-c17a0ba564a2
**CEDUrlStart** :http://entced.symantec.com/entt?product=SMP&version=7.1.6797.0&language=en&module=qlub65YMYgWeGGssRthgvN1WHJjANnIAgZtUStOHQto=&error=862971658&build=**CEDUrlEnd**
( Exception Details: Altiris.NS.Exceptions.AeXException: Unable to build the client configuration XML for advertisement with guid {8592325b-1b4a-4cf4-8c46-c17a0ba564a2}. Reason: Did not get a row for Software Delivery Advertisement ""Inventory Plug-in - Install"", Guid = {8592325b-1b4a-4cf4-8c46-c17a0ba564a2} from the SWD tables. ---> Altiris.NS.Exceptions.AeXException: Did not get a row for Software Delivery Advertisement ""Inventory Plug-in - Install"", Guid = {8592325b-1b4a-4cf4-8c46-c17a0ba564a2} from the SWD tables.
  at Altiris.NS.StandardItems.SoftwareDelivery.AdvertisementItem.OnBuildClientConfigXml2(Guid workstationGuid, XmlNode requestDocumentElement, XmlTextWriter xmlBuilder)
  --- End of inner exception stack trace ---
  at Altiris.NS.StandardItems.SoftwareDelivery.AdvertisementItem.OnBuildClientConfigXml2(Guid workstationGuid, XmlNode requestDocumentElement, XmlTextWriter xmlBuilder)
  at Altiris.NS.StandardItems.Policies.ClientConfigPolicy.GetConfigXml(Guid resourceGuid, String requestXml)
  at Altiris.NS.AgentManagement.PolicyRequest.<>c__DisplayClass4.<LoadItemPolicy>b__0(IDatabaseContext ctx)
  at Altiris.Database.DatabaseContext`1.PerformWithDeadlockRetryHelper(Int32 retries, Boolean inTransaction, Getter`1 getContext, Action`1 action, Action`1 retry)
  at Altiris.Database.DatabaseContext`1.PerformWithDeadlockRetry(Int32 retries, Boolean startNewTransaction, IsolationLevel isolationLevel, Boolean independentContext, Action`1 action, Action`1 retry)
  at Altiris.Database.DatabaseContext`1.PerformWithDeadlockRetry(Int32 retries, Boolean startNewTransaction, Action`1 action, Action`1 retry)
  at Altiris.NS.ContextManagement.DatabaseContext.PerformWithDeadlockRetry(Int32 retries, Action`1 action, Action`1 retry)
  at Altiris.NS.AgentManagement.PolicyRequest.LoadItemPolicy(String request, Guid requestGuid, Guid resourceGuid, Guid hostGuid, Guid policyGuid, String& policy, String& policyHash, Guid& category, Int32& priority, Boolean& canCache, ISet`1& requiredPermissions, ISet`1& filterCollections) )
( Exception logged from:
  at Altiris.Diagnostics.Logging.EventLog.ReportException(Int32 severity, String strMessage, String category, Exception exception)
  at Altiris.NS.Logging.EventLog.ReportException(Int32 severity, String strMessage, String category, Exception exception)
  at Altiris.NS.AgentManagement.PolicyRequest.LoadItemPolicy(String request, Guid requestGuid, Guid resourceGuid, Guid hostGuid, Guid policyGuid, String& policy, String& policyHash, Guid& category, Int32& priority, Boolean& canCache, ISet`1& requiredPermissions, ISet`1& filterCollections)
  at Altiris.NS.AgentManagement.PolicyRequest.LoadItemPolicies(String request, String configVers, Guid hostGuid, List`1 idents, SortedDictionary`2& policies, SortedDictionary`2& hashes)
  at Altiris.NS.AgentManagement.PolicyRequest.GetPolicies(String request)
  at Altiris.Web.NS.Agent.GetClientPolicies.ProcessRequest(String& request, Byte[]& clientConfigData, String& clientConfigXml, Boolean& compress)
  at System.RuntimeMethodHandle._InvokeMethodFast(Object target, Object[] arguments, SignatureStruct& sig, MethodAttributes methodAttributes, RuntimeTypeHandle typeOwner)
  at System.Reflection.RuntimeMethodInfo.Invoke(Object obj, BindingFlags invokeAttr, Binder binder, Object[] parameters, CultureInfo culture, Boolean skipVisibilityChecks)
  at System.Delegate.DynamicInvokeImpl(Object[] args)
  at Altiris.Common.Threading.LocalThreadPool.InvokeCallback(Object state)
  at Altiris.Common.Threading.LocalThreadPool.ExecuteUserWorkItem(UserWorkItem workItem)
  at Altiris.NS.Threading.NSThreadPool.ExecuteUserWorkItem(UserWorkItem workItem)
  at System.Threading.ExecutionContext.runTryCode(Object userData)
  at System.Runtime.CompilerServices.RuntimeHelpers.ExecuteCodeWithGuaranteedCleanup(TryCode code, CleanupCode backoutCode, Object userData)
  at System.Threading.ExecutionContext.Run(ExecutionContext executionContext, ContextCallback callback, Object state)
  at Altiris.Common.Threading.LocalThreadPool.ExecuteUserWorkItemInContext(UserWorkItem workItem)
  at Altiris.Common.Threading.LocalThreadPool.ThreadPoolProc(Object threadStartParameter)
  at System.Threading.ThreadHelper.ThreadStart(Object obj)
)
( Extra Details: Type=Altiris.NS.Exceptions.AeXException Src=Altiris.NS.StandardItems  Inner Extra Details: Type=Altiris.NS.Exceptions.AeXException Src=Altiris.NS.StandardItems )","Altiris.NS.AgentManagement.PolicyRequest.LoadItemPolicy","w3wp","37"
There are 3 ways to resolve this issue. Each subsequent method involves more work, so it is recommended to go through the easiest first, and only proceed if it does not work.
First Method
This method requires a working environment. Support can supply a working package to complete these steps.
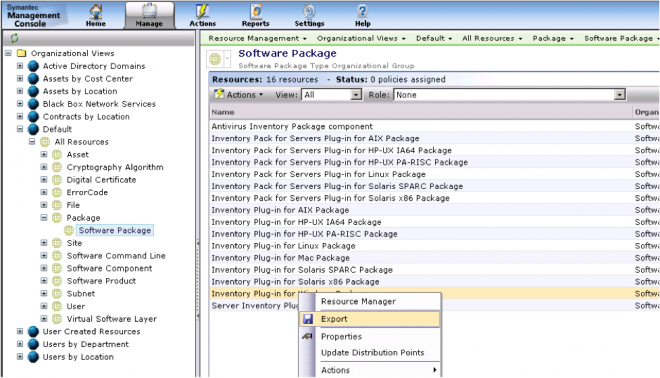
- In the Symantec Management Console browse under Manage > All Resources.
- Browse in the right-hand pane under Default > All Resources > Package > Software Package.
- In the search field in the right-pane, found in the upper right, type: Inventory
- Find the Inventory Plug-in for Windows Package, right-click, and choose Export.
- Save the file, and transport it to the Notification Server that is having the issue.
- At the same location above, right-click on Software Package and select Import.
- Browse to the file that was copied over in step 5.
- Done! In many cases this resolves the issue.
Second Method
The second method does not require a working environment, but requires additional steps. It is recommended to take a backup for your database before using the second or third methods to resolve this issue. This is only a precaution, and I have not had issues with these methods in the past.
- In the Symantec Management Console, browse under Settings > Console > Views.
- In the left-hand pane browse under Software and select the Software Catalog.
- In the search field in the right pane, located in the upper right, type Inventory Plug-in
- In this list, locate all versions for the Inventory Plug-in for Windows.
- For any entry that shows a disk for the icon (seen in the screenshot for step 10) right-click and choose Delete.
- Right-click on the resource that contain packages, shown as a different icon, and choose Properties.
- Copy out the Guid listed for this resource.

- Run the following query against the database, using the GUID found from step 7.
UPDATE RM_ResourceSoftware_Release

		SET Attributes = '0'

		WHERE [Guid] = '80328534-9d5c-4343-bcad-bda7ecf9621f'
- Reload the Symantec Management Console and browse back to the Software Catalog, using the search filter.
- Right-click on the Software Resource for the Inventory Plug-in for Windows and choose Delete.

- Make sure no Inventory (disk) or Release (computer with disk) plug-in items remain.
- Open a command window (right-click, Run ad Administrator).
- Browse to the following location where the platform is installed:
\Program Files\Notification Server\Bin\
- Now run the following command-line, NOTE that locations will need to be set to your install directories:
C:\Program Files\Notification Server\Bin\AeXConfig.exe /configure "C:\Program Files\Altiris\Inventory\Config\Inventory.config"
- To review the progress, open Log View and filter on "AeXConfig". This will allow you to see the entries as the reconfigure is occurring.
- Done! If this does not resolve the issue, the logs gathered during the reconfiguration are vital.
Third Method
The third method uses a more messy, dramatic approach. It also requires the steps used in the previous approach.
- Walk through steps 1 through 11 of the Second method.
- From the logs gathered during steps 12 through 16 of the second method, you'll find an import error. This will include reference to the GUID found in step 8 of the second method. The key to this error is finding the other GUID in the error that causes the import to fail. Once that GUID is found, proceed.
Message will state: "Unable to import resource (ref), a duplicate resource (ref) already exists"
- Open the following URL, which is a search query to use: www.symantec.com/docs/HowTo1191
- Paste the query into SQL Enterprise Manager. Change the GUID to the one found in the message to the location marked /* Enter Search Guid here */
/*
    Last Revision: 3 August 2012
*/

set transaction isolation level read uncommitted

/* Declare variables */
declare @strSql nvarchar(max),
    @searchguid uniqueidentifier,
    @lowrow smallint,
    @SrchEvtTables bit,
    @SrchCharTypes bit,
    @SrchTextTypes bit,
    @CharTypeColName varchar(200)

/* Enter Search Guid here */
set  @searchguid = ltrim(rtrim('3e71856b-aadb-48d8-8264-0b36d1aac224'))

/* Search Event Tables: If you wish to disable searching the event tables then set
   @SrchEvtTables to 0.  This option was added since the event tables can get quite large
   and many of the guid columns in them are not indexed. Disabling this will speed up the
   query in such cases (at the cost of not searching those tables).
   (Enabled: 1, Disabled: 0) */
set @SrchEvtTables = 1

/* Search Character Type Columns: There are some columns in the database that hold GUIDs,
   but the column is not a uniqueidentifier type (they have the GUID as a character string
   instead).  If you want to search character column types (char, nchar, varchar, and nvarchar) then you must set the @SrchCharTypes value to 1.
- The results may take a minute or longer to complete. The last column contains Select statements. Select the entire column by clicking on the column header, and copy the data.
- Paste the data into a new query window.
- Hit Ctrl + H to bring up the find and replace window.
- Search for: SELECT *
- Replace with: DELETE
- Once done, run the query to delete this object from the database's tables.
- Now run through steps 12 through 15 of the second method.
- Done!
If the problem persists, please contact Symantec Support for assistance.
Application Metering Plugin
To track usage of applications, and utilize the deny/block functionality for designated executables, the Application Metering Plugin is required. This plugin is only available for Windows Workstations at this time, and does not support Server-class operating systems or Unix, Linux, or Mac.
Please note the following concerning this plugin:
- Stability issues exist - Crashes can occur on 64bit systems. This is often due to the plugin operating through the AeXNSHostSurrogate32.dll process. This process facilitates the plugin running in WOW mode on 64bit systems. Fixes exist for many versions of the plugin, so if you are experiencing crashes please search the knowledgebase or contain Support.
- Resource Utilization - If the Application Metering plugin often begins to cause memory consumption you can restart the Symantec Management Agent service periodically to avoid the issue, It is also recommended you search the KB or contain support for a more permanent solution.
- Do not roll this out to servers. The way the Metering agent monitors all launched processes can cause issues on a server-class system, including crashing the Symantec Management Agent, cause the launching application to fail, or cause other failures of services on the system.
Continue to Part 2: Troubleshooting Inventory Solution 7.5 (also 7.1), Part 2
Part 3: Troubleshooting Inventory Solution 7.5 (also 7.1), Part 3
Part 4: Troubleshooting Inventory Solution 7.5 (also 7.1), Part 4