Introduction
Inventory Solution provides hardware and software details on devices in your environment. Understanding how Inventory works, and how to troubleshoot problems, will give you the confidence needed to report accurate, relevant data. This is essential when managing assets and software licenses in the environment. Know what you have and where you have it. This document strives to provide both an understanding of how Inventory works, and how to troubleshoot problems that may arise, enabling you to succeed.
Table of Contents
Target Systems Not Running Inventory
Does the system have the Plug-in?
Is the computer part of the target filter for the policies?
Does a custom schedule have an End Date that's passed?
Does the schedule only run once?
Execution Fails
Check Agent UI for status
Log Errors or Warnings
Crashes, Restarts, and Hangs
Crashes, Restarts, Hangs symptoms:
Remediation:
Data Not Collected
NSI Files
Data transmitted to the Server
Agent Logs
HTTP Post Errors
Agent Queue
Server Logs
Cause
Solution
NSE capture options
Wireshark
Target Systems Not Running Inventory
If target systems are not running Inventory, here are the questions to ask:
- Does the system have the Plug-in?
- Is the computer part of the target filter for the policies?
- Does a custom schedule have an End Date that's passed?
- Does the schedule only run once?
Does the system have the Plug-in?
This question has two answers that indicate a problem. One is that it does not have the plug-in. The second is it has the plug-in, but it is not running valid scheduled Inventory Policies or Tasks. For the first answer where the plug-in is not installed, please refer to the section Verify Plug-in Install found previously in this article. This section walks through to validate if it is installed or if it is not, and what to do to install it
.
If you find yourself in the situation where the plug-in is installed but inventory is not running, this may indicate a corrupt install of the Plug-in. To resolve this situation, please walk through the following steps:
- In the Symantec Management Console, browse under Settings > Agents / Plugins > All Agents / Plugins > browse in the left-hand pane under Discovery and Inventory > Windows / UNIX / Linux / Mac, and click on Inventory Plug-in Uninstall.
- Make sure you delete the current target of the policy, as it is targeted to all systems that have the Inventory Plug-in installed.

- Use the Apply to > Computers section to add the systems that are having this issue. You can create a filter beforehand or add computers individually in the Target.
- Typically the Run once ASAP will work the first time you run this policy against systems. If you've used this policy before, you'll need to use the Add schedule > Scheduled Time so systems run this policy again. Also note if you've used a previous schedule, delete the schedule and recreate to ensure it runs against all targeted systems.
- Enable the policy and Save changes.
- Wait the sufficient amount of time so all systems have run the uninstall policy.
- Run a Delta Membership Update to ensure all filters are updated.
- In the Symantec Management Console browse under Settings > Agents / Plugins > All Agents / Plugins > browse in the left-hand pane under Discovery and Inventory > Windows / UNIX / Linux / Mac, and click on Inventory Plug-in Install.
- Click on the Apply to row and click the Edit pencil.
- Click the Update results button. Review the list of returned systems to ensure the right systems show up. If they do not, you may need to wait additional time for the uninstall and filter updates to occur.
- Likely this will already be enabled, but no specific schedule will be assigned. To get these systems that have previously run it to install, create a new schedule by:
- Under the Schedule section, click Add schedule > Scheduled Time.
- Provide a time such as 00:10 with no repeat. This schedule should run as soon as systems receive the install policy.
- Click Save changes.
- The policy will not run and reinstall the Inventory Plug-in.
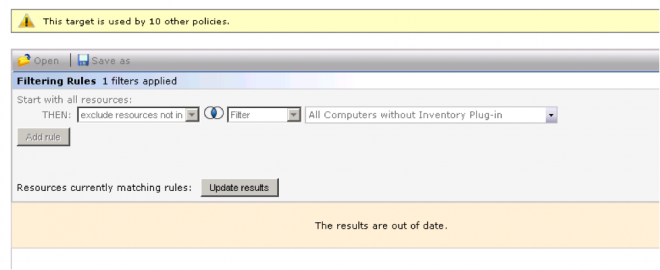
Is the computer part of the target filter for the policies?
By default all systems with the Inventory Plug-in are assigned to the three default policies. This ensures systems run Inventory as they should. However not all users use the default policies. When new policies are created, new filters or targets may be applied. I have often come across issues where a client has no enabled Inventory policies based on filter and target settings.
To validate if a computer is part of your Inventory Policies, go through this process.
- In the Symantec Management Console, browse under Manage > Policies and browse in the left-hand tree under Discovery and Inventory > Inventory > and select one of the enabled policies.
- Expand the Applies To / Compliance section.
- In the View: dropdown, select Computers and users.
- In the search field to the right, type in the name of the computer in question.
- The system should show up if it is properly applied to this policy, even if it has never run it for whatever reason. If the computer does not show up the filter or target rules excludes this system.
- To address, change the View: dropdown back to Applied by.
- Double-click on the row you wish to review. Each row represents a target. Review the rules to see why the computer is not included. Reasons may include:
- Computer is part of an exclude filter.
- The selected filter for inclusion does not include the computer.
- A computer list for exclusion includes the computer.
- The computer is not applied as part of a computer list.
- Repeat the process for each policy as needed.
- You can either adjust the filter or add the computer to an include computer list to ensure the system or systems are covered.
- For groups of computers the same steps apply, but the exclusions or inclusions should be viewed in relation to the missing group.
Does a custom schedule have an End Date that's passed?
By default Inventory Policies have no end date to their schedules. If using the default schedules (listed on the policy as Daily, Weekly, and Monthly) no end date will ever be applied. If using a Custom schedule, the end date is not checked by default, however a user can check the end date. Use the following process to determine if an end date is being used, and if so, to correct it. Note that these steps can also be conducted at the same time as the Run Once issue.
- For each applicable Inventory Policy that is not being run, browse in the Symantec Management Console under Manage > Policies and browse in the left-hand tree under Discovery and Inventory > Inventory > and select the policy.
- Click on the Custom schedule hyperlink. If one of the default schedules are being used, this is not the cause of the issue.
- Click the Advanced button.
- Ensure the End checkbox is not checked. If it is checked, uncheck it. If an end date is required in the future, adjust the end date so it is not past.
- Click OK, and OK, and save the Policy to apply the changes.
- Repeat these steps for each policy that is not running.
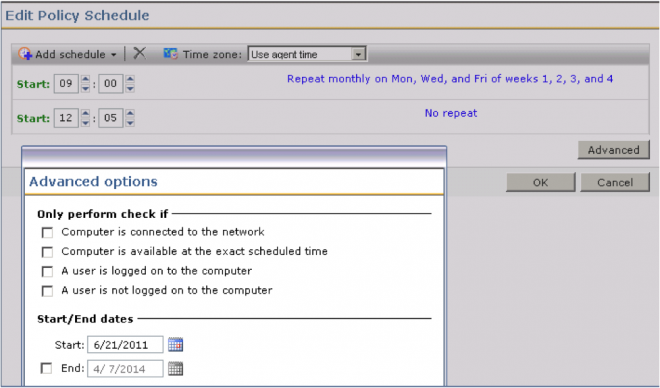
Does the schedule only run once?
When a schedule is created, a date is not specified unless you go into the advanced settings. Also schedules do not repeat unless a repeat is added. If Inventory is not running as expected, it could be that the schedule applied to the policy only runs once. The following process walks through checking and adjusting the schedule as needed. Note that these steps can also be conducted at the same time as the End Date issue.
- For each applicable Inventory Policy that is not being run, browse in the Symantec Management Console under Manage > Policies and browse in the left-hand tree under Discovery and Inventory > Inventory > and select the policy.
- Click on the Custom schedule hyperlink. If one of the default schedules are being used, this is not the cause of the issue.
- Click the Advanced button.
- The schedule should have the repeating data included. The below screenshot shows a schedule with repeating executions, and one that will only run once.

- Add a repeating schedule to at least one of the schedules shown to ensure systems run it regularly to keep Inventory up to date.
- Repeat these steps for all policies.
Execution Fails
The Applies To / Compliance section will show a percentage of Succeeded versus Failed. For failed executions a number of resources exist to discover what is causing the failure and how to correct it.
- Check Agent UI for status
- Find Error code (typically in the logs at failure point)
- Search KB for specific Error
- Look for explanations in logs around the error
- Use trace and verbose for additional information on what was occurring at failure point
- Crashes/Task Agent Hung
Check Agent UI for status
On The client computer, launch the Symantec Management Agent user interface by double-clicking on the icon in the system tray. If the icon is hidden, launch it by executing AeXAgentActivate.exe found under C:\Program Files\Altiris\Altiris Agent\.
Inventory Policies do not show up under the Software Delivery tab. To check statuses, click on the Task Status tab. Click Task history to review the results of recent Inventory executions.

If the status is Failed, the Return code may provide a specific exit code thrown by Inventory when an exception occurred. If it is 1 or -1, the actual error may only be found in the logs. If you do get a specific error code you can use it to search in the Symantec Knowledgebase for a possible solution.
If the Return code is -1, that is often a restart of the computer system or at least the Symantec Management Agent service. That may indicate an interruption, or a hang of the task. The Start time and End time can be consulted to see how long it ran before being interrupted. You can also check these times to see how long Inventory is running.
Log Errors or Warnings
When there is a failure, often the agent logs will have more data on what occurred. The logs provide the best chance of finding what is occurring and take corrective action. In the very least you can have the error ready if you need to engage support on the issue.
Agent logs are located in different places depending on the version of windows. The Server and Client logging section previous in the article provide locations of where the logs may be. Here is a quick reference:
- C:\Program Files\Altiris\Altiris Agent\Logs\
- C:\Users\Public\Public Documents\Altiris\Altiris Agent\Logs\
The following methods can be used to more easily view the logs and find the necessary messages or errors:
- In the Task History make a note of when Inventory ran. That time-frame can be used to select only those log files that will contain entries pertaining to the failure.
- You can enable Diagnostics on the Symantec Management Agent to more easily view the logs using these steps:
- Go to Start > Run (or go to Start > and in the search field type "Run" and click OK).
- Type "regsvr32" (without quotes) into the Open field and place a trailing space.
- Leaving the Run dialog open, use Windows Explorer to browse to C:\Program Files\Altiris\Altiris Agent. Drag the AeXAgentDiagnostics.dll into the Run dialog.
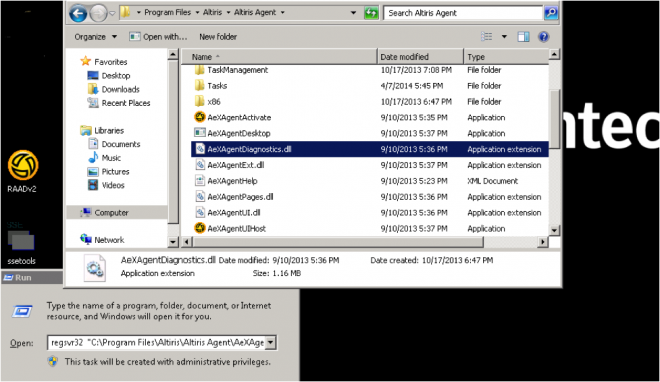
- Click OK to register the DLL. You should get a message stating: DllRegisterServer in C:\Program Files\Altiris\Altiris Agent\AeXAgentDiagnostics.dll succeeded.
- Click OK.
- From the Symantec Management Agent system tray icon, right-click and choose Diagnostics Window. This will give you various options, including the first tab labeled Logs. This will allow you to view the logs.
- Note that you have to load log files separately to view.
- If the diagnostics log view is not sufficient, copy the pertinent logs to the Notification Server. Launch the Log Viewer and then clear the log and browse to where you copied the files. This gives you much greater control at reviewing the Agent logs.
- Be sure to look in the time frame of the execution, especially the End time. The End time should correlate to when the error was thrown.
- Check the error text. Often it will not be something that is directly actionable. Take the error text (usually the sentence that gives a brief explanation of what happened) and search the Symantec Knowledgebase for possible solutions.
- Any other entries relating to the Inventory execution can be helpful. Using Log View, you can review entries based on the TID, or Task ID. This may give you what else was being done around the time the error was thrown. If you've enabled Inventory verbose logging, you will have a great deal of information logged before the error, which will likely give a method or data class where the error is occurring.
Crashes, Restarts, and Hangs
When the Symantec Management Agent crashes, or the Inventory Policy hangs, there are no specific log entries that will help to identify this. Instead you have to look at the symptoms to determine if one of these is the case. Review the symptoms and required actions based on your situation.
Crashes, Restarts, Hangs symptoms:
- The Task History shows old Inventory Policies or Tasks as still Running - This might indicate a hang, so you need to determine if the task is indeed active. Check to see if the same task shows another run after the one shown as running. A reboot after the time shown will also indicate it is not really running.
- The Task History shows an Inventory Policy with a failure of -1 - While this might indicate other problems; it sometimes indicates a restart of the Symantec Management Agent service during the execution of Inventory. This kills the thread, and fails the task.
- Multiple Inventory Policies still running - If an Inventory Policy hangs, all subsequently executed policies, including duplicates of the same one, will queue up behind it. Inventory is unique in that it looks for already-running policies and will sleep until its turn arrives.
- A crash might or might not log the policy as failed. Typically the crash will show on the desktop, and a crash event will be logged in the Microsoft Event Viewer. In the least the crash will be captured by Event Viewer.
- A minor crash or exception that halts the policy will log the event in the agent(n).log files. This will show as failed in the Task History and looking up the error in the log provides specifics.
Remediation:
If a crash occurs, check the log and take the error found. This error might point you to a knowledgebase article that provides you with the solution of the issue.
For any hangs, enable verbose logging for Inventory and see what the system is doing. It may be:
- Actually hung - If this is the case see what it was doing before it stopped. This will let you know what part of Inventory is having the issue.
- Scanning files - If the target system has a lot of files, or shortcuts, mapped drives, or file shares it can take a very long time to scan it all.
- Task Server - Client Task Agent may be hung, not Inventory. If Inventory does not log any data about having started in the logs, the problem could be with the Task Agent.
Too many files - If this is the issue and it just scans and scans for days, editing the file scan properties is essential. Under the Inventory types > File properties section there are items to check for to ensure you are not scanning areas you do not want to. Please note the following:
- Including network drives is not recommended unless you are certain those locations will not have excessive files
- Insure that the folder exclusions have not been removed, as this will add many windows-based files to both the scan time and what is gathered.
- Do not include file types like XML that will have many, many files as it will slow down the gathering process, and bloat the data being returned to the NS.
- Exclude folders where many shortcuts may exist to network locations. We found that Inventory scans the files at the end of those shortcuts, or LNK files.
Find the source of the problem - This is essential! There is a method to find out where the issue is occurring. Use the following technique:
- In the Inventory Policy there are 4 main checkboxes, covered previously in the document. Uncheck all but one and run Inventory. Does the issue happen? If no, uncheck that one and move to the next until the issue occurs. You've now found which type of Inventory is causing the issue.

- The file properties was covered earlier, but the same principles apply.
- The options for Software - Windows Add / Remove Programs and UNIX / Linux ? Mac software packages are nonexistent so no settings can be changed. The one file that stores this data is the SoftwareCache.xml. If the issue is occurring at the end of this software scan you can try renaming this file so it is regenerated to see if that corrects the problem.
- For both options: Hardware and operating system - CPU, hard drives, memory, firmware, users and groups, etc., and Server applications (Requires Inventory Pack for Servers), the following method can be used to pinpoint the exact data class the issue is occurring on.
- Go into the Advanced settings for the Policy.
- Under Inventory data classes, check just one of the subcategories.
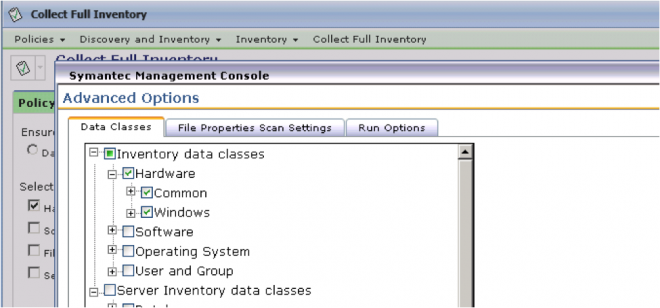
- Run Inventory. If the issue occurs, you've found the right category. If the issue does not, uncheck the first and check the next, until you find which one is causing the issue. The same process can be used for the next subcategories, typically platform related. Using this method you will end up with a list of data classes.
- Select half of the data classes in the list, and run inventory again.

- If the issue occurs, uncheck half of what you have checked, and run inventory again. Do this until you find the one data class causing the problem. If the issue doesn't occur, select the other half that wasn't selected originally, and use the same process of elimination to pinpoint the problem area.
- Once you have this information you can:
- Report the problem to Support with the information on what data class is causing the issue.
- Keep that one data class unchecked so that inventory, in all other aspects, will be successful. NOTE: the one data class where that won't work is Logical Device, as this data class ties into many of the other hardware ones.
In the very least completing these processes will give you more information to provide Support if you need to contact them.
Data Not Collected
When Inventory completes successfully, but you do not see the data you expect in the database, there are a number of reasons this might occur. This might be that we are not successfully collecting the specific data you are after, such as the Processor information. In those cases the data section will be blank when going up to the server. It might be we are not attempting to gather it, if the data class is unchecked in the policy being executed. This section covers our failure to collect the data using the methods we use. Considerations include:
- Execution successful but missing data
- Check NSI files for data
- Trace and Verbose logs will log why data is not gathered if NSI data section is blank
- Check Policy selects for data classes
- Check WMI - wbemtest
NSI Files
NSI files contain the data for each data class inventory has been collected for. Most files are kept at this location: C:\Program Files\Altiris\Inventory\NSI.
The following is an example of a NSI file (represented as .bak on the disk):
<inventory>
	<dataClass guid='{9b44bf1b-459e-4d62-ba9d-cdac8c70e8ce}' name='HW Chassis' manufacturer='Altiris' version='1.0' platform='Win32'>
		<data>
			<resource>
<row c2="False"  c5="None" c7="System Enclosure 0" c6="3" c1="1" c8="No Asset Tag"></row>
			</resource>
		</data>
	</dataClass>
</inventory>
The fragment contains the following useful information:
- Data class name as the name of the file itself
- Data class GUID and name included
- Data tags contain the data to be inserted into the database between <data> and </data>.In the corresponding table in the database (data class name in this format: Inv_HW_Chassis), the first column is c0, the second c1, the third c2, and so forth. This is how you can correlate the data in the NSI fragment to the stored data in the database.
If the data is missing, such as having no data in the data tags, then Inventory is unable to pull that information from the computer. When this occurs we can check the source of the information by using the following method:
- Note the Data class name (this will be the name of the NSI or .bak file found in the NSI directory).
- Browse to the following location: C:\Program Files (x86)\Altiris\Altiris Agent\Agents\Inventory Agent\.
- Open the file InvConfigSln.xml in Notepad, Internet Explorer, or another editor such as Crimson Edit or Notepad++.
- Do a search for the data class name. For example if HW Processor is the data class name, do a search for "HW Processor". You will find a map from the name to the data class GUID, but further down in the document you should find a section for Processor.
- Now review the data found there.
The difficulty is finding what is being done, however WMI is the largest source of data and most queries can be found by reviewing the data. For this example I will take HW Processor since it has a lot of logic, but the WMI calls can still be found. I've taken a snippet of the Processor section. Please note the highlighted sections below:
<dataClass name="HW Processor" GUID="{23d8740a-1e0e-4372-9986-e35793e36a93}" merge="horizontal">
<approaches>
<approach type ="script">
<commands>
<command scriptType="vbscript" function="execute" timeout="70000">
<scriptText>
<
- In the query window, use the XML file, namely: Select * from Win32_processor
- Click Apply.
- Double-click on the row returned. If more than one row returned, double-click on one of the rows. Note that in this example we had 4 processors returned, so we have 4 rows. Also note that none of the processors returned a c7 value, or the Version value.
- In the Properties window, scroll down until you find the property "Version".
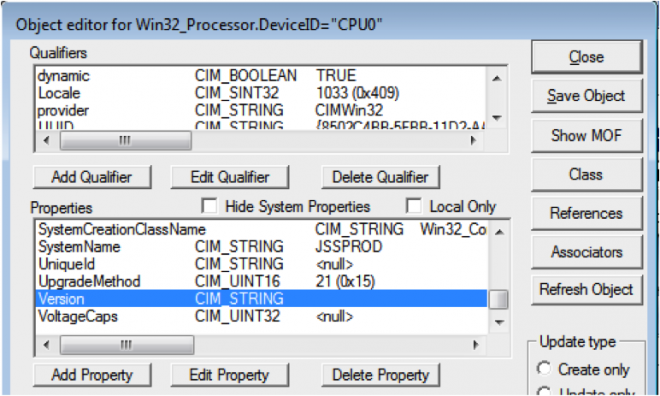
- Note that the value is empty, or blank. A <null> will also not return any data. We have confirmed that WMI does not have a value for this property, thus is why we do not return a value.
This process can be done for any of the data classes as most of them use WMI as a source for data. There are scripts that are also run, and in some instances API calls. These are more difficult to test against without knowledge of how the calls are made.
Data transmitted to the Server
Once Inventory is complete, it hands the resulting NSEs over to the Symantec Management Agent. There are several areas where data can be lost. Initially, the Agent attempts to post the NSE directly to http://servername/altiris/ns/agent/postevent.asp. If this fails, it will place the NSE in the queue. The following list provides points that can be reviewed when tracking if the NSEs made it to the Notification Server queue.
- Agent logs will show if problems with NSE transport
- Check Agent queue C:\Program Files\Altiris\Altiris Agent\Queue
- Check Server logs for NSE transport problems
- Check for busy messages both Server and client-side
- Wireshark for hard cases
Agent Logs
In the agent logs any difficulty sending events or inventory to the Notification Server will be logged. The two most common issues are Server Busy, or the URL is not available (client is offline, for example). Errors include:
PostFile to 'HTTP://<NSServerName>/ALTIRIS/NS/Agent/PostEvent.asp' failed: HTTP error: 503 Service overloaded (-2147213300)Attempt for url http://altiris.hsd1.org/Altiris/NS/Agent/PostEvent.asp returned 2147554187, Post failed, HTTP error: 404HTTP error: 403 Forbidden (-2147209951)HTTP Request Failed: An unexpected network error occurred. (-2147024837)
The following process provides ways to resolve this error in some instances.
HTTP Post Errors
- Generally HTTP Post errors are caused by either name resolution or security.
- Open up a browser on the client machine. In the log the HTTP Post error will have a corresponding URL, for example:
- http://servername/AeXNS/Postevent.asp Try to reach this site locally from the client machine. You should receive a 'NO DATA' message. If you receive "Page cannot be found" or "Page cannot be displayed", we are failing to reach the site.
Also check for the pages http://servername/AeXNS/getclientpolicies.asp and http://servername/AeXNS/createresource.asp.
When accessing the getclientpolicies.asp you should receive the message:
"<error number="80041002">
- <![CDATA[ Failed to GetClientConfig. Error number: 80041002. Error description: GetClientConfigXml failed: Guid not found in request "<Request></Request>"
 ]]>
 </error>"
When accessing the createresource.asp you should receive the message:
"- <error number="80004005">
- <![CDATA[
Failed to CreateResource. Error number: 80004005. Error description: DataLoader: Failed to CreateResource: XML Parse Error 0xc00ce558 at line=0, pos=0
Reason:
XML document must have a top level element.
Near:
Doc head:
 ]]>
 </error>"
If you do not receive the above messages, this is likely a security issue.
- On the Notification Server, open up IIS Manager.
- Right-click on the Default Website and choose Properties.
- Select the tab "Directory Security"
- Click Edit under Authentication and access control.
- Both Enable anonymous access and Integrated Windows authentication in most cases. For secure environments this may be tightened, but Integrated Windows should be checked.
- Do the same on getclientpolicies.asp, createresource.asp. and postevent.asp
Other permissions should be set as follows:
- Users security group should have read permissions (and IUSR_<computername> should be a member of users).
- Also check the EvtQueue and EvtQFast directories. The Users security group should have read and write permissions (and IUSR_<computername> should be a member of the users group).
- You can see if the NS client machines are having problems getting to these files by setting the NS server name (FQDN, NetBIOS, IP address) to be in the Restricted Sites IE security zone on one or more of the NS client machines, and then make sure the custom security on this zone is set for User Authentication --> Logon --> Anonymous logon [This makes sure that the connection is anonymous to these pages on the NS server, which is the same as how the NS client does it.] Then in a browser window one of the NS clients machines where the IE security has been configured as above go to the three previously listed ASP pages to see if you get the correct results.
- User group should have read and write permissions on the NTFS equivalent files and folders corresponding to the anonymous IIS permissions. The AeXNS virtual website is the Notification Server folder.
Agent Queue
The Agent Queue is very useful to hold data that could not be transmitted to the Notification Server. In most instances this works well, and allows data to be transmitted after connection has been reestablished. The queue is located at:
C:\Program Files\Altiris\Altiris Agent\Queue\fqdn_ofservername.domain.com\
Note that the drive letter and install path may be different, and that the last folder will be the fully qualified domain name of the Notification Server.
If Inventory files reside in this queue, typically it means the client cannot reach the server or the server is returning that it is busy. If this occurs, please note the following:
- If there is a connection, then the server is probably busy.
- If there are a lot of files located here, there may be a huge load problem on the Notification Server, or the NS has not been processing files for some time.
- With instances where there are a lot of files, the agent queues should be flushed if this client is an indication of what all clients possess. Run through this process to do it if necessary:
- The registry key FlushAgentEvents (Reg_Dword located under HKEY_LOCAL_MACHINE > SOFTWARE > Altiris > eXpress > Notification Server) controls the ability to flush the local queue for the Altiris Agent. When set to 1, the Notification Server Event Router will send the Altiris Agent an error response that will activate "flush local queues" on the Altiris Agent side. By default, this value is 0.
- Note: This registry setting exits only on the Notification Server.
- If the FlushAgentEvents registery key does not exist on your Notification Server, you can create it. In REGEDIT, click My Computer > HKEY_LOCAL_MACHINE > SOFTWARE > Altiris > eXpress. Right-click Notification Server, click New, click DWORD Value, type FlushAgentEvents and press Enter. Change the value to 1 to stop the Altiris Agents from reporting in. Change it back to 0 to have the Altiris Agents report in.
- With many files here, a lot of the inventory NSEs will be out of date, since newer ones have been stored here. In these instances it is recommended to flush the queues and schedule a Full Inventory to get systems back up to date. There have been instances where older inventory overwrites newer.
Server Logs
For transport problems, usually there is one type of message that indicates problems with Inventory reaching the server, and thus the Evtqueue.
NS Event Queue (EvtQueue) is full - returning BUSY
The A logs are reporting NS Event Queue (EvtQueue) is full - returning BUSY.
Cause
In the HKLM\Software\Altiris\express\Notification Server registry location are a number of keys:
MaxFileQEventCount - Default is 20000. Indicates that only 20K files are allowed into each queue before the queue is considered full.
MaxFileQSize - Default is 512000 (512K). Indicates the sum of the memory size of all of the NSEs in a queue.
These settings are global for all queues.
EvtQueueCurrent Size - The current disk space that the NSEs in the EvtQueue are currently using. There is a similar key for the EvtQFast and EvtQSlow queues.
EvtQueueCurrentCount - The current count of NSEs in the EvtQueue folder. There is a similar key for the EvtQFast and EvtQSlow queues.
EvtQueueFull- If either the EvtQueueCurrentSize or the EvtQueueCurrentCount exceed MaxFileQEventCount or the MaxFileQSize, the value of this setting is set to 1. The NS will begin reporting that the server is busy because the EvtQueue is full. There is a similar key for the EvtQFast and EvtQSlow queues.
In this case, the MaxFileQEventCount was set to 60000 and the MaxFileQSize was set at 512000. Even though only 11000 NSEs were in the EvtQueue, they exceeded the 512MB limitation set by the registry.
Solution
The MaxFileQSize registry setting value is limited only by the amount of available disk space on the Notification Server. Increasing the value of this setting to 1512000 (1.5 GB) can resolve the issue.
NSE capture options
Another way to see if NSEs are being sent is to enble a registry setting on the client computer. This setting is located in the registry. Follow this process to enable and view sent NSEs.
- Go to Start > type Regedit > press Enter.
- Browse under HKEY_LOCAL_MACHINE > SOFTWARE > Altiris > Altiris Agent > and select Transport.
- Locate the value "Capture Events Folder".
- Provide a path where outgoing NSEs can be copied, such as C:\files\NSEs.
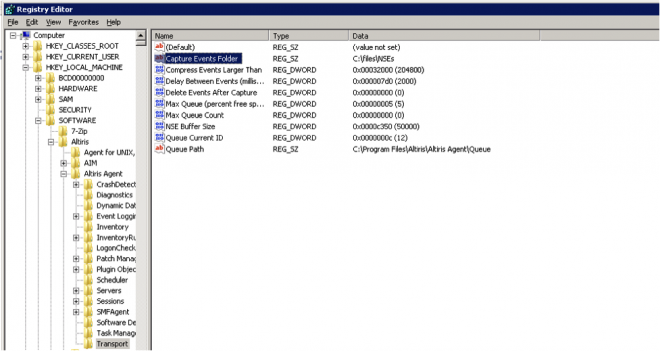
- Close the editor.
Nothing else needs to be done. Now when Inventory is run the NSE will be copied to that location. Since the naming convention does not tell you what the NSEs are, check the size. Inventory NSEs will be larger. Also note the creation time and correlate it for when an Inventory Policy completed.
Wireshark
Wireshark has a lot of capacity, and is thus can be intimidating in its complexity. For our purposes, Wireshark is very easy to use. All we need to look for is traffic between two IP Addresses, that of the server and the client. Things to watch for are:
- Packets being received and sent between the server and client
- Successful posts to postevent.asp.
- Any errors shown in communication between the two
Other Network monitoring programs can be used, but for this example I chose Wireshark because I have experience in it. I used version 1.6.5 in these instructions. To use Wireshark, please follow these steps:
- Install and launch Wireshark on the Notification Server.
- In the Capture pane, click on the hyperlink for the interface (network card) you want to monitor traffic on.
- Sent Inventory (NOTE: you will want to type the capture around the time the inventory completes if possible since the amount of data being captured will be large.
- Once complete, click the stop live capture icon, or go to the capture menu and choose Stop.
- To filter the results, use the following filter logic:
ip.addr == 10.0.0.1
- Click Apply.
- Now you can see all traffic to and from the Notification Server from that client.
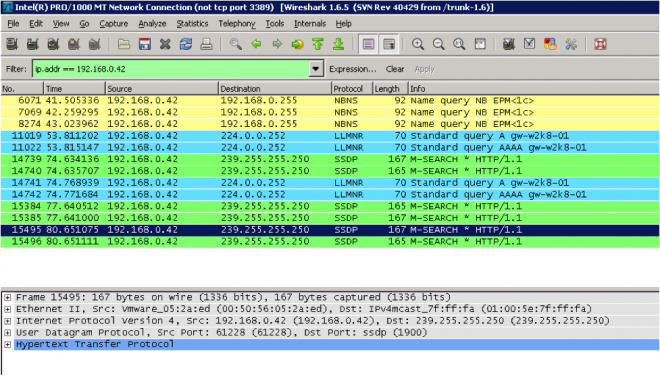
In the Info column you should see the URL being used, and the Protocol will be HTTP (or HTTPS if SSL is being used). This will let you confirm if information is being sent from the client and reaching the server. If you can't find any references here, then we know the server is not seeing anything from the client.
Return to Part 1: Troubleshooting Inventory Solution 7.5 (also 7.1), Part 1
Return to Part 2: Troubleshooting Inventory Solution 7.5 (also 7.1), Part 2
Continue on to Part 4: Troubleshooting Inventory Solution 7.5 (also 7.1), Part 4