Introduction
Symantec’s Servicedesk solution is a world class Service Process Automation tool, automating Incident, Change and Problem Management processes for its end users. This document addresses a customer requirement surrounding the use of the “Send Email” Process Action, using that function in meeting initial SLA (Service Level Agreement) response requirements.
The Challenge: How to Use the “Send Email” Action on the Process View Page to Meet the response requirements for SLA
The Servicedesk Incident Management process view page provides all of the functions to work and close a Servicedesk incident. One of the requirements, when SLA (Service Level Agreements) is configured, is for the assigned user to take some form of action on the incident before the Initial Response time has elapsed. There are a variety of ways for that action to occur. Up until recently, using the “Send Email” process action option was NOT one of those methods. Now, with a little ingenuity and Rulesets, “Send Email” can.
Configuration Items Required
In order to use the “Send Email” process action to meet Initial Response SLA requirements, the following should be configured on the Servicedesk Server:
- A functioning SLA environment
- Proper configuration of email resources in Process Manager. (Admin>MasterSettings>Email Settings. Make sure the server, and port settings are accurate and that it tests correctly)
How to Configure Servicedesk to Use “Send Email” to Fulfill the Initial Responses SLA Using the steps listed below will outline the process needed to generate and use the components.
1. Building a SLA Response Email Template.
a. Open up the Portal and click on Admin>Process Automation, then click the chevron next to Incident Management
b. Click on the Service Dashboard button.
c. In the Actions: INCIDENT-MGMT Web Part, click on Manage Email Templates.

d. Click Add Email Template
e. Make sure the Process Event Radio button is configured.
f. Give the Template a Name – Initial Response SLA Template
g. Provide a Description
h. Click the “From” radio button, under Add To:, then over in the From: section on the form, put in an administrative do-no-reply type of email account, such as “Do-Not-Reply@domain.com”.
i. Click the “Subject” radio button, under Add To:, then click into the Subject section on the form, then on the left side find ProcessID, click on it, then hit the space bar, and back over on the left side click on Incident Title. Then add any additional email subject items you choose to represent the subject of this email. In this example, “Email Response to Fulfill Initial Response SLA” was added to the Incident Process ID and Incident Title in the subject line.
j. Now, Click the “Body” radio button, under Add To:, then over in the Body section on the form, click into the Body area, and hit enter 5-6 times. This will put the cursor at the bottom of the body section.
k. Now type in “{IID=” and then find in the left column Workflow Tracking ID, and click on it. This adds the Workflow Tracking ID to the form, a good idea for all email templates. Press the enter Key
l. Now enter the following text “{Initial Response SLA Met}”. Highlight and copy this text string to a text editor. This will be used later.
m. Enter any additional text as desired. A screenshot of a sample form is below. Once the form is satisfactory, click Save.

n. As this process becomes more familiar, one consideration might be to highlight the text for the Workflow Tracking ID and the Initial Response SLA Met and change its color to a less obvious, such a yellow or light blue, giving the form a nicer appearance.
2. Create a Ruleset
a. Click on Manage Rulesets in the left web part.
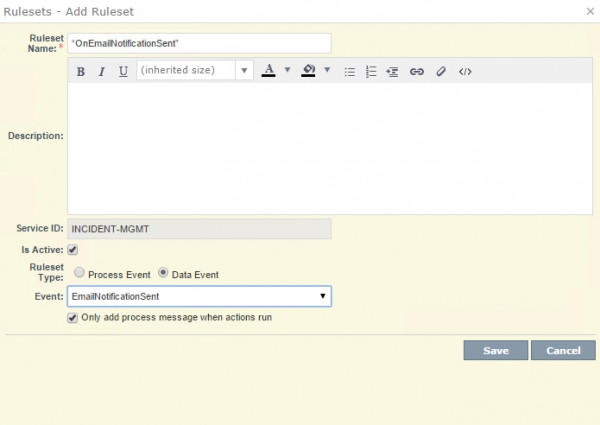
b. Create a new Data Event Ruleset by clicking Add Ruleset.
c. Give it the following name: “OnEmailNotificationSent”
d. You can provide a description
e. This needs to be a Data Event ruleset, so click on the Data Event radio button, next to the Ruleset Type:
f. Choose the “EmailNotificationSent” event.
g. Click Save.
3. Add a Rule to Provide the SLA Satisfaction Function
a. Expand the “OnEmailNotificationSent” Ruleset by clicking on the chevron next to the Ruleset name.
b. Click the Lightning bolt on the right side, and choose Add Rule.
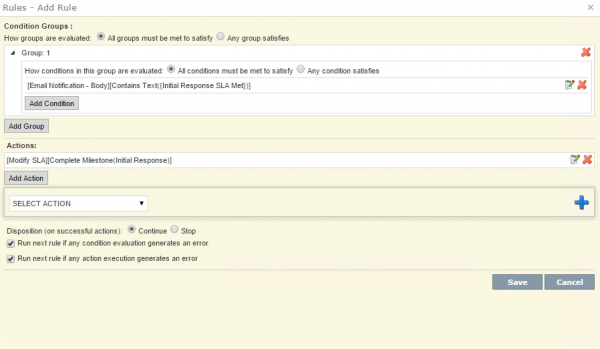
c. Under the Condition Groups: section, click the Add Group Button
d. Leaving the ‘All Conditions must be met to satisfy” radio button checked, click the Add Condition button.
e. Drop down the SELECT CONDITION options and choose Email Notification – Body. Leave the Contains Test option in place and now copy the text {Initial Response SLA Met} from the text editor.
f. Click the blue + icon to add the condition
g. Now click on the Add Action Button
h. Drop down the list under SELECT ACTION
i. Choose Modify SLA. The Complete Milestone option should appear, along with the Initial Response Choice. If not, make those selections.
j. Click the blue + icon to add the action.
k. Your rule definition should look like the screenshot below.
l. Click Save.
m. Make sure the Rule is Active. This completes all the configuration.
4. Testing the Configuration
a. You now can open up any incident process on your server.
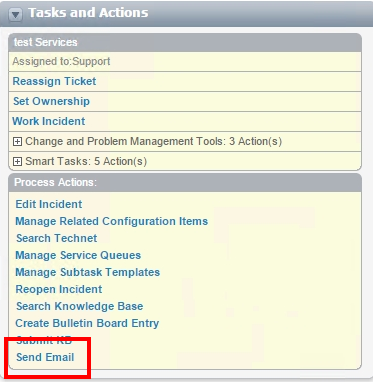
b. Once in Process View, choose the Send Email Action
c. Choose the newly defined email template – Initial Response SLA Template
d. Either pick or manually enter a email recipent or group. Then click the Add reccipient button on the right side.
e. Make any additions to the email as desired.
f. Then Click Send

g. Click OK, then Cancel
h. Now Refresh the Process View.
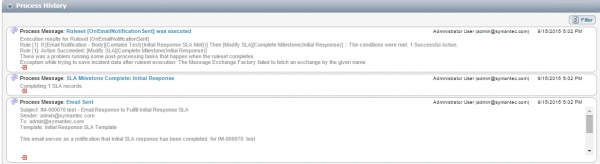
i. You should see three new messages in the Process History. The first shows an email was sent, the second shows that the Initial response SLA Milestone was completed, and the 3rd shows your new ruleset was executed.
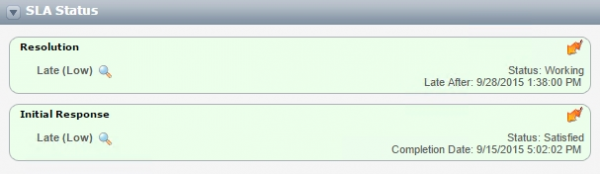
j. Lastly, you can look at the SLA Status Web part in the upper right and see that the initial response SLA was satisfied.
Summary
In summary, the key items to remember are that a key phrase (this example used {Initial Response SLA Met}) must be defined and created, and included in an email template. If you want any of the email templates to activate the rule, they must have the key phrase included. Otherwise administrators MUST define, and users MUST choose a specific email template as demonstrated in this paper. In the best circumstances, the decision on whether or not to use the Send Email action as a SLA Initial Response satisfaction tool should be made in the planning stages of the Servicedesk implementation. It can be added at any time, but defining this early will allow for proper training on the system to occur.