Pt. 2 – Installing and Configuring Symantec GSS
Part 2 deals with installing Symantec GSS and configuring it. As with installing anything, there are a few prerequisites that need to be in place before installing:
- Make sure you’re installing Symantec GSS on a Server OS only. Installing it on a desktop OS like Windows 7 or 10 isn’t supported at all. Check out the Platform Support Matrix for GSS, but the lowest version of Microsoft Server you can go for instance is Microsoft Server 2008, with the highest being Microsoft Server 2012 R2. Server 2016 is currently only supported for client installations.
- Make sure the following ports are opened on any firewall running: 37 (Time Sync between server/client - UDP); 49 (Security/Authentication – UDP); 53 (Security/Authentication – UDP); 67 (PXE Server service – UDP); 68 (PXE Server service – UDP); 69 (PXE Mtftp Server – UDP); 137/138 (NetBIOS/Security – TCP); 402/403 (eXpress Server service, Dagent communication, Client Transfer Port – TCP); 1345/1346/1347 (Ghost Multicast – UDP); 4011 (PXE Server service – UDP); 5001/5002 (Remote Control ports – UDP); 6666/6667 (Ghost Multicast – UDP).
- Make sure you’re not installing GSS on a Domain Controller as being a member of the Local Admins Group is a requirement, and DCs have no local groups. Furthermore, disable UAC if running.
- .NET Framework 3.5 (requirement before installing MS SQL Server 2014 Express).
- DHCP needs to be configured and running in the event of PXE Server being used.
Once you have verified these, it’s time to move onto installing. You can install GSS in 1 of 2 ways: Simple install which installs all components on the designated server, or Custom install which allows you to choose which components you would like to install and where.
I am going with the simple installation option.
Double-click the installer to start the process. Select the folder to which you want to extract the installation files (default is C:\DSSetup). Once done, select Extract & Execute App.
On the next splash screen, you’re given the choice of installation (Simple/Custom) and can run a Prerequisite check. This shows you if you need to remedy any issues before proceeding with the installation. Select the option to install a local PXE Server as well (allows remote systems to be installed and configured by an administrator). Click Next to continue.
The following splash screen allows you to install any license files you may have, and input details of the account you will be using, along with customizing the installation directory.

Make any changes you need too and click Next to continue. A popup alert states that a license file is not specified and will continue in trial mode. If you’re using it for testing purposes, simply click OK, or No to return and input the license file.
If you ran the Prerequisite check, you might have seen a failure for a local database. This would pass if SQL was already installed. The next popup alert received states that SQL needs to either already be installed, or is needed to be installed via SQL Express.
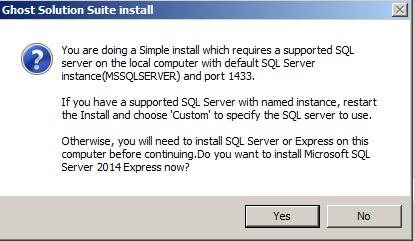
My personal preference was to preinstall SQL Express 2014 as I’ve run into issues with applications installing SQL Express as part of the installation. In order to use the pre-existing SQL Express DB, then you would click No. However, you will then need to restart the installation process and select the Custom Install option. If you want to let SQL Express be installed automatically, click Yes.
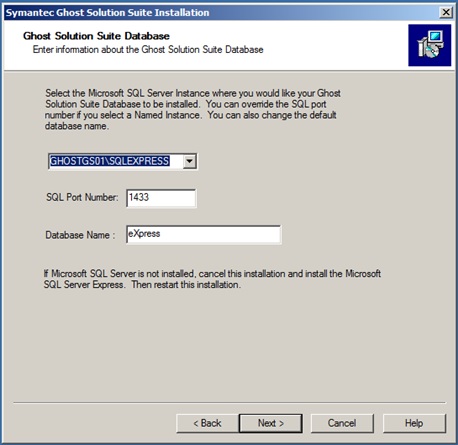
Selecting No, and running a Custom Install results in the screenshot shown below where you casn customize some details such as SQL Port Number and DB name.
![]()
Click Next, and choose to use either Windows NT authentication or SQL Server authentication. I defaulted to Windows NT authentication. Click Next, and your next option is to choose whether or not to use PXE Server. I chose to install it in order to test it properly.

On the next screen, I chose the option to connect directly to the Ghost Solution Suite Server (default). Click Next after making your choice. Just a side-note: If you choose Choose Ghost Solution Suite Server using TCP/IP multicast, then it connects to the first GSS server it finds.
I selected the default to install the GSS Console on the current server, but you have the option to install on another server. Click Next once you have made your choice.
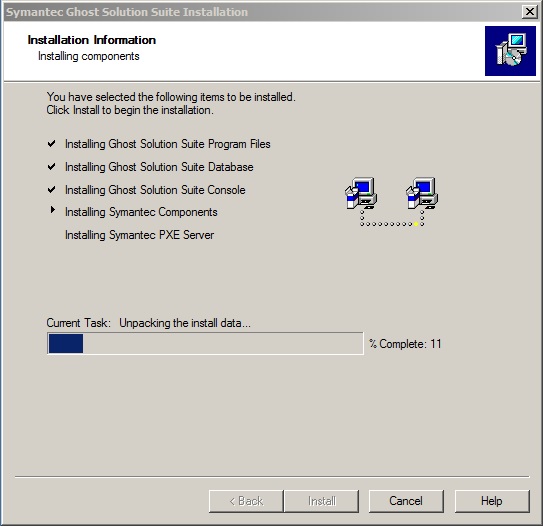
The final screen is a list of what has been selected, and when you click Install, it shows the current task running, and the % completed.
The final part of the installation is to install the GSS agents on computers you’re going to manage. As before, either select the option to install remotely, or leave it and complete the installation.
If you choose to install the agent, you’re presented with another screen where you specify a username/password for each workstation. As I have a very flat, basic domain I left mine as the default, but for security reasons, some companies might require separate accounts. In such a case you would then manually enter in those details. Click Next once done.

Leave the installation directory as the default, or change as required. Click Next once done.
You then add clients to a default group or create a new one. For test purposes I have left this default. Click next once done.
The next screen allows you to add in your computers you want to manage. Click Next once you have added in all your servers. Bear in mind you can also add via an Import job, which is valuable if you have multiple workstations. Hit Finish.

Enter in the user account for this installation and let it run.
This results in Symantec Ghost Solution Suite being installed. The next installment will deal with configuring it and running your first job.
.