Part 4 is the last technical section of this series of articles and deals with restoring a *.gho image to a PC. You can assume that the PC in question has died and needs to be reimaged in order to bring into working condition again.
Open up the Symantec Ghost Solution Suite Console. Under Restoration Jobs, right-click and select New Job.
Give the new job a meaningful name as that will then help you identify what it was used for if you have multiple restore jobs. You’re given a slightly different screen. There is a split window in which you will click the Add button à Distribute Disk Image (this is for restore purposes):

Once you have done this, you have a number of options and choices to make. Clicking Select Options allows you to select a specific folder for an image, if that image is not located in the default share created at installation. If you specify a different folder, that folder has to be accessible to the VM in question. Otherwise, click Select Options, make any changes you want too, and then click OK which then populates the location path as per the screenshot below:
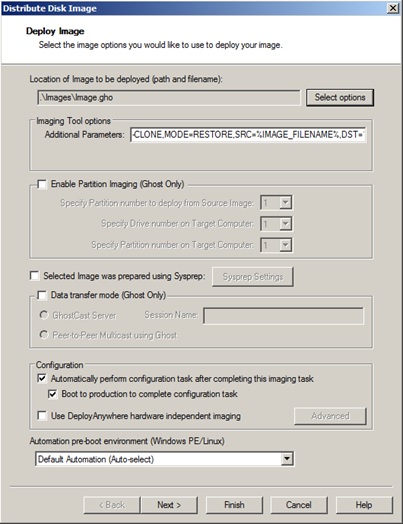
I left all other settings as default, and clicked Next. I left the Return codes and Rip and replace options as default, but you are able to insert additional return codes if you so wish.
Click Finish.
Once you are ready to restore, you will drag-and-drop the newly created job onto the PC you want to restore. You’re presented with a screen as shown below where you can schedule the job for a later time, run the job immediately (default), job repetition or schedule the job to run in batches.
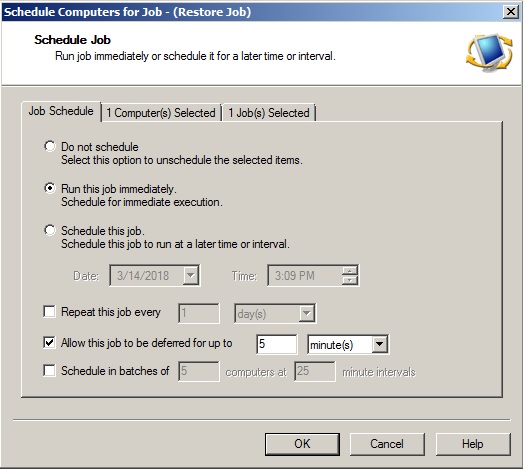
The other tabs show the number of computers selected, as well as the jobs. I kept everything as default and clicked OK. Once done, the job starts and restores the image to the PC selected.
If this was a template that was applied to the PC, you would have to re-add to the domain, change the name of the PC and update any software required.
To confirm that the job completed successfully, check the Symantec GSS.
As you get further into GSS you're going to be able to do more with it, so get a demo version, a lab (virtual works well) and play around with the software.
Good luck!