After performing the steps in this walk through you will have a working PXE and TFTP set up delivering a Win PE 4.0 package with the latest Ghost executables and 2 optional default Win PE 2.0 Ghost packages.
With this walk though it is assumed that the Ghost Solution Suite 2.5 is already installed on a 2008 server (other os’s are an option however the screen shots and file paths are form a 2008 server installation.) These instructions also assume that your Ghost Server, DHCP server and Client are on the same network segment.
Because WinPE, ADKsetup.exe, TFTPD32.exe, and 3com PXE server are not Symantec products Symantec technical support is not responsible for their performance or able to assist with troubleshooting or supporting these technologies. The appropriate manufacturer of each of these third party software’s will need to be contacted to assist with troubleshooting their respective technology’s.
Downloading and installing required tools.
Windows ADK
- Download and run the ADKsetup.exe from the following link. This is for the Windows Assessment and Deployment Kit (ADK) for Windows 8 http://www.microsoft.com/en-in/download/details.aspx?id=30652
- Choose the “Install the Assessment and Deployment kit to this computer” radio button. Maintain the default locations if the batch files included are to be used.
- You will only need to select the “Deployment Tools” and “Windows Preinstallation Environment (Windows PE)”

- This download may take a long time but you can move forward with setting up this server while the download finishes.
PE batch files.
- Create the following folder structure. Make sure that capitalization is correctly observed.
- c:\WinPE
- c:\WinPE\Ghost
- c:\WinPE_x64
- c:\WinPE_x64\mount
- c:\Drivers
- c:\TFTPBOOT
- Download the Winpe1.txt and Winpe2.txt files from the following KB to the c:\WinPE folder renaming them as noted to .bat files. http://www.symantec.com/docs/HOWTO93846
3 Com install
- Run the Setup.exe from the following folder of the ghost install disk “\Extras\3Com Boot Services\Install\”
- Continue the install wizard. You will see a window entitled 'Setup Type.' Specify Server rather than Administrator or Custom.
- Accept default values for the rest of the installation.
- When done with the wizard, click on Finish, and exit all windows.
- Run the PXE Server.
- Click Start and All Programs.
- Select 3Com Boot Services and click PXE Server. You will be prompted to create a DHCP proxy. If you are installing 3Com Boot Services on a computer that does not run a DHCP Server, answer 'Yes.'
NOTE: If the PXE Boot Services are installed on the DHCP Server, you must use the option that adds the "Option 60 PXEClient Tag String" to DHCP packets.
If the PXE Boot Service are installed on a different computer, you must enable the ProxyDHCP function in the PXE Server software. The first time you run the PXE Server, you will be prompted to enable ProxyDHCP. Symantec recommends that the PXE, Ghost and DHCP be installed on the same subnet. These instructions assume that this is true.
Download and install TFTPD32
- The TFTPD32 Standard Edition Installer is what is used for this demonstration. The service version could be used and then set to run as a service rather than needing to be logged in and running. Download it from http://tftpd32.jounin.net/tftpd32_download.html
- Once downloaded start the install and accept the defaults.
Create a TCP/IP Network Boot Image with the Ghost Boot Wizard.
At least one pe 2.0 package has to be built with the ghost boot wizard even if you will be replacing the package with a manually created pe 4.0 package. Custom PE4.0 and Stock PE 2.0 ghost packages can exist on the same server.
In this demonstration we create 1 item and it will be the default option when PXE booting.
- Click Start > Programs > Symantec Ghost > Symantec Ghost Boot Wizard.
- Select Windows PE [Default]
- Click Next.
- Select TCP/IP Network Boot Image option and click Next. 5x
- Browse to the c:\TFTPBOOT
- Name the package PE4GHOST
- Click Next twice.
- Click Start Again
- Select Windows PE [Default]
- Click Next.
- Select TCP/IP Network Ghost Boot Image option and click Next. 5x
- Browse to the c:\TFTPBOOT
- Name the package PE4GHOST
- Click Next and then Finish.
- In windows explorer copy bootmgr.exe from the C:\TFTPBOOT\boot folder to the C:\TFTPBOOT folder.
BCD File
PXE boot packages are tracked in the bcd file located in the C:\TFTPBOOT\boot folder.
The default behavior for the boot menu is that if only one PXE package has been created with the ghost boot wizard then no menu will be presented and the only item listed will be booted to. If a second boot package is created with the Ghost boot wizard then a menu will be displayed and the first package created will be the default option with a 30 second counter.
Microsoft provides the bcdeditor.exe to allow for modifying this file. The command line tool from Microsoft can be confusing and tedious to use. Several third party tools exist that allow for visually editing the bcd file using a GUI editor and may be worth researching if you need to be modifying the bcd boot menu file to change the default selection or to update the time to respond to the boot menu.
Building the PE 4.0 boot package with Ghost.
The following directories and files should have already been created and downloaded as noted in http://www.symantec.com/docs/HOWTO93846
c:\WinPE
c:\WinPE\Ghost\ (the updated ghost executables from HOWTO93843
c:\WinPE_x64
c:\WinPE_x64\mount
c:\Drivers
c:\WinPE\Winpe1.bat
c:\WinPE\Winpe2.bat
If you don’t already have the updated Ghost executable Ghost64.exe (12.0.0.4570) downloaded contact support and mention you need the ghost executables noted in HOWTO93846 then place them in the c:\WinPE\Ghost\ folder
Download any new Win8_x64 NIC drivers and or Storage drivers (if necessary) into C:\Drivers folder. Make sure that the drivers have been extracted and are not still in the .zip or .exe format that they were downloaded in.
- Copy the winpe.wim from the amd64 folder that is located under the ADK installer directory C:\Program Files (x86)\Windows Kits\8.0\Assessment and Deployment Kit\Windows Preinstallation Environment\amd64\en-us, to the C:\WinPE folder.
- Launch a command window as administrator by navigating to the Start Menu> All Programs> Accessories> and Right clicking on the Command Prompt and selecting Run as administrator
- In the command prompt type cd\ press Enter
- Type cd "Program Files (x86)\Windows Kits\8.0\Assessment and Deployment Kit\Deployment Tools" press Enter
- Type DandISetEnv.bat press Enter
- Type cd\ press Enter
- Type cd WinPE press Enter
- Type Winpe1.bat Press Enter
- Look for the Press Any Key prompt and review the lines above for errors If no errors are seen then Press Any Key. Do this for each prompt you receive.
- To add the drivers from the c:\Drivers folder type Dism /Image:c:\winpe_x64\mount /Add-Driver /Driver:c:\drivers /Recurse and press Enter
- Leave the command windows open for now and open windows explorer and navigate to c:\winpe_x64\mount\windows\system32
- Open the startnet.cmd file with Notepad. You will see that it only contains the word wpeinit at the top. On the line below wpeinit add the following script lines as they appear below (each command on its own line so just copy and paste it):
wpeutil disablefirewall
X:
cd\
cd ghost
start ghost64.exe
- Exit note pad saving your changes close the windows explorer window and return to the command window from step 11
- Type cd\ Press Enter
- Type cd WinPE Press Enter
- Type Winpe2.bat Press Enter
- Look for the Press Any Key prompt and review the lines above for errors If no errors are seen then Press Any Key. Do this for each prompt you receive.
In the c:\WinPe_x64 folder you should now have a winpe_x64.iso that could be burned to DVD to boot from to test its viability. If when booted from the local systems hard drive is seen and the network is also seen then this package is viable and can be transferred into the PXE server.
Replacing .wim file.
- In Windows Explorer Navigate to the C:\WinPe_x64\ISO\sources folder and locate the boot.wim file.
- Right click the boot.wim file and select to Rename the file to PE4GHOST.wim
- Copy this file to the C:\TFTPBOOT\boot folder replacing the existing PE4GHOST.wim
- The ghost pe 2.0 menu item will be replaced with this new pe 4.0 package
Configureing the PXE server
Specify client computers in the BootPTab Editor.
- Click Start > All Programs > 3Com Boot Services > BootPTab Editor.
- Click Edit and then click Add Host to open the Edit Host window.
- Provide the information as follows:
- Name: This is the computer name of the client computer, or host computer. If you don't want to specify a particular computer name, click the box to "Use node for name"
- Node: Specify the MAC address of the client computer that should use the PXE menu. If you want to specify multiple computers based on MAC addresses, you can use a question mark as a wildcard character. For example, if one computer's MAC address is 123456889988 and another is 123456852963, notice that the first 6 digits are the same. Using the MAC address of 123456?????? in the Node field would allow both machines to connect to use the PXE package. This will work as long as there are no other BootPTab host entries that exactly match the MAC address of the computers. You can also use all wildcards (???????????) to allow all of your clients to receive the PXE package.
- IP #: Do not use this box.
- Image: Type the information as follows exactly as follows: /boot/pxeboot.n12
- Click OK. The entry should be reflected on the Hosts tab.
- Click on File, and Save. Do NOT change the file name of the BOOTPTAB. It must be named 'BOOTPTAB' (without any extension) and be located in C:\TFTPBOOT.
- Close the BootPTab Editor.
- Launch the 3com PXE server and keep it running whenever clients need to PXE boot.
Configuring TFTPD32
- Open TFTPD32 from the desktop short cut (it will need to be launched before it works if you want it to run as a service consider using the service version of TFTPD32)
- Configure the Current Directory to point to the C:\TFTPBOOT and select the correct Network card from the Service Interface see below.

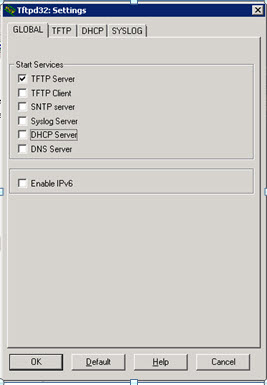
- Open the Settings option
- The only check box on the Global tab needs to be checked is TFTP Server
- Click OK and restart if requested.
- Because this walk though didn’t choose the TFTPD32 service installer we will have to launch the TFTPD32 application and leave it running in order for clients to pxe boot.