Original article is posted here.
I had the opportunity to respond to a post here, regarding writing data to an Excel file. Here’s a quick go-to on how to do it.
Let’s have a look at two different scenarios. The first being that there’s a file that’s being output to a specific location (like a log file), and the second, that a user is downloading report data to an excel file that will be saved to their default download directory.
Both scenarios are illustrated in the demo project (attached) for this post, and require the import of the LogicBase.Components.Office.dll library (Microsoft Office).
*Note that this method can also be applied to a number of other scenarios, but an important third scenario would be sending an Excel file via the Send Email component as the file attachment.
In the first scenario, in which we’re writing a file to a specific location, we’re going to make use of the Excel Write Component. There are two of these files; one in the Automation directory and another in the Native directory. Warnings fire when you pull anything from the Automation directory, so let’s stick to the Native version.

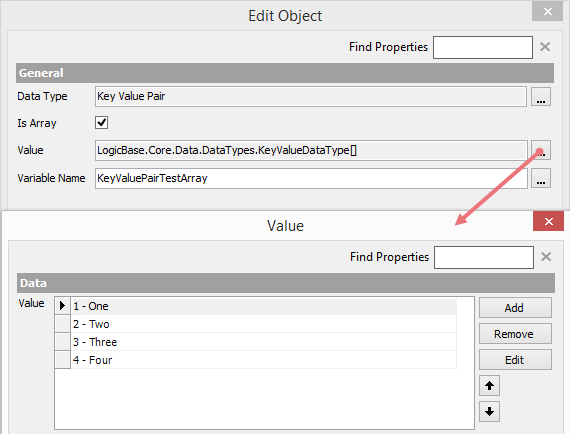
For this demo we’re going to use a simple Key Value Pair array as our output data.
Initialize a Key Value Pair array in an Initialize Data component and give it a few values.
Next, in the “Input Type” field of the Excel component, select Key Value Pair. Use the array you added to the Initialize Data component in the “Input Data” field. The input data fields can be toggled on and off, depending on whether you want the column included in the Excel file.
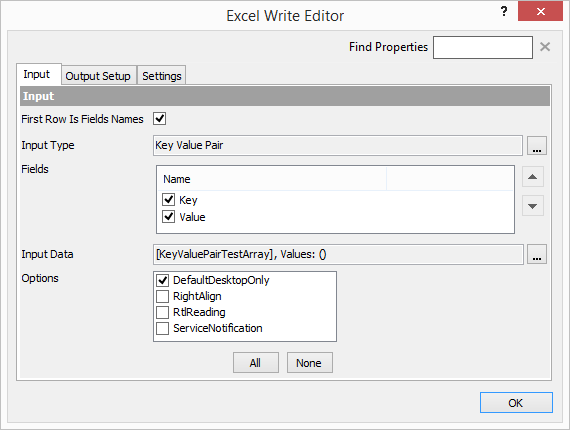
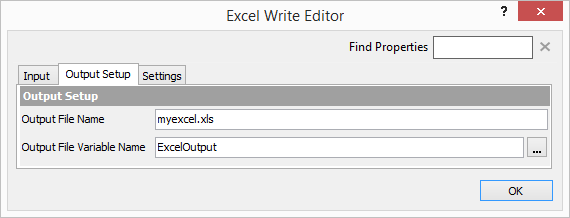
Give the component an “Output File Name” (in this context, this value is arbitrary) and “Output File Variable Name”, and you’re ready to move on.
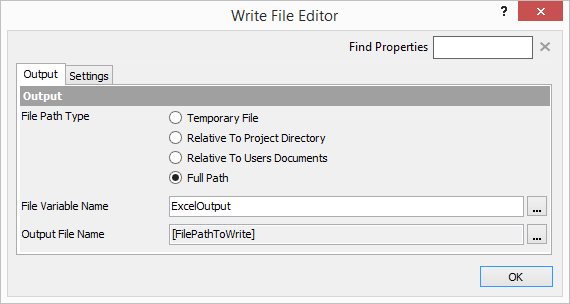
Next, we’re going to use a Write File component to write the Excel data to a file. In this demo, we’re going to use a Full Path and write to a test directory located at C:\Test (this directory must already exist). Select the “File Variable Name” variable (this will be the “Output File Name” variable from the previous Excel component). The “Output File Name” field must include the actual file name itself. This value will overwrite the “Output File Name” field from the Excel file (rendering that value arbitrary, as mentioned above). So the value of this field will be something like “C:\Test\excelfile.xls”.
This will work as a functional test for our first scenario. Run it and the file should be written to the directory entered in the last field above.
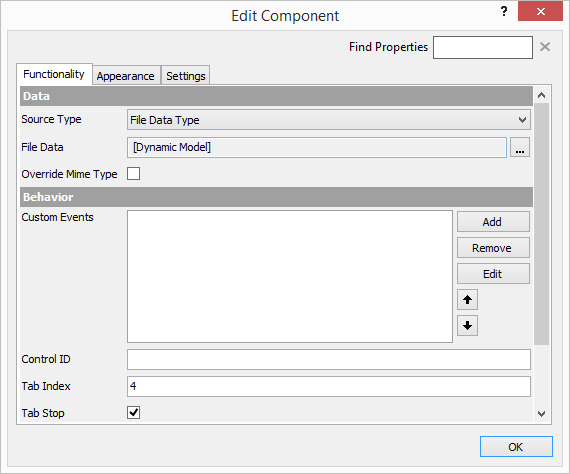
For the second scenario, we’re assuming a user will be wanting to download a report in an Excel-formatted file. For this, we will use a Button Download component with a dynamic file source model. For the “File Data” field, select “Dynamic Model” as the value source.
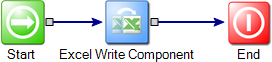
Inside this model, use an Excel Write Component just like in the first scenario, above. The only difference here is that, because we have no Write File component, the “Output File Name” variable is no longer arbitrary, and will be used to name the file that is being downloaded.
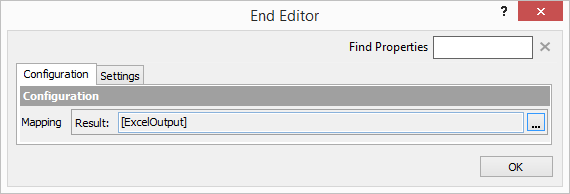
Configure the End component of this submodel with the output variable of the Excel component.
When a user clicks the button, the excel-formatted data will be downloaded and saved as an .xls file in the user’s default downloads folder.
Featured Components
Excel Write Component
Initialize Data
Write File
Button Download
End