Contents
1. What is ImageInvoker?
1.1. ImageInvoker Features
1.2. Testimonials
1.3. About The Author
1.4. Acknowledgements
2. What’s New in V1.0
3. Installation and configuration of ImageInvoker
3.1. ImageInvoker Installation
3.2. Silently Installing ImageInvoker
3.3. Regenerating your Automation Images
3.4. Tagging Jobs for the Automation Portal
4. Overriding Portal Menu Item Names
4.1. Overriding Job Names
4.2. Overriding Job Folder Names
5. Imaging Computers With ImageInvoker
5.1. Imaging Computers already known to DS
5.2. Imaging Computers Unknown to DS
6. Securing ImageInvoker with a Password
6.1. Setting a basic password hash for ImageInvoker
6.2.Configuring ImageInvoker for Server/Domain Authentication
7. Timeout Options with ImageInvoker
7.1. Global Configuration of Timeout
7.2. Local Timeout Override
7.2.1. Implementing Override in LinPE
7.2.2. Implementing the Override in WinPE
8. The ‘Other’ Options In the ImageInvoker Configuration Utility
8.1. Disabling Client Rename
8.2. Enabling detailed Logging
8.3. The ImageInvoker Root Folder
8.4. Flat vs hierachical menu types
9. Troubleshooting ImageInvoker
9.1. Checking the Installation
9.2. The Log & Comms Files
9.3. The ImageInvoker Utility ‘About’ Tab
10. Version Notes
10.1. What about ImageInvoker for 7.x?
10.2. Known Issues
10.3. FAQ
10.4. Enhancement Request History
10.4.1. Pending Enhancement Requests (in no particular order)
10.4.2. History of Implemented Enhancement Requests
10.4.3. Trash Canned Enhancement Requests
1. What Is ImageInvoker?
ImageInvoker is an Altiris Deployment Server (DS) 6.x add-on which is designed to reduce the total cost of ownership of using DS in your environment. It turns your Altiris Deployment Server into an imaging service by extending mini-consoles, or deployment portals, into your client base using the Altiris automation environment.
As ImageInvoker will only deploy to machines the portal is invoked on, it immediately reduces the risk of imaging tasks being scheduled on computers in error and further naturally limits the impact of any deployment error.
This Altiris add-on both accelerates the imaging process and crucially removes the need to have extra Altiris administrators trained and on-hand just to facilitate day-to-day tasks like computer builds, rebuilds and mass rollouts. A 5 minute training session is all that’s required to get your technical teams deploying with ImageInvoker.
1.1.ImageInvoker Features
ImageInvoker extends the imaging capability of Deployment Server 6.9 as follows,
- Safe and Rapid Deployment Process
ImageInvoker’s fundamental design goal is to enable users without Altiris training to deploy computers quickly and safely. Its efficiency has been tuned over the years to the point that a computer unknown to Altiris may now be named and start deploying within 20 seconds of booting into Automation. This is without ever having to touch the Altiris Deployment Server Console.
It is ‘deployment safe’, which means jobs may only be scheduled on the machine the ImageInvoker client menu is called from. This means that portal access can be rapidly provisioned to untrained staff without introducing the risk of a high-impact imaging event in your environment.
- User-Friendly Deployment Menus
When the Deployment Server administrator tags jobs for ImageInvoker delivery, the menu name is by default taken from the job name. This can however be altered to make the menu a bit friendlier. This is helpful in organisations whose naming conventions are created with change control in mind rather than end-user readability.
- Easier Deployment Planning
ImageInvoker’s ability to create computer objects on-the-fly removes the need for advance provisioning of computer objects. Once the image job is selected, the facility to set the computer's name means that no more client touches are required to deliver a fully functional endpoint.
- Portal Security
The deployment portal can be configured to require server, domain or even simple hash password authentication before unlocking it for deployment. The NT security model used in this release of ImageInvoker encompases authorisation too; so that portal users only see menus they've been granted scheduling rights to.
1.2.Testimonials
We’ve been using ImageInvoker since DS6.9SP1 and the first thing that struck me was the simplicity with which it could be deployed and used. There is almost no adjustment or training time for end users to become proficient in its use. Literally any job, task or image can be called from the local computer by ImageInvoker -all while retaining the remote execution features that DS is known for.
I have been working with Altiris-turned-Symantec Deployment Solution for 7 years now with a team of only 3 full-time and one part-time resource dedicated to DS. We have 40,000+ endpoints spread across 56 sites worldwide, each with its own Deployment Server. We have over 80 customers that each need their own sets of applications and custom configurations across 7 languages and 3 OS platforms. ImageInvoker can handle all of this directly from the local desktop.
If we are on the floor troubleshooting a PC and find we need to image, re-configure or add applications, we can easily reboot the computer and use either the flat or directory tree structure to choose, schedule and execute jobs without having to use RDP or go back to our offices to pull up a remote DS 6.9 console session. One of the neat things is the ability to set up passwords that allow different sets of tasks/images to be made available to different user groups. We can even provide limited access to our end users to facilitate self-repair and updating of their workstations.
Needless to say, without this simple yet powerful and intuitive snap-in, our Field Services team and certainly our Altiris team would never be able to stay ahead of all the changes in our dynamic environment.
Mike Barta
Desktop/Systems Engineering
IT Operations
Stream Global Services
“We’ve used ImageInvoker pretty much since Ian released it on the forums. It is – and I cannot understate this – invaluable to our use of Altiris.
The ability to not only initiate jobs from the workstation, but also to rename/create their DS accounts on the fly has been absolutely essential in assisting with our workload.
Each summer, our authority purchases a large number of new workstations for all of our schools. These replace older PCs which – in turn – replace even older ones.
Without ImageInvoker, we would have to create predefined computers for each new one and link jobs to each. This presented problems when 6 of us were trying to do work on the DS console as well as the issue of trying to FIND your predefined computer from the list.
With ImageInvoker, my team and I are able to PXE boot a brand new PC, select a job and name the computer all in one easy operation.
So – in short – it’s a fantastic bit of software.
Gerard Sweeney
Senior ICT Technician ~5000 Nodes
1.3. About The Author
Ian Atkin works at Oxford University as an Altiris specialist. He is also a Symantec Connect Trusted Advisor and writes IT articles to scratch the writing/teaching itch that remained when he stopped working as a physicist. He spends a lot of his time at Oxford distracting his colleagues; an activity which he continues to insist is for their own good.
Ian’s prime focus at Oxford University is to create and develop an endpoint management infrastructure which suits well the complexities encountered across this open and federated environment. The scale of this challenge lends itself particularly well to being measured using astronomical units.
In his free time, Ian dreams fervently about what he would do if he had some free time. Ian lives in the UK in rural Worcestershire with his wife and two boys. In the winter, the local population find it simplest to cower indoors whilst the Atkins pour onto the streets and battle with lightsabers.
One important thing to note about Ian is that he is terrible at DIY. This is something which is painfully obvious should you ever drop in to see him at his home.
1.4. Acknowledgements
ImageInvoker has been created in conjunction with Symantec Partner, Incit Technology. Since its early days as a simple vbscript, Steve Massie at Incit has supplied advice, tips, programming and beer; all of which been instrumental in getting ImageInvoker to where it is today.
I’d like also to thank Darren Collins and his endless patience in plugging the leaks in my MSIs.
A big collective hug is also due to the Symantec Connect community; my calls for testers have never gone unanswered and the bug hunters among you have been truly impressive.
Finally a huge thank you to my wife Karan who has tolerated the loss of many a weekend as I’ve coded, tweaked and mulled in dark corners throughout the ImageInvoker project.
2. What’s New In V1.0
For those who are ImageInvoker veterans, this version of ImageInvoker improves on previous versions in the following areas,
- Speed
ImageInvoker v1 is now much faster than previous releases. If you use ImageInvoker to deploy many jobs within a single menu item (by tagging a folder) you’ll notice a significant speed improvement; rarely will any menu item scheduling now take more than a few seconds.
For those who use ImageInvoker with WinPE versions 3 and above, you’ll now see big improvements to the menu response times as ImageInvoker now disables WinPE SMBv2 directory caching.
- Menu Presentation
ImageInvoker now has the ability to present either a flat or folder-based structure to clients. The latter can be useful to assist menu item location in environments with large numbers of menu items.
- On-The-Fly Menus
ImageInvoker v1 no longer requires the Altiris administrator to explicitly rebuild client menus. Clients now request their menu to be built on portal entry. This means that newly tagged menu items are instantly available to clients without any further action by the Altiris Administrator.
- Scalability Improvements
Whilst some Symantec customers have deployed ImageInvoker in environments with client counts exceeding 50K nodes, ImageInvoker was actually originally designed for small-medium business use. ImageInvoker v1 now utilizes menu caching together with other efficiency improvements to make ImageInvoker feel far more responsive in larger environments.
- Bug Fixes
Whilst rebuilding ImageInvoker (now over 15,000 lines of code) I took the opportunity to squish a few bugs.
- AD Authentication and Authorization
This is the biggest enhancement in this release; ImageInvoker can now bring authentication and authorisation to the client menu. When the new server/AD authentication options are enabled, menu items also are scoped according to the rights of that user. Please note that although there are currently no known issues with this authentication add-on, I consider this beta functionality in this release.
3. Installation And Configuration of ImageInvoker
ImageInvoker's only software requirement is that Altiris Deployment Version 6.9 is installed. ImageInvoker has been tested on DS 6.9 SP4, SP5 & SP6.
Please note that whilst ImageInvoker v1 may work with previous DS6.9 releases, your mileage will vary. Feel free to respond on this Connect thread with success/doom stories for these earlier releases.
To get ImageInvoker up and running in your environment you’ll need to follow the three steps below,
- Install ImageInvoker from the Windows Installer package
- Regenerate your automation environments
- Tag jobs in the Altiris deployment console to mark them for exposure through the client portals
Let's get started now by going through each of the above three steps in more detail.
3.1.ImageInvoker Installation
As mentioned previously, the only installation requirement for ImageInvoker is that Deployment Server 6.9 is installed.
The resource requirement for the ImageInvoker service is very minimal –if your hardware is capable of running Deployment Server, it’s certainly capable of running ImageInvoker too.
To install ImageInvoker the steps are,
- Download the zip file attached to this article to your Deployment Server
- Extract the MSI from the zip archive
- Execute the MSI on your Altiris Deployment Server
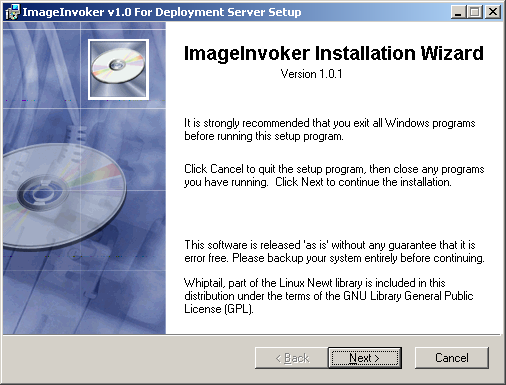
Click ‘Next’ to proceed
- On the next screen you should be presented with the destination folder as being the Deployment Server installation folder. If this is incorrect use the 'Browse' button to select the correct location.

Click ’Next’ to proceed.
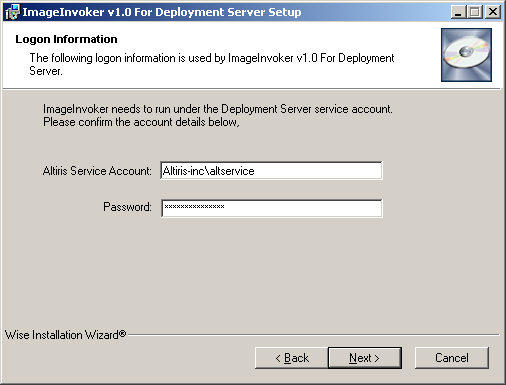
- This is the point where we need the credentials for the ImageInvoker service. As this must be the service account used for the Deployment Server services, the account name is auto-populated for you. Enter the password for this account to continue.
Please note that from a security point of view is not a good idea to run the Altiris Service account under SYSTEM, local Administrator, or even a domain administrator account. If you find your system installed in this way, please take a look at Parts 4 and Parts 5 of the Altiris Deployment Server Training Notes on Symantec CONNECT. These detail best practice in how configure the Deployment services to run under their own service account.
Finally, for those environments which have DS Console security enabled, the service account you use for Deployment Server must be present as DS user account with DS Administrator rights in the Deployment Console. If you do not do this, the service will not have sufficient rights to function correctly.
Once you entered the password, click ’Next’ to proceed.
- At this point the installer has all the information it needs. Click ‘Next’ to begin and in just a few seconds you should find ImageInvoker installed.
- Finally, click ‘Finish’ to exit.

If you are the curious type, open up now the services control panel and confirm the ImageInvoker service is installed and running,

3.2. Silently Installing ImageInvoker
Silently installing the ImageInvoker MSI is straightforward. All you need to set on the command line is the Deployment Server service account password -all the rest of the data needed by the installer will be discovered.
The command line will be something like,
msiexec /i imageinvoker_v1.msi MYPASSWORD="password" /qn
3.3. Regenerating Your Automation Images
If you’ve followed the above installation steps, the ImageInvoker service should now be ready to accept requests from client portals. In order to inject the portals into your client automation environments, you’ll need to rebuild them so that they take on the new settings.
The Altiris Automation environments can be delivered in many ways; USB Flash drives, CDs, DVDs, harddisk partitions and of course by PXE. Rather than go through all the ways of rebuilding your automation environments we’ll focus here on just one delivery method here, PXE.
When it comes to PXE images, the fastest way to rebuild them is to use the PXE Configuration Utility’s regenerate feature. This performs a complete rebuild of the selected automation environment and combines the most current automation files and drivers with your customisations. The process is as follows,
- Open the PXE Configuration Utility
This is available on your Deployment Consoles menu toolbar and directly as a quick-click ‘cog’ icon on the icon bar.
- In the Boot Menu tab, locate the Regenerate Boot Images frame. Tick the automation environment you'd like to load up ImageInvoker in, and click Regenerate. In the screenshot below shows both Linux and WinPE being made ImageInvoker 'aware'.
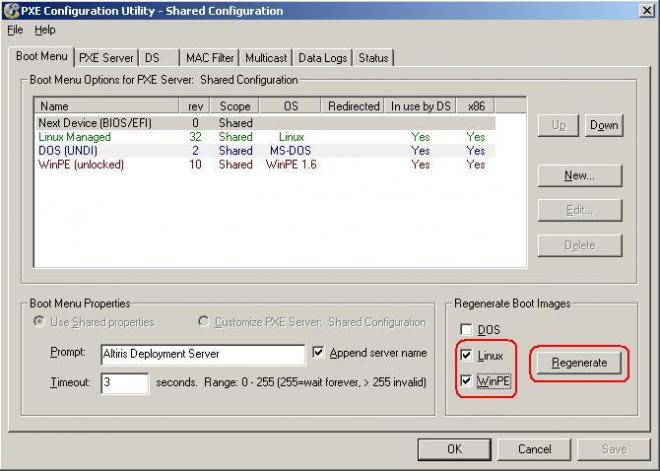
- Once the regeneration is complete, click Save. This will push the regenerated automation images down to your PXE Server(s).
For those that want to know exactly what’s happened here, the ImageInvoker installation copied the following files into the express share folder tree,
- A shell script file called menu.sh into the Bootwiz Linux folder hierarchy
- A windows batch file menu.bat into the Bootwiz WinPE folder hierarchies
The regeneration process forces the automation file systems to update with these files. For Linux the rebuild process is fast as the Linux core is fairly small. However when WinPE regenerates, the combination of larger core and a more complex built process makes the build rather more time consuming. In short, when WinPE rebuilds, grab a coffee.
3.4. Tagging Jobs For The Automation Portal
The final task to get client portals up and running is to configure jobs so that they appear as a Menu Items in the portal. The process is very simple; simply edit the job name and add into it the 4 character string (MI). This process of renaming jobs to contain this string is called ImageInvoker tagging. The ImageInvoker tag can be placed anywhere in a job or job folder’s name.
This process of using the Deployment Console UI directly to tag jobs for the portal (rather than use a separate interface) has two benefits. First, it keeps menu item tagging simple; as soon as you add the tag that item is immediately available to clients that subsequently boot into automation. Secondly, this tagging makes it clear to Altiris Administrators whether any job they might wish to work on is ‘alive’ and exposed in the client portal.
To illustrate the tagging process, see the figure below. It shows an example of a job hierarchy before (structure on the left) and after (structure on the right) the tagging process.

Note in the above, the tagging of one job and two folders are illustrated,
- The job ‘DoD Disk Wipe’
This is an example of a single job being tagged for the portal. The (MI) string could be present anywhere in the name, but for clarity it's been appended to the job name. In the portal this will be presented as "DoD Disk Wipe"
- The folder ‘Deploy Public Access Computer’
This is an example of tagging an entire folder of jobs for the portal. In the portal, this will be presented as the single item "Deploy Public Access Computer"
- The folder ‘Deploy Staff Computer’
Another example of tagging an entire folder of jobs for the portal. In the portal this will be presented as the single item "Deploy Staff Computer".
The important point to note here is that ImageInvoker can present both single jobs and job folders as menu items in the portal. Should you tag a folder as a menu item, not only are all the jobs within the folder processed, but subfolders are processed too exactly as if you dropped that folder on the a PC by hand using the DS Console.
The key takeaway here is that you don’t need to change the way you organise your jobs in order to use ImageInvoker.
4. Overriding Portal Menu Item Names
In order to permit menu item names to differ from those used in the DS Console, ImageInvoker caters for menu name overrides. This feature enables your job names to be reflected in the portal with different names. This can be useful in the event that your job naming over the years has been tuned to align with your own internal change process standards.
4.1. Overriding Job Names
If you don't want to use the job name as the menu text for a job, the override mechanism is to set a description for the job. Once you've set a description, this override will be seen instantly by any clients booting into their automation portals from that point on.

Figure showing how menu item names can be overridden using the job description field
4.2. Overriding Job Folder Names
As description fields don’t exist for job folders, a different mechanism to override job folder names from that above is required here. Overrides in this case are executed through a dummy job called ‘(MI)’. The process is as follows,
- Create a job with the name (MI) and place it in the root of the menu item folder
- Put in the description field your menu item text
- Add to the currently empty job a single ‘run script’ task
- In the ‘Run This Script’ box, enter in the text REM MenuItem and ensure the job is configured to run in Windows
- In the ‘Script Run Location’ inset, configure the script to run on the Deployment Server, and uncheck the box to ‘Run when the Agent is Connected’
This job therefore does absolutely nothing and will not impact on your deployments. Its sole purpose is to provide this mechanism to give you a menu item name.

Figure showing how folder names can be overridden using a special menu override job
5. Imaging Computers With ImageInvoker
Now we’ve prepped our automation environments and tagged our jobs, we’re ready to use ImageInvoker.
We’ll cover now two ImageInvoker deployment scenarios. First we’ll look at the scenario of a machine already known to Deployment Server, and then we’ll see how ImageInvoker copes with computers it hasn’t yet seen.
5.1.Imaging Computers Already Known To DS
When we PXE boot a known machine into automation, this is what we’ll see in ImageInvoker’s default configuration,
- The Timeout Countdown
Once a computer is booted into automation, ImageInvoker will load in a timeout mode. If this is not interrupted within the preconfigured timeout window (by default 5 seconds) it will exit and the automation boot will continue as normal.
If however the ‘i’ key is pressed within the timeout period, ImageInvoker will load and present a deployment menu.
The figures below show how ImageInvoker looks in both the Linux and WinPE environments with the timeout countdown.
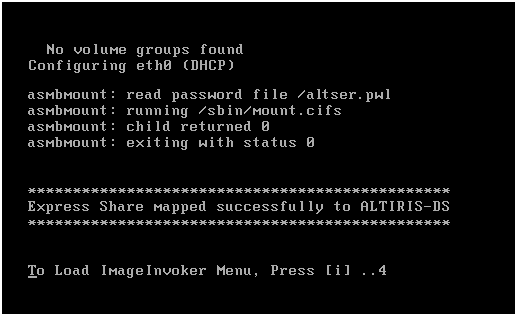
Figure 1(a) : A Linux automation boot showing the ImageInvoker timeout countdown

Figure 1(b) : A WinPE automation boot showing the ImageInvoker timeout countdown
- The ImageInvoker Menu
The next screen presents your deployment options. Here you’ll see all the menu items that we previously showed as being tagged in the Deployment Console screenshot. Use the arrow keys to move up and down the list and hit ‘ENTER’ to select the item.
The figures below show how ImageInvoker looks at this stage in both Linux and WinPE.
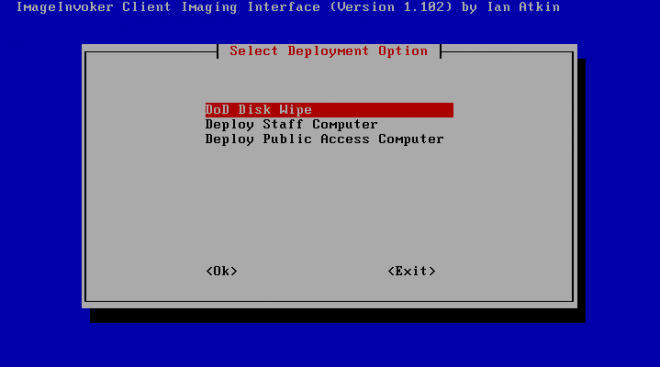
Figure 2(a): The Deployment Menu as presented in Linux automation
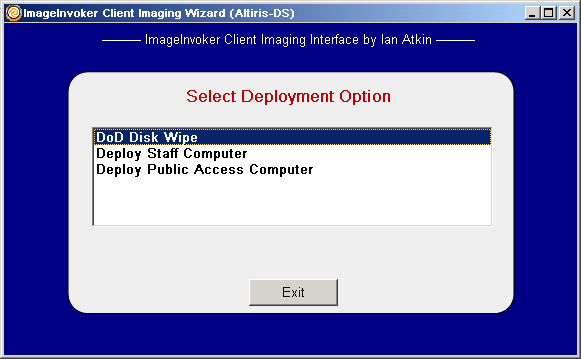
Figure 2(b): The Deployment menu as seen in WinPE.
In this case, we’re going to select "Deploy Public Access Computer".
- Computer Name Override
This stage of the interface provides the opportunity to change the computer's name. This computer is currently known to Deployment Server as TEST-VM-05 -a virtual machine. We can change this here if we wish, but for now let's just hit enter to move to the next screen.

Figure 3(a): The Computer Name override screen as seen in WinPE
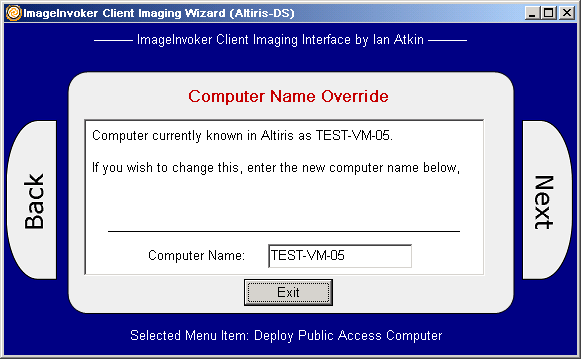
Figure 3(b): The Computer Name override screen as seen in WinPE.
- The Job Scheduler
Once you’ve selected a menu item you’ll move straight onto the Job Scheduler screen. At this point you simply wait; behind the scenes the menu item you’ve selected has been sent to the server for processing.
For a Deployment server of sensible hardware specification, the scheduling process should take no more than a few seconds for any single menu item.

Figure 4(a): The job scheduling screen as seen in WinPE
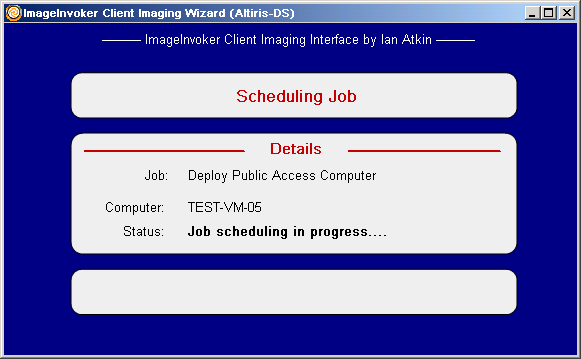
Figure 4(b): The job scheduling screen as seen in WinPE.
- Job Scheduler Complete
Once the jobs have been successful scheduled server-side, you'll be presented with the following screen. This signifies the completion of ImageInvoker and it will momentarily terminate allowing the deployment agent to load and begin the execution of your scheduled jobs.
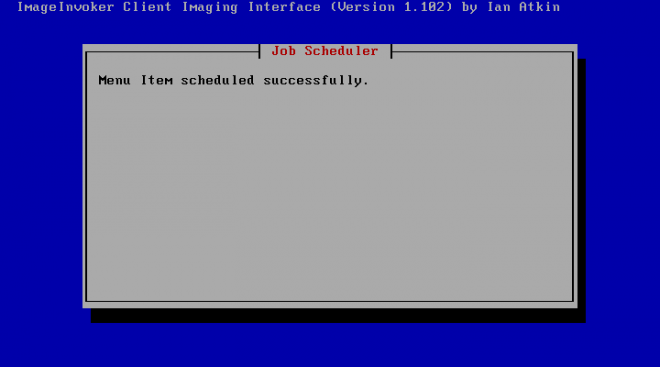
Figure 5(a): Linux Automation screen which shows the successful scheduling of a menu item

Figure 5(b):WinPE Automation screen which shows the successful scheduling of a menu item
If you take a look in the console you'll now find the jobs scheduled in the UI,

Figure 6: Deployment Console showing the jobs scheduled by ImageInvoker on the test VM
One feature of ImageInvoker to note, is that in order for it to schedule jobs successfully to immediate execution it must first delete any pending jobs. So if you find you've put on the wrong image job, don't panic. Just reboot the client computer, reload the menu, and select the correct menu item. The previously scheduled jobs will simply be magicked away.
5.2. Imaging Computers Unknown To DS
There is very little difference between imaging new and existing machines with ImageInvoker. When new, unknown, computers are booted into the portal the Computer Name Override screen is the only screen that changes. This change is just to emphasise that the computer isn't in the database, but other than that it’s business as usual for ImageInvoker.
Below are the screenshots of the Computer Name Override screens which highlight that the computer is currently unknown to Deployment Server.
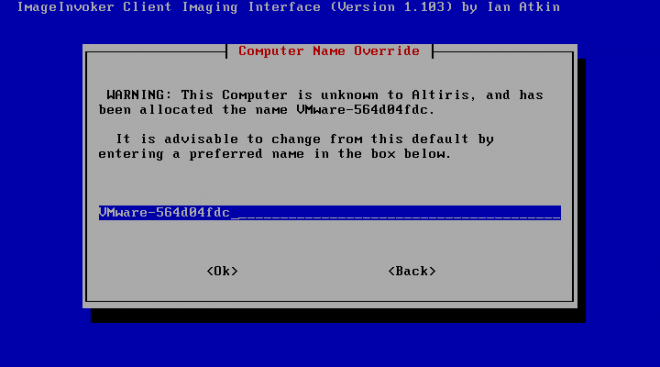
Figure 7(a): Linux Automation screen Computer Name Override screen which highlights that this computer has not been found in the Deployment Server database.
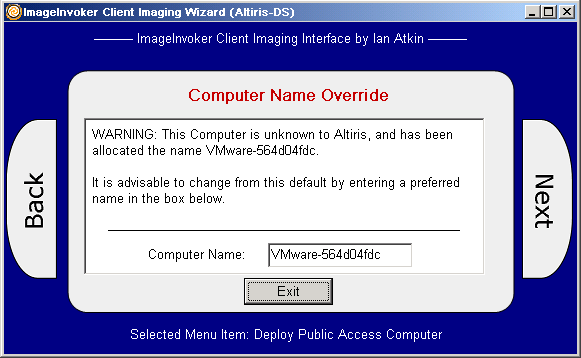
Figure 7(a): WinPE Automation screen Computer Name Override screen which highlights that this computer has not been found in the Deployment Server database.
In the scenario, where the Deployment Console can't find the computer in the database, ImageInvoker must create a computer object for it. By default, the name of the computer object is set to the computer's serial number (to ensure uniqueness), but you can of course override this and generally you should. The rest of the process is exactly the same as for deploying existing machines, as in previous section.
6. Securing Imageinvoker With A Password
One issue which emerges particularly in the PXE boot scenario of automation delivery is that anyone PXE booting on your imaging subnets will be presented the ImageInvoker client portal.
To protect curious users from re-imaging their computers by mistake, it is best to password protect ImageInvoker. This way, anyone loading ImageInvoker will be challenged for a password before being presented with deployment options.
ImageInvoker's authentication method is a single global setting and cannot be overrideen on the client.
6.1. Setting A Basic Password Hash For ImageInvoker
This is the simplest password lock in ImageInvoker. To configure it, do the following,
- In the Deployment Console, from the menu-bar select Tools -> Altiris Tools
- Select "ImageInvoker: Create Automation Client Menu" from the tools list
- Enable the client menu password by selecting ‘Hash’ from Client Menu Password Protection dropdown.
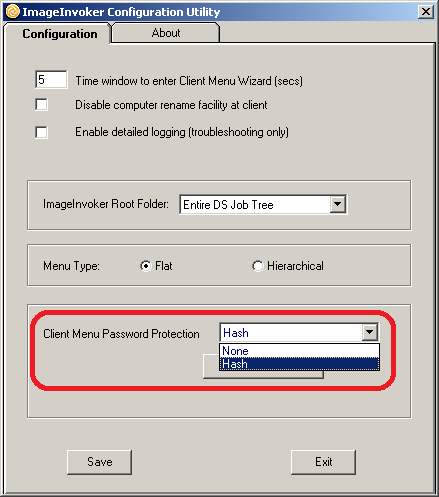
Figure 8: The ImageInvoker configuration utility. This is used to configure the basic configuration options available in ImageInvoker. Of interest here is the password protection option towards the bottom of the Window. Here we can set the following password protection options: None & Hash.
- Click the ‘Set Password’ button that appears beside the dropdown. In the password dialog box that pops up enter in your password and click OK

- Now save your changes by clicking the ‘Save’ button located in the bottom left of the Window. This will save these changes to the menu_options.ini file and restart the ImageInvoker services to ensure these changes are seen by the engine.
Once these changes are committed by the service restart, all clients trying to use access ImageInvoker will be prompted for this password. Three login attempts are permitted before portal access it denied.
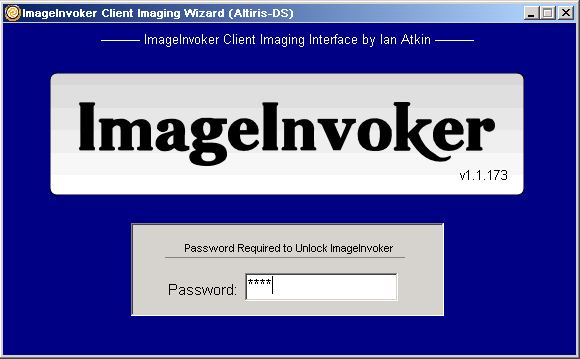
Figure 9: ImageInvoker in WinPE showing a password lock screen
6.2. Configuring ImageInvoker for Server/Domain Authentication
This released of ImageInvoker has the ability to provide security scoped menus and is designed for servers where security is enabled. This is an enterprise ehnancement to ImageInvoker which enables menus to be taylored according to your security role.
Please note that enable domain authentication, the deployment server must be a domain member.
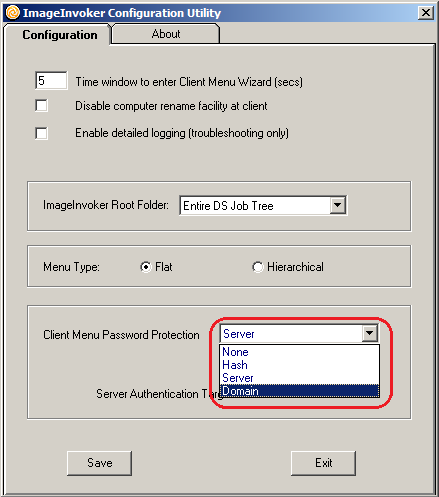
Once this option is saved, the client automation portals will require a valid username and password before permitting entry.
7. Timeout Options With ImageInvoker
One of the options which can be configured with the ‘ImageInvoker Configuration Utility’ is the timeout. This timeout is the time window within which Client portal entry is permitted. Once this time elapses without user interruption, ImageInvoker will silently exit to permit the automation boot process to continue as normal.
The default timeout which is set by the installation of ImageInvoker is 5 seconds. This timeout can be tuned for your environment however. For example, if you download WinPE over PXE, the 5-second window can often be missed, so extending the timeout to take into account distractions whilst waiting for a long PXE TFTP transfer can be useful.
Disabling the timeout (by setting it to zero) is especially useful when imaging using automation USB Flash drives or DVDs. In such cases you’d likely want ImageInvoker to wait indefinitely for user input on loading (if you are using these media the chances are you are intending to image a computer, and therefore the objective of loading automation will be to load ImageInvoker).
Changing the timeout is supported at a globally through the configuration utility and further can be overridden by adding command-line options to the ImageInvoker startup script.
7.1. Global Configuration Of Timeout
To change the default timeout do the following,
- In the Deployment Console, from the menu-bar select Tools -> Altiris Tools
- Select "ImageInvoker: Create Automation Client Menu" from the tools list
- Set a new Timeout by selecting the timeout textbox, and entering your new value,

In the above example, I've chosen to increase the timeout from the default value of 5 to 10.
- Click ‘Save’ in the ImageInvoker utility to save your changes and restart the ImageInvoker service. Once the services have restarted, click “Exit” to close the ImageInvoker Configuration utility.
Once this changed has been saved, all ImageInvoker clients connecting from this point on to this Deployment Server will have this timeout configured. The only exceptions here are clients which have local overrides configured in the automation startup scripts that launch the client.
In the next section we’ll take a look at how this can be done.
7.2. Local Timeout Override
In the previous section we implemented a global 10 second timeout configured using the ImageInvoker configuration utility. Some of the defaults configured in the utility can however be overridden above on a case-by-case basis on your clients. This is achieved by amending the command-line that calls the ImageInvoker client.
Forcing the timeout to be different from that set on the server is useful in environments which leverage automation CDs and flash drives. In these situations, having a locally forced timeouts of zero configured can be useful to force the permanent loading of ImageInvoker on such media whilst leaving PXE boot timeouts in place. In some environments, you might even want to create specific PXE boot options which are only ever selected manually which force-load ImageInvoker.
7.2.1. Implementing Override In LinPE
Let’s take a look now at how to override the global timeout defaults to in Linux Automation. We’ll set a timeout of so that when the Linux PXE option is booted, ImageInvoker will load and wait indefinitely for user input.
- Load the Linux image in BootDisk Creator.
If the Linux image is a PXE image, just select the option to "Edit Boot Image" in the PXE Configuration Utility. When you load up the image in Bootdisk Creator, you'll be taken straight to Step 8, which allows you to edit the configuration.
In the left-hand pane which allows you to navigate through the files, browse to menu.sh under "Linux Additional Files -> startup"
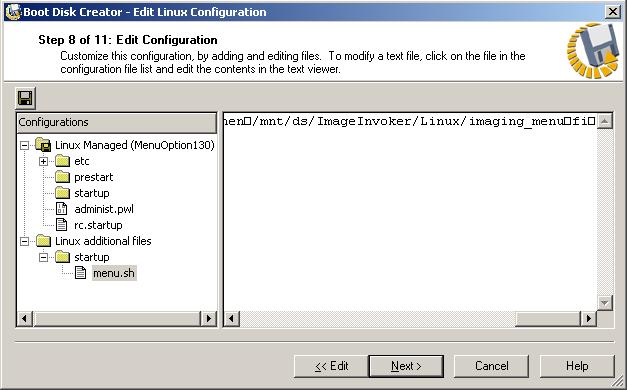
- Create a custom menu.sh in the Linux configuration Folder
Right-Click menu.sh and select copy from the context menu. Right-Click the startup folder in you Linux configuration and select paste. This will provides a local copy of menu.sh which we can then customise so that it is specific to this configuration. This will override the 'global' version in the "Linux Additional Files" folder.
In the right-hand pane which displays the contents of menu.sh, scroll all the way to the right, and add after the text "imaging_menu" the timeout override text "-t 0" as shown below. This will set a timeout of 0.
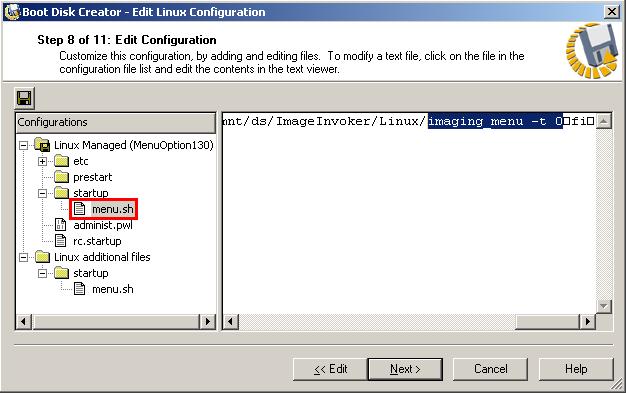
- Compile the automation environment
Click 'Next' to begin compiling the Linux automation environment. When prompted to save changes to menu.sh, click "Yes". Note that when editing a PXE boot image, don't forget to save this to the PXE server when you’re returned to the PXE Configuration Utility.
7.2.2. Implementing The Override In WinPE
Here we will cover how to override the global defaults to timeouts under WinPE with our zero timeout option. Just as with LinPE, when the amended WinPE option is PXE booted, ImageInvoker should load and wait indefinitely for user input.
- Load the WinPE Image in BootDisk Creator
If the WinPE image is a PXE image, just select the option to "Edit Boot Image" in the PXE Configuration Utility. When you load up the image in Bootdisk Creator, you'll be taken straight to Step 9, which allows you to edit the configuration.
In the left-hand pane which allows you to navigate through the files, browse to menu.bat under "WinPE Additional Files -> startup"
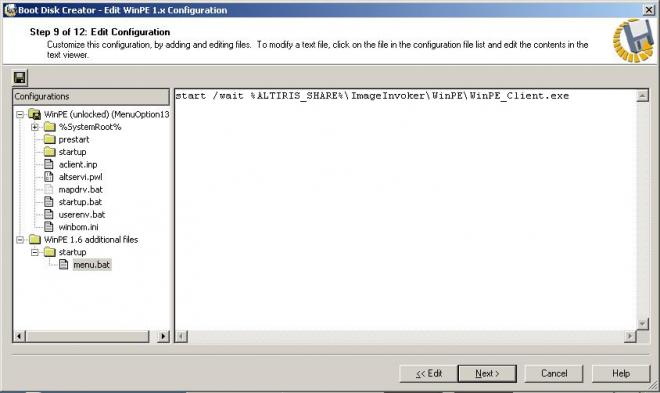
In the right-hand pane which displays the contents of menu.bat, scroll all the way to the right, and add after the text "WinPE_Client.exe" the timeout override text "/t 0" as shown below. This will set a timeout of 0.
- Create a custom menu.bat in the WinPE configuration folder
Right-Click menu.bat from the context menu and select ‘Copy’. Right-Click the startup folder in you WinPE configuration and select ‘Paste’. This will provides a local copy of menu.bat which we can then customise to be specific to this configuration. This will override the 'global' version in the "WinPE Additional Files" folder.
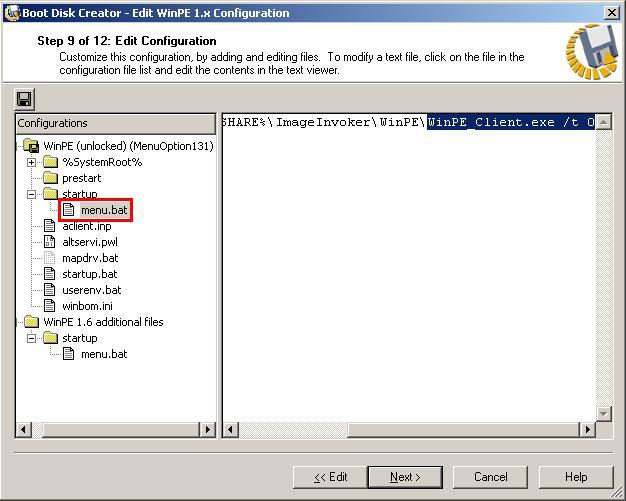
- Compile the Automation Environment
Click ‘Next’ to begin compiling the WinPE automation environment. When prompted to save changes to menu.bat, click "Yes". Note that when editing a PXE boot image, don't forget to save this down to the PXE server when returned to the PXE Configuration Utility
8. The ‘Other’ Options In The ImageInvoker Configuration Utility
The ImageInvoker Configuration Utilty has a few other options which have not been mentioned yet. These generally aim to give just that little bit of extra flexibility.
8.1. Disabling Client Rename
This option is for those who do not want ImageInvoker to be able to rename machines. This can be useful in situations where,
- Software deployments are tied to machine names so changing a computer’s name has a user impact in software delivery
- Computer naming conventions mean that extra thought is required before a rename is executed.
- Computer renames require an associated DNS change
So to remove the client rename option, just check this box in the ImageInvoker configuration utility and click save. Note that this option only applies to machines which are already known to Deployment Server.
8.2. Enabling Detailed Logging
If you think there is a problem with ImageInvoker, detailed logging is the first point of call. Enabling this will ramp up the log verbosity which should assist troubleshooting.
8.3. The Imageinvoker Root Folder
By default, ImageInvoker will scan the entire job tree looking for ImageInvoker tagged items. You can narrow this down though to a specific folder. This focus is useful as it can help prevent Menu Item ‘pollution’ in situations where people copy live jobs to their own private folders but forget to remove the menu item tagging.
8.4. Flat vs Hierachical Menu Types
If you are an environment which employs many menu items, then you’ll have already found that that the flat menu can be cumbersome. With v1 comes the option of a folder based navigation system which allows you to navigate the DS tree folder structure in order to locate your job.
Only folders trees which house ImageInvoker menu items are exposed to reduce screen clutter.
9. Troubleshooting ImageInvoker
If ImageInvoker is not behaving as expected, try some of the troubleshooting tips below. If these fail, drop me a line on Symantec Connect and I'll see what I can do.
9.1. Checking The Installation
There will always be situations where the Installer hasn't behaved as I anticipated. If you have problems with the install, it’s likely that ImageInvoker is not installed properly. The install does the following things,
- Locates the express share, and Deployment Server service account
- Creates the ImageInvoker folder .\express\ImageInvoker
- Copies menu.sh to .\express\Bootwiz\Include\LINUX\SHARED\startup
- Copies menu.bat to .\express\Bootwiz\Include\WinPE\SHARED\startup
- Copies menu.bat to .\express\Bootwiz\Include\WinPE2\SHARED\startup
- Copies menu.bat to .\express\Bootwiz\Include\WinPE3\SHARED\startup
- Copies menu.bat to .\express\Bootwiz\Include\WinPE4\SHARED\startup
- Installs and starts the ImageInvoker service
- Installs custom SQL functions
These are called dbo.Custom_IsFolderwithinFolder, dbo.Custom_IsEventwithinFolder, dbo.GetIIFolders, dbo.GetIIMenu
So the first port of call is to check all the above is in place, and if it hasn't let me know.
Next I'd check that the regeneration of the automation environments has worked as planned.
In Linux automation confirm that the menu file /startup/menu.sh is present. For WinPE, this location is X:\startup\menu.bat. If these files aren't present, try regenerating your automation environments.
9.2. The Log & Comms Files
For troubleshooting, ImageInvoker logs to three locations:
- C:\ImageInvoker.log
This is for critical service errors such as failure to locate the deployment share
- 2. .\eXpress\ImageInvoker\Logs
Here you can find the runtime logs of the ImageInvoker service and the Menu Configuration Utility. The log files are date stamped.
ImageInvoker client communications are stored under,
- .\eXpress\temp\ImageInvoker_In
This is where currently active client-server comms files are written. If ImageInvoker is currently idle it is normal for this folder to be empty.
- .\eXpress\temp\ImageInvoker_Good
This is where successfully processed client communications are moved to
- .\eXpress\temp\ImageInvoker_Bad
This is where client communications which failed to process are moved to
If you have problems, and want me to help you troubleshoot, zip up the entire ImageInvoker folder and the log folders above email them across to me
9.3. The ImageInvoker Utility ‘About’ Tab
This about tab contains,
- A link to this CONNECT ImageInvoker v1 manual
I’ll keep this updated with known issues should they arise
- A link to my CONNECT profile
This is so you can PM me if you have a support request. Feel free to also post directly to the CONNECT article as others might be able to assist you also
- A summary of the ImageInvoker file versions
This is another new edition which will assist troubleshooting should it be required

10. Version Notes
10.1. What About ImageInvoker For 7.X?
This note is for Altiris Administrators who solely use the revision 7 platform; ImageInvoker is currently is only available for the DS 6.9 product line. The development work required to push ImageInvoker into the 7.x world exceeds my current programming free-time and likely more importantly my wife’s patience. If anyone has a programming bent, understands v7.x and is interested in helping out, please feel free to drop me a line.
Please note though that if you are entitled to run DS7 in your environment, then you are also entitled to run DS6.9 too. The revision 6 branch of Deployment Server is still fully supported and has a secure development and service pack path. Many customers who have upgraded to CMS7 also still use DS6.9 for deployment. Symantec understand this, and are completely aware that solid real-world scenarios exist where the case for continuing to use DS6.9 is compelling.
10.2. Known Issues
I'll use this section to provide updates to known issues as they occur.
In the release of ImageInvoker the following issues have been logged,
- Deployment failure when imaging multiple machines with a common USB NIC (pending)
In scenarios where the target machine has no network card, USB ethernet cards can be used to facilitate network access. Using the same ethernet card to image mulitple machines however presents problems as ImageInvoker uses the client MAC address to uniquely define the target computer. ImageInvoker will see this as a duplicate and will not proceed as it cannot uniquely identify the machine.
The solution for this is for ImageInvoker to use other identifying data like Serial, Asset or UUID (just like DS does). This will require an engine change and the author has scheduled this in for the next minior update (no timescales yet!)
- ImageInvoker engine logs SQL Query failures (fixed in v1.0.7)
This is due to SQL Server being configured with a case sensitive collation. Since v1.0.7 case sensitive collations should now be supported.
- Linux Client does not load if timeout is zero (fixed in 1.0.8)
The compliled C launcher for the Linux client had a bug which meant that the Linux imageinvoker client would not load if the timeout was set to zero (both from the server config utility and through the commandline override option)
- WinPE Client would not parse computer nanes correctly if they begin with a number (fixed in 1.0.8)
A variable declaration error in the WinPE client meant that if a computer name began with a number the computer name would be presented as the number portion only.
10.3. FAQ
Q: I am worried that this product is free and doesn't have any official support. I don't want to rely on it now, and then find it will no longer be developed.
A: Over the last 5 years there have been 5 ImageInvoker releases. I also have a roadmap for its development over the 2014.
Q: My automation images have the keyboard and mouse lock enabled. Can I still use imageinvoker?
A: Yes. The keyboard/mouse lock feature is enforced once ImageInvoker exits. This applies to ImageInvoker clients in both Linux and WinPE.
Q: I exclusively use DOS automation Why isn’t this supported?
A: Unfortunately, DOS has been de-emphasised for some time now in Deployment Server 6.9 (it’s not even available as an automation option in the 7.x). Although I personally think DOS is great, it is not supported either by Microsoft of Symantec. I do not therefore intend on writing an ImageInvoker client for this OS.
Q: I've tried this on Deployment Server 7.x and it does not work. Why not?
A: The engine for Deployment Server 7 is tied to Notification Server. As such ImageInvoker requires a complete re-write to support it. This is a lot of work, and as Symantec are also working on various portals, I’ve been waiting to see what emerges on the Symantec's front.
Q: How do I uninstall ImageInvoker?
A: ImageInvoker can be cleanly uninstalled using the ‘Add/Remove Programs’ control panel applet. Uninstalling will remove the service, the files and ImageInvoker menu creation item from the Altiris Tools menu. The only items left on your system will be the logs, and the custom SQL functions in the eXpress database.
10.4. Enhancement Request History
I've received various enhancement requests since releasing the first prototype of ImageInvoker to Symantec Connect. As the amount of time I could spend developing ImageInvoker is limited (I have a day job!), I can never provide any firm commitments as to timescales. I tend to prioritize by considering the enhancement usefulness and ease of implementation.
10.4.1. Pending Enhancement Requests (In No Particular Order)
- Log-file auto cleanup options
- Extend job rename capability to folders
- Auto-generation of unknown computer names
- Make client portal text user configurable
- Deployment Server 7.x support
- ImageInvoker statistics option (so we can see at a glance historical client-server communication health)
- ImageInvoker ‘Live’ report to show what stage clients are in their deployments.
- Administrator emails in the event that ImageInvoker detects a client failure to schedule a menu item
- Ability to just send the author logs and add a comment to email from within ImageInvoker
- Ability for users to schedule deployment items (for self-service)
10.4.2. History Of Implemented Enhancement Requests
- Ensure all queries are case accurate for case-sensitive collations in SQL Server (implemented for v1.0.7)
- Password protection and menu scoping through Active Directory (implemented for v1.0)
- Ability to narrow down menu-item scavenging to particular folder hierarchies (implemented for v1.0)
- Implement mechanism for a sub menu system (implemented for v1.0)
- Logging level changeable through the ImageInvoker Configuration Utlity (implemented for v1.0)
- Ability to change the menu timeout (implemented for v0.3)
- Set log datestamping to ISO format (YYYY-MM-DD) (implemented for v0.3)
- WinPE Support (implemented for v0.3)
- Ability to silently install the ImageInvoker MSI (implemented for v0.2)
- Automate the addition of the menu.sh shell script to Linux Automation (implemented for v0.2)
- Password protection of the client menu interface (using MD5 checksums) (implemented for v0.2)
10.4.3. Rejected Enhancement Requests
Stunningly, I've only rejected outright one enhancement request. I generally just keep them on the pending list forever instead as that’s less traumatic… ;-)
- DOS support
DOS is not a supported platform for ImageInvoker as use scenarios are too limited now for this environment.